PHP Social Dashboard
Congratulations and thank you for choosing PHP Social Dashboard!
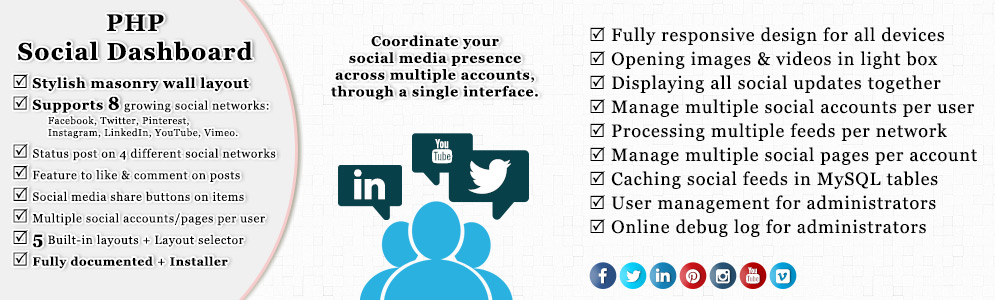
PHP Social Dashboard is a social media management tool that individuals or companies can use to coordinate a social media presence across multiple channels or accounts, through a single interface.
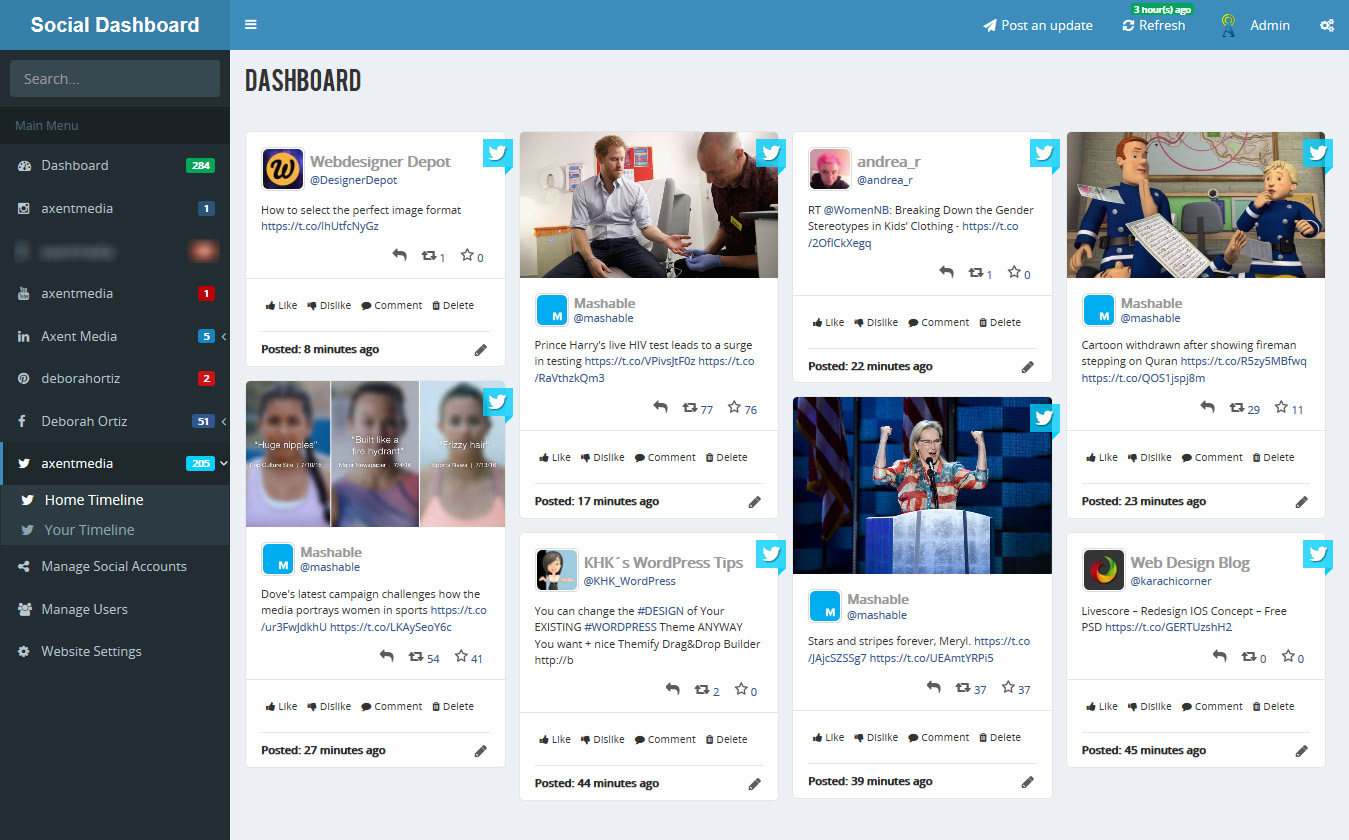
This script gives you a combined social media stream for all of your social network updates displaying in an stylish masonry wall layout. It supports 8 and growing social networks and it can manage multiple social accounts including all their subset pages or channels.
Your users are able to post updates to their social accounts, like and comment on posts or share your posts on other social networks. You will also have the option to reply, retweet or favorite the Twitter posts. You can even filter your social dashboard by social network, social page or channel.
All users can change the style of their dashboard using the template selector, manage their social accounts and update their profile. Administrators can also manage all the users, change website settings and view debug logs.
![]()
PHP Social Dashboard Script
Created By: Axent Media
Created On: 10 November 2016
Last Update: 13 March 2019
Version: 1.6.2
If you have any questions or suggestions concerning to PHP Social Dashboard script, please contact us via our page on CodeCanyon or via our website.
Note: We provide installation and configuration for clients. After your purchase, simply contact our support desk and provide us your website information if you need to use this service.
Script Showcase
Installation
Installation of PHP Social Dashboard is straight forward and on average should take no longer than just a few minutes.
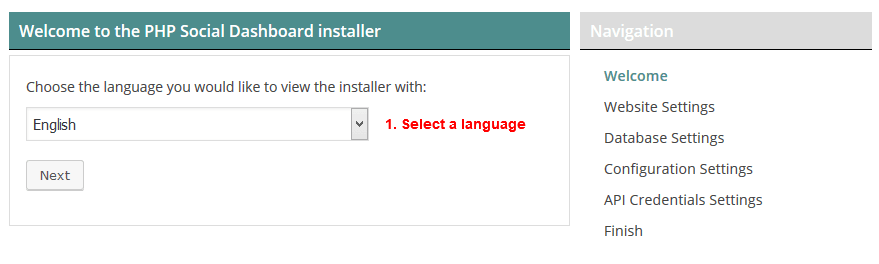
Method 1 (Using Installer):
This is by far the easiest way of installing this script.
- Open and extract the PHP Social Dashboard compressed zip file that you have downloaded from CodeCanyon to a location on your computer.
- Find, extract and upload the contents of the
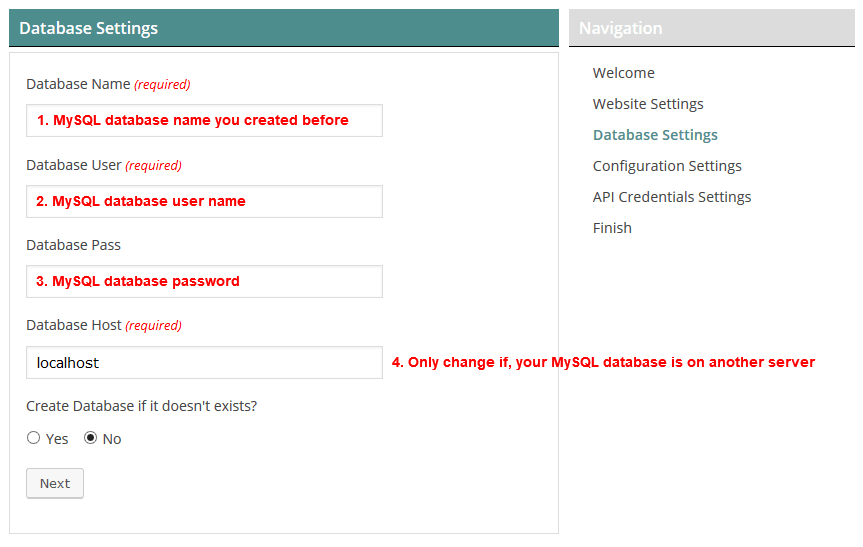
php-social-dashboard-x.x.zipfile from your computer to the root or subfolder of your website where you'd like the script to be accessible. You can use an FTP client or use your web hosting control panel file manager. - Create a MySQL database on your web server using your web hosting control panel or phpMyAdmin program. Save the created database information for later use.
- Using your browser open the Social Dashboard URL where you have extracted the files.
- You will be redirected to the installation page for the first time.
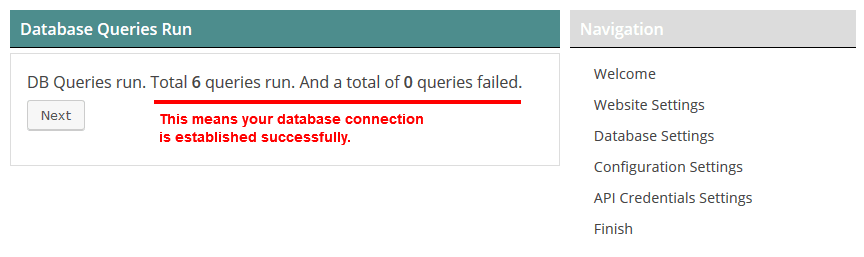
- Follow the steps from screenshots below and and complete the installation:
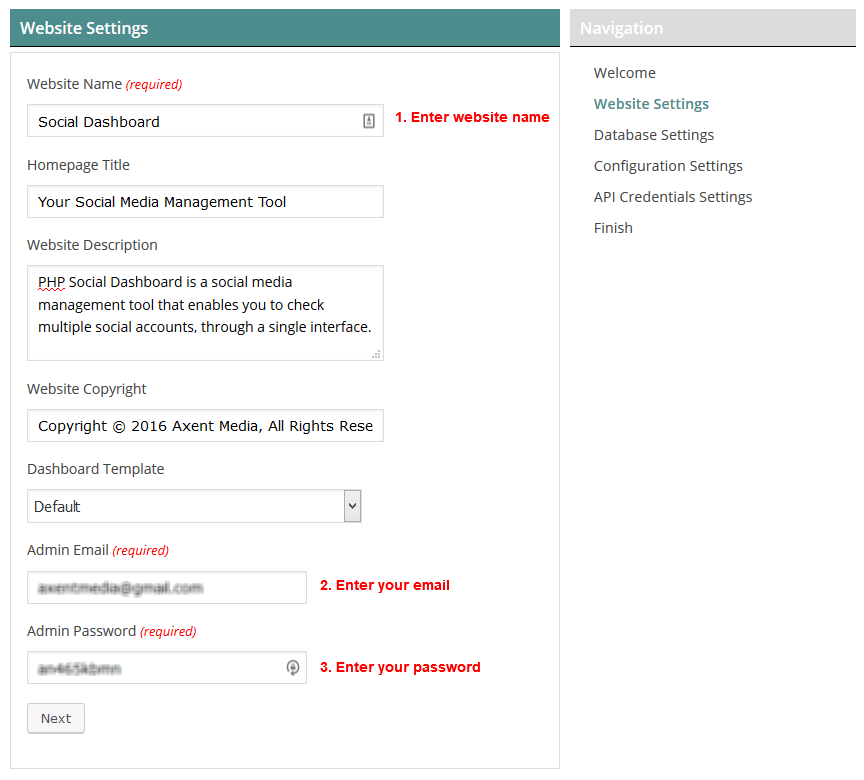
- Use the MySQL database information you have got in step 3 in the form below:
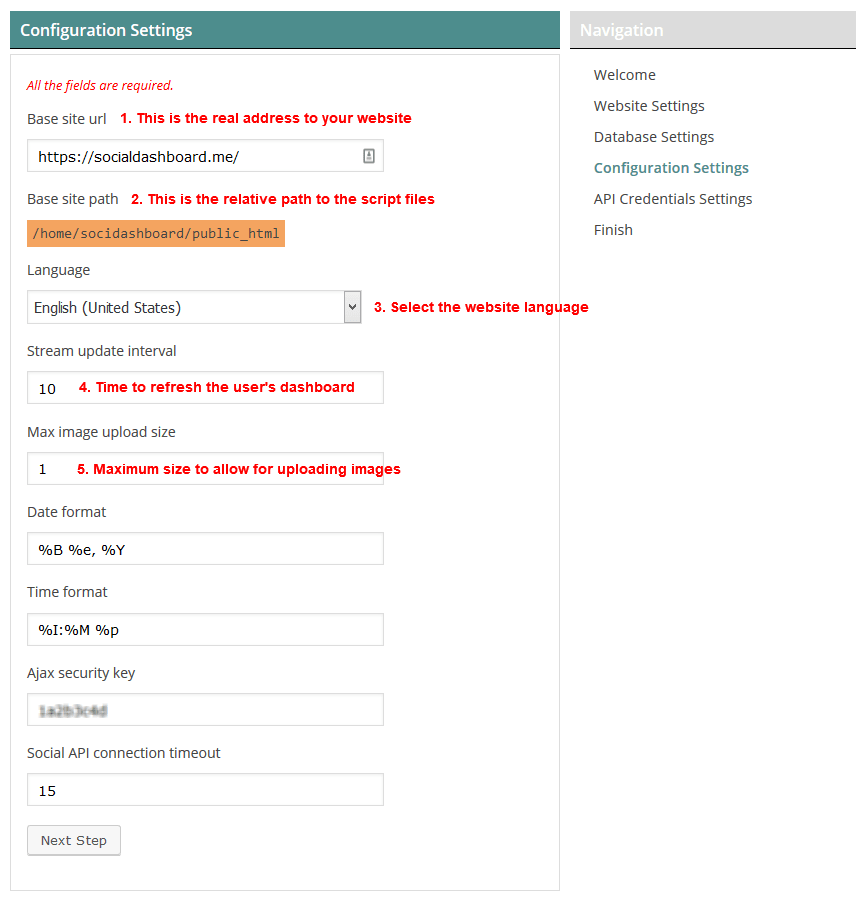
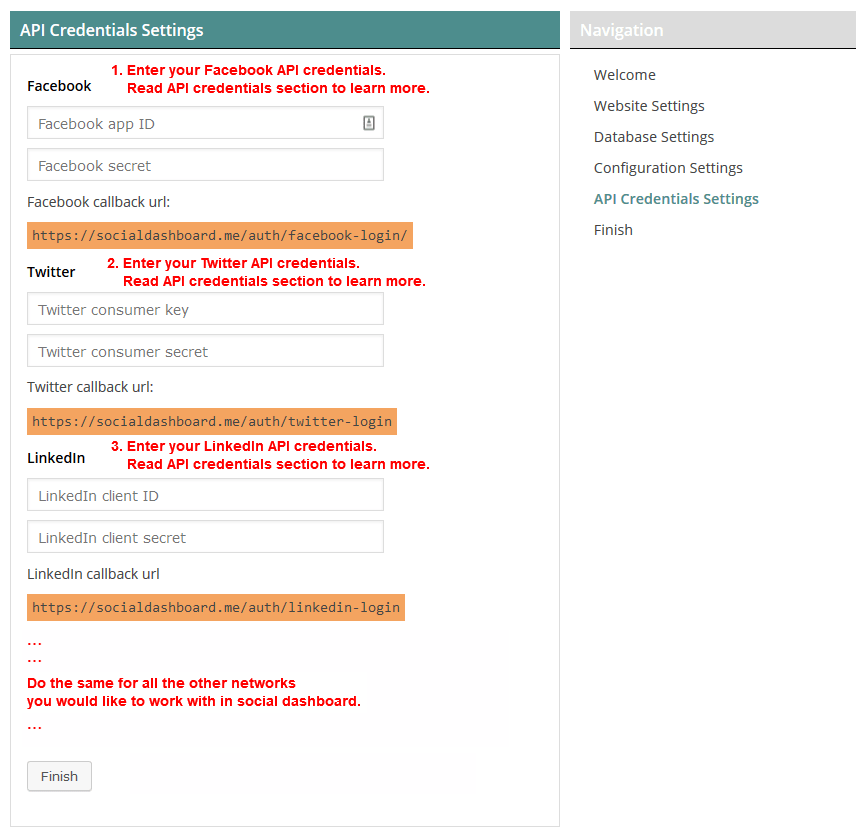
- Read the API Credentials section for more details on how to get your API Credentials for each network and, fill in the following form with the proper data for each network. You can also complete these settings later from Website Settings page in your Social Dashboard Administration area.
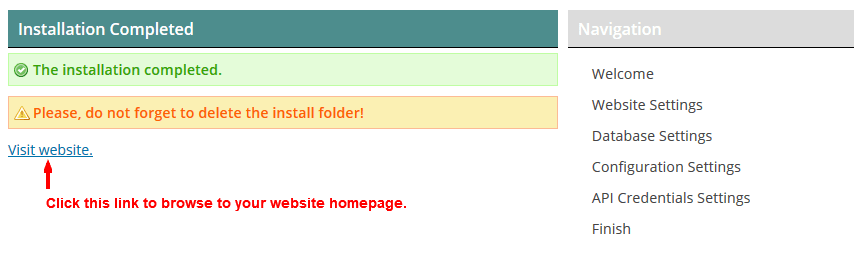
Now you have installed the PHP Social Dashboard script on your website. You would have to read the API Credentials section if, you haven't set it yet.
Method 2 (Manual Installation):
You can also install this script on your website manually.
- Open and extract the PHP Social Dashboard compressed zip file that you have downloaded from CodeCanyon to a location on your computer.
- Find, extract and upload the contents of the
php-social-dashboard-x.x.zipfile from your computer to the root or subfolder of your website where you'd like the script to be accessible. You can use an FTP client or use your web hosting control panel file manager. - Create a MySQL database on your web server using your web hosting control panel or phpMyAdmin program. Save the created database information for later use.
- Find and open the
config-sample.phpfile and do the following required changes:
SITE_URL=> The absolute path to your website (Your website URL) - e.g.https://socialdashboard.me/.
DB_NAME=> The name of the database - Use the MySQL database information you got in step 3.
DB_USER=> MySQL database username.
DB_PASSWORD=> MySQL database password.
LANGUAGE=> Define your locale language - Available options are described below it - e.g.es_ES.
Note: We already don't have translations for all spoken languages. Please, read the translation topic to find out on how to create your desired language.
- Rename the
config-sample.phpfile toconfig.php. - Open your MySQL database management program (e.g. phpMyAdmin) on your web server or your web hosting control panel and import the
social-dashboard.sqlfile located ininstallfolder, into the database you created in step 3. - Now you have installed the PHP Social Dashboard script on your website. Using your browser open the Social Dashboard URL where you have extracted the files.
- Login to your administration area using the following information:
USERNAME: admin@socialdashboard.me
PASSWORD: admindemo
- Select the Website Settings from the left menu and fill in the API Credentials form with the proper data for each social network. Read the API Credentials section for more details on how to get your API Credentials.
Now you have installed the PHP Social Dashboard script on your website.
Installation Requirements
- The plugin requires the PHP version 5.6.0 or higher.
- The plugin requires the MySQL version 5.1.0 or higher.
- This script requires both PHP's multibyte string extension AND iconv extension.
- PHP's XML extension is required (enabled by default).
- PHP's cURL extension is recommended (required for Facebook & Twitter API).
- Apache Mod_Rewrite module is required (to use pretty permalinks).
Upgrading
Upgrading the script is automatic and simple.
- Open and extract the new PHP Social Dashboard compressed zip file that you have downloaded from CodeCanyon to a location on your computer.
- Browse to your Social Dashboard project files root on your website using an FTP client or your web hosting control panel file manager.
- Remove all the project files except
config.phpfile. - Find, extract and upload the contents of the new
php-social-dashboard-x.x.zipfile from your computer to the project files root on your website. - Browse to your website and you will see the "Upgrade Required" message.
- Click the "Upgrade" button to upgrade the database.
Now you have upgraded the PHP Social Dashboard script on your website.
API Credentials
Without creating apps and adding API keys and secrets, your website will not be able to connect to the Social Networking servers. The token authentication makes a secure channel via Social Network server and your website to get the permission to access your social profile, perform your actions and fetch your social feed.
Here we will show you that, how to create apps on different social networks and receive your API credentials.
Twitter API Credentials
To create your Twitter API credentials:
- Browse to https://apps.twitter.com/ and sign in with your Twitter Account.
- You will be redirected to your Twitter Application Management area. Then click on "Create New App" button.
- Fill in the Name & Description fields with anything you like.
- Fill in the Website filed with your website absolute URL. The URL you set during installation.
- Fill in the `Callback URL` with the URL you got during the installation process or from the Social Dashboard Settings page.
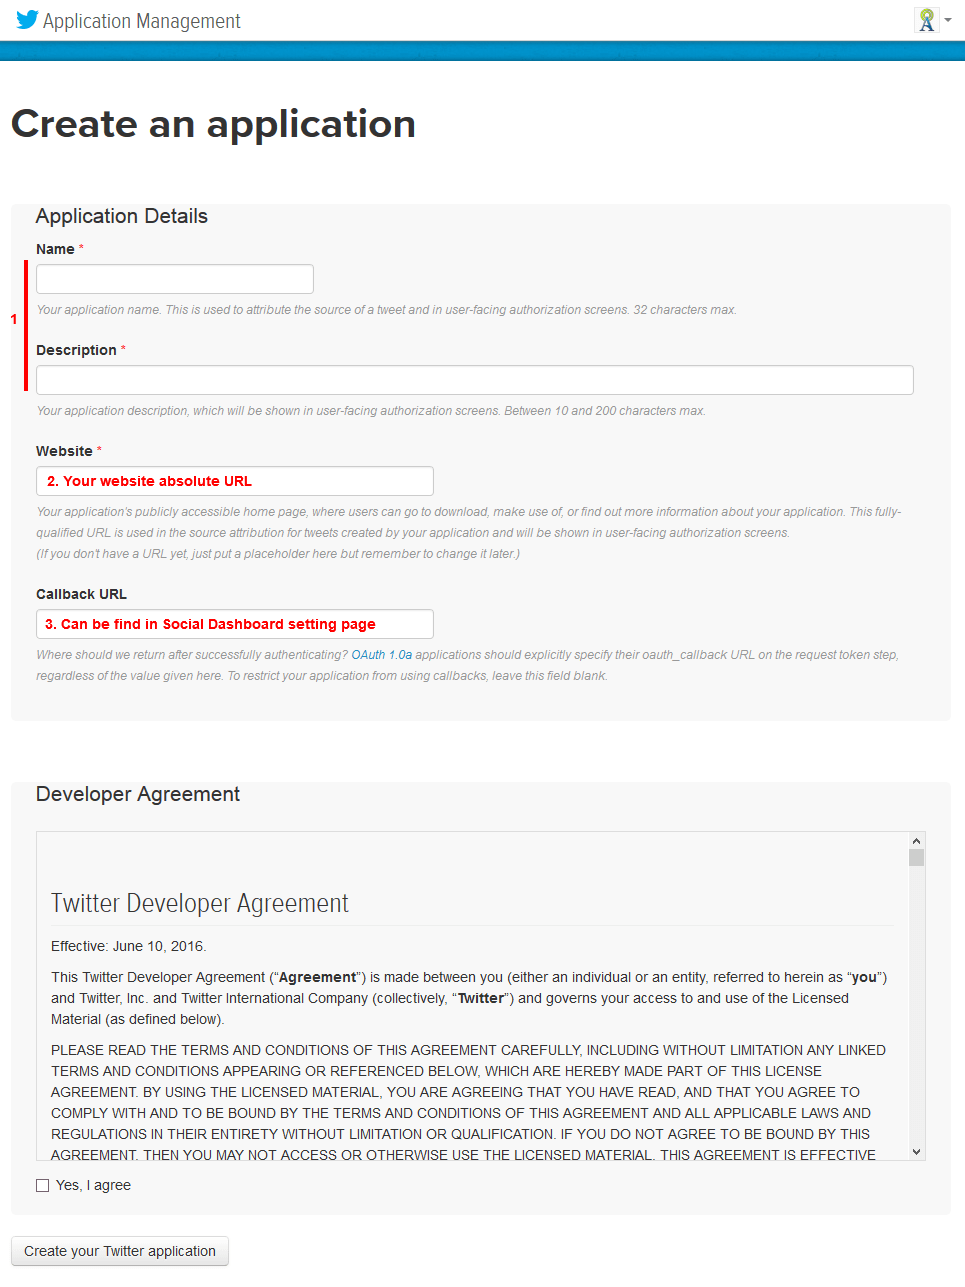
- Read the "Developer Agreement" and check the "Yes I agree" box.
- Click "Create Your Twitter Application" button. After creating the Application, the Application Details page opens.
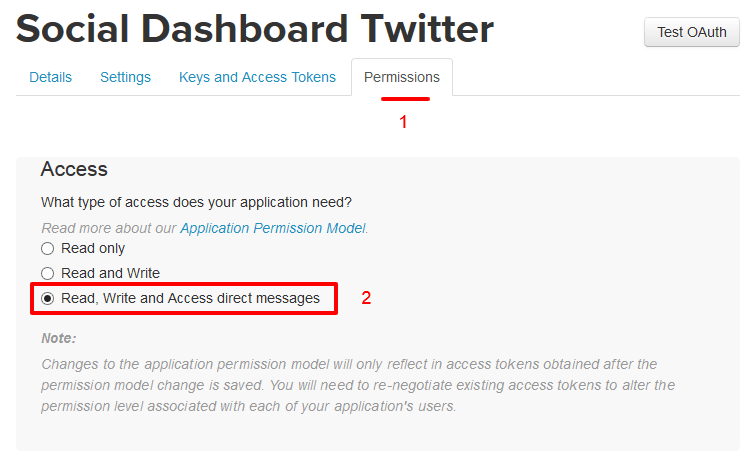
- Go to "Permissions" tab and change the application access to "Read, Write and Access direct messages".
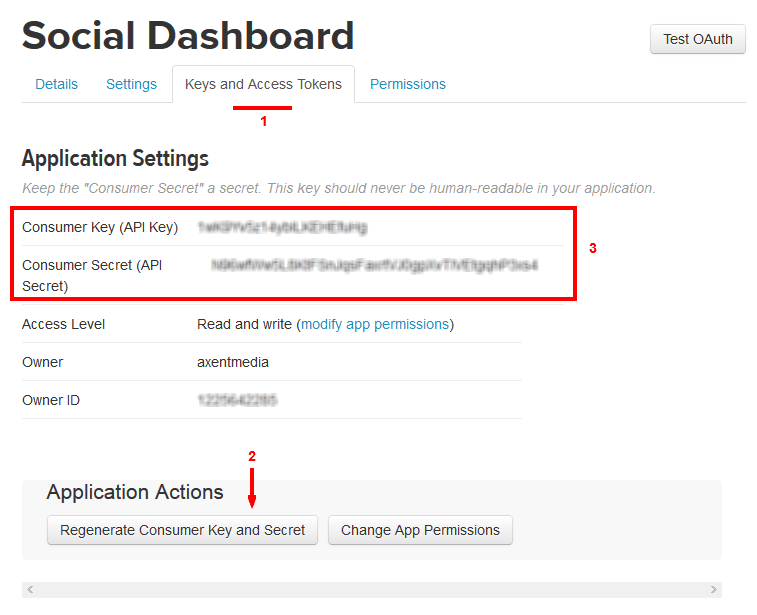
- Go to "Keys and Access Tokens" tab.
- Click on the "Generate Consumer Key and Secret" button.
- Copy the API Key and API Secret values and paste into the "Twitter API Credentials" section in Social Dashboard Settings page and the program should be already connected to your Twitter app and can get access to the Twitter users data who grant access to your app.
Facebook API Credentials
In this quick guide we are going to show you how to create an App in Facebook and get the App Credentials.
- Login to your Facebook account.
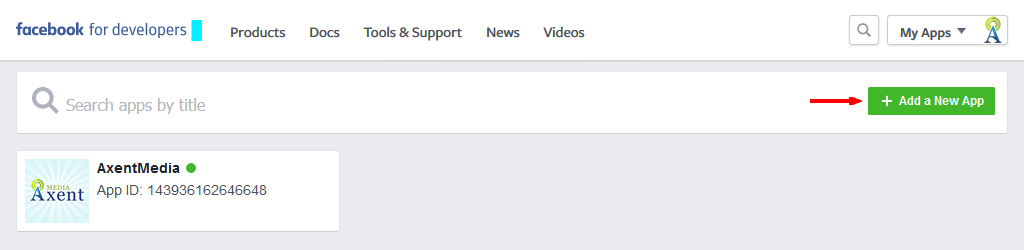
- After login, go to this link: https://developers.facebook.com/apps/ and then click on, “Add a New App” button.
- If you have not registered to become a developer you should do that now by pressing the “Register Now” button on the page. It's a quick and easy process to get signed up.
- If you are registered as a developer, the “Add a New App” window will be open.
- Enter a Name for the App in the "Display Name" field, and your email address in "Contact Email" field and click the "Create App ID" button.
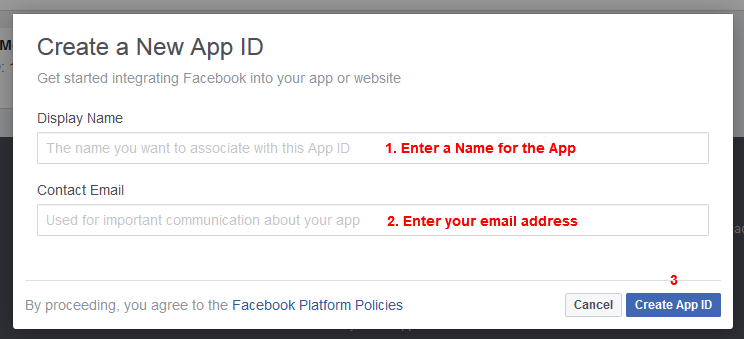
- You need to pass the Security Check after clicking the “Create App ID” button.
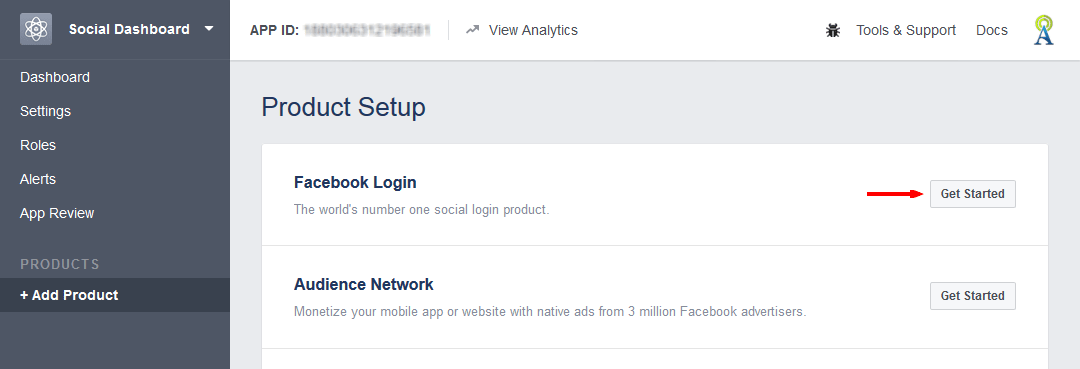
- Your App is created now. You will be automatically redirected to "Product Setup" page. Your page should now look something similar to the following picture.
- Click the "Get Started" button in front of "Facebook Login" to get redirected to "Client OAuth Settings" page.
- Make sure "Client OAuth Login" and "Web OAuth Login" are checked.
- Fill in the "Valid OAuth redirect URIs" with Your Facebook Callback URL you have got from Social Dashboard Settings page or during the product installation process and Save Changes.

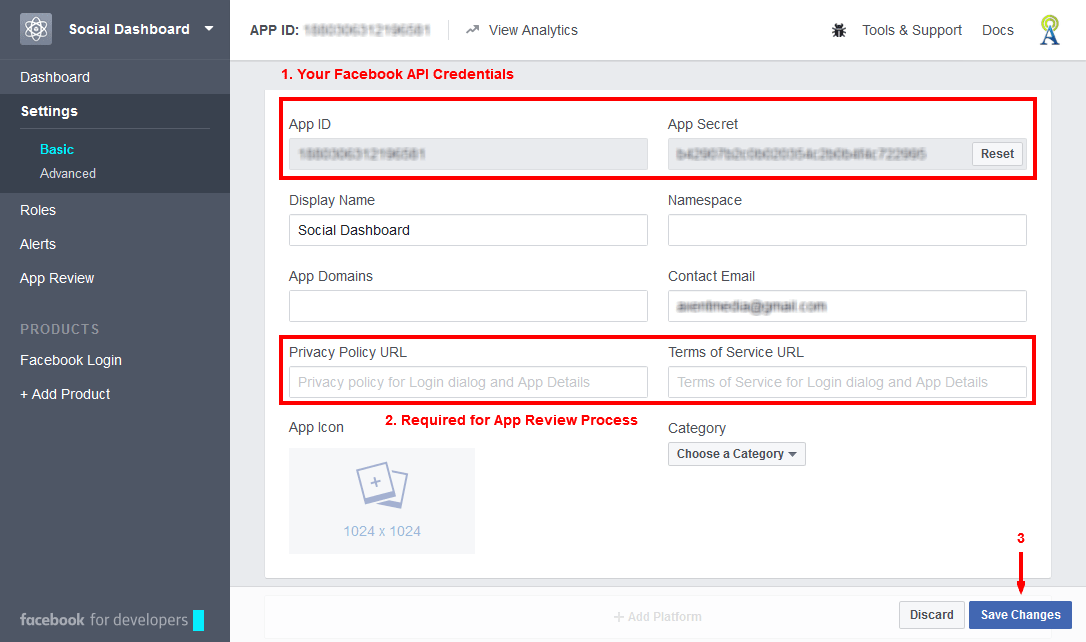
- Click "Settings » Basic" from right side menu and you should see the following page.
- Copy your App ID and App Secret from part 1 and paste into its respective field in your Social Dashboard Settings page.
- You are also required to create and add a "Privacy Policy" and "Terms of Service" URL if you want to go for App Review process.
App Review!
App Review is required for your Facebook App if you want to allow other Facebook users in addition to your own Facebook user and your sandbox users, to work with Social Dashboard on your website. Read more about on, how to go for App Review?
Add more users
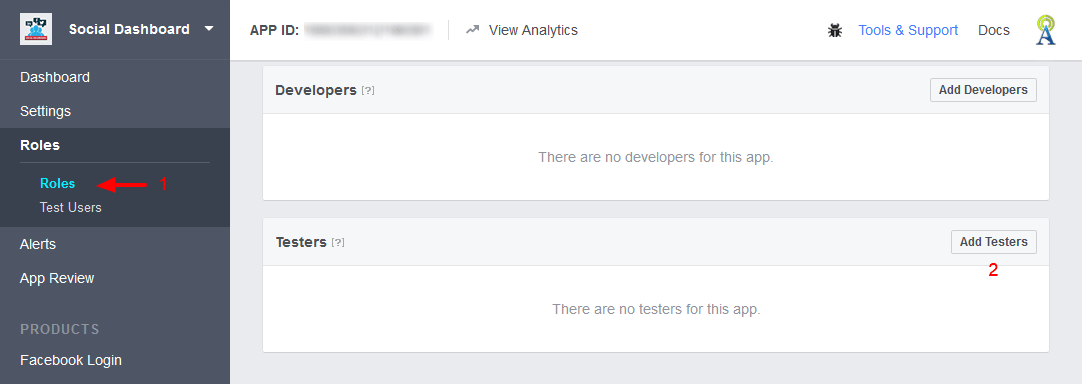
- Browse to your App management dashboard, click "Roles » Roles" from the right side menu and you should see the following page.
- Add users you want to allow their access to your App and let them use Social Dashboard on your website (without needing to get approval for your App) and Save Changes.

App Review
- Browse to your App management dashboard, click "App Review" from the right side menu.
- Click "Start a submission" button and fill out the step by step form to complete the process. You will need to produce a screencast video for your app behaviour showing that how your website uses Facebook.
- You should finally see the following page after you got approval for your Facebook App.
Google API Credentials
In order to create and obtain your own Google API Credentials follow the steps below.
This API setup is required for YouTube network to work.

- Browse to your Google APIs Console and sign-in with your Google account.
- A default project called "API Project" is created for you when you first login to the Developers Console. You can use that project, or create a new one by clicking the "Create Project" button at the top of the window.
- Select one of the projects in the list - e.g. "API Project" or, click the "Create Project" button.

- If you select the previously created "API Project" for the first time, a popup opens asking you to set a Project ID. Click OK and continue.
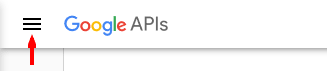
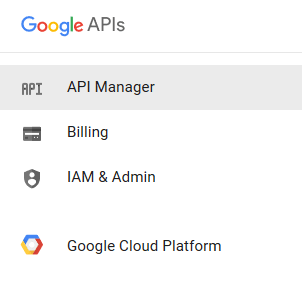
- Click the bars button and select API Manager from the left sidebar.
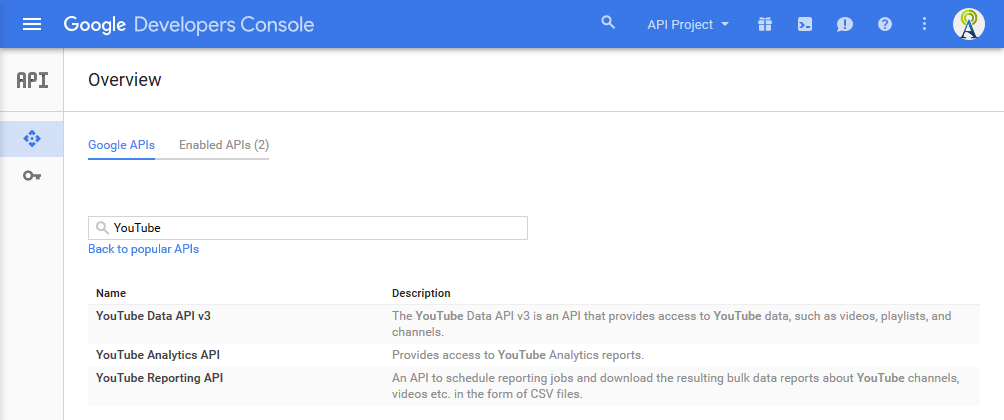
- Under Google APIs, search and click on "YouTube Data API v3".
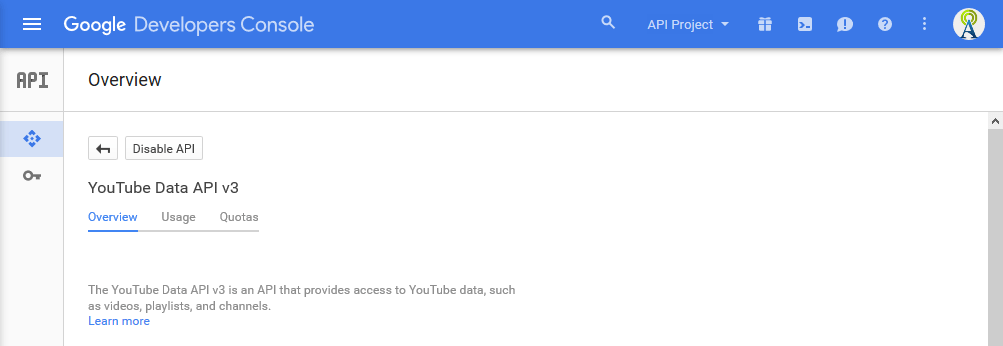
- Click the "Enable API" button on top of the "YouTube Data API v3" page to turn it on.
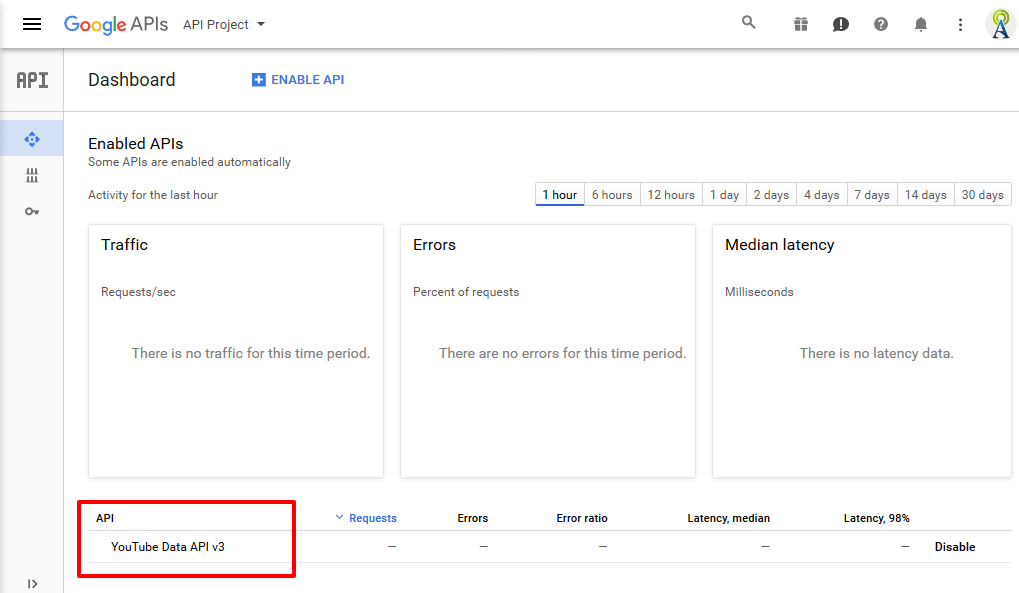
- Click back and you will have "YouTube Data API v3" under API Library tab.
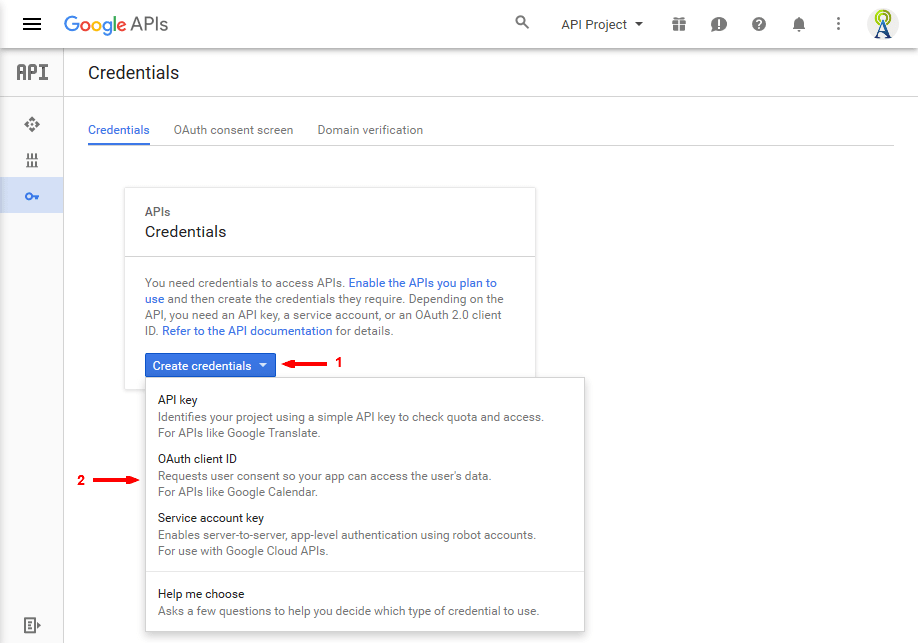
- Click Credentials on the left sidebar, under "API Credentials", click the "Create credentials" button and from opening list click the "OAuth client ID".
- If you have already created a client ID, under "API Keys", click "Create new key" button and you will escape the next step.
- Fill in the Create client ID form according to the picture below and click the "Create" button.
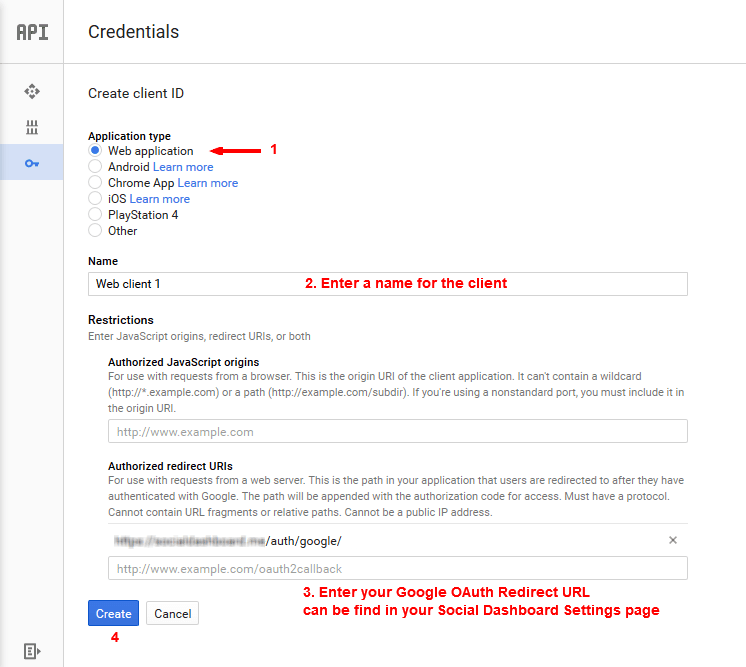
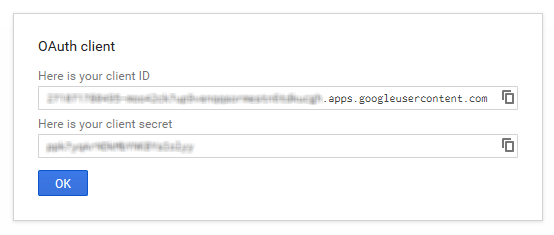
- Copy your OAuth Client ID and Secret and paste into Google API Credentials Settings section in your Social Dashboard Settings page.
Instagram API Credentials
In order to create and obtain your own Instagram API Credentials follow the steps below.
- Browse to https://www.instagram.com/developer/ and login to your account if required.
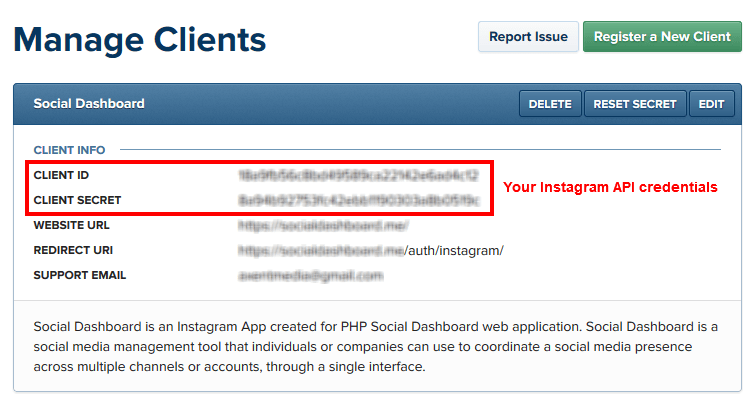
- Click on Manage Clients, and finally click on Register a New Client.
- Fill out the required fields for registering a new Client ID as below.
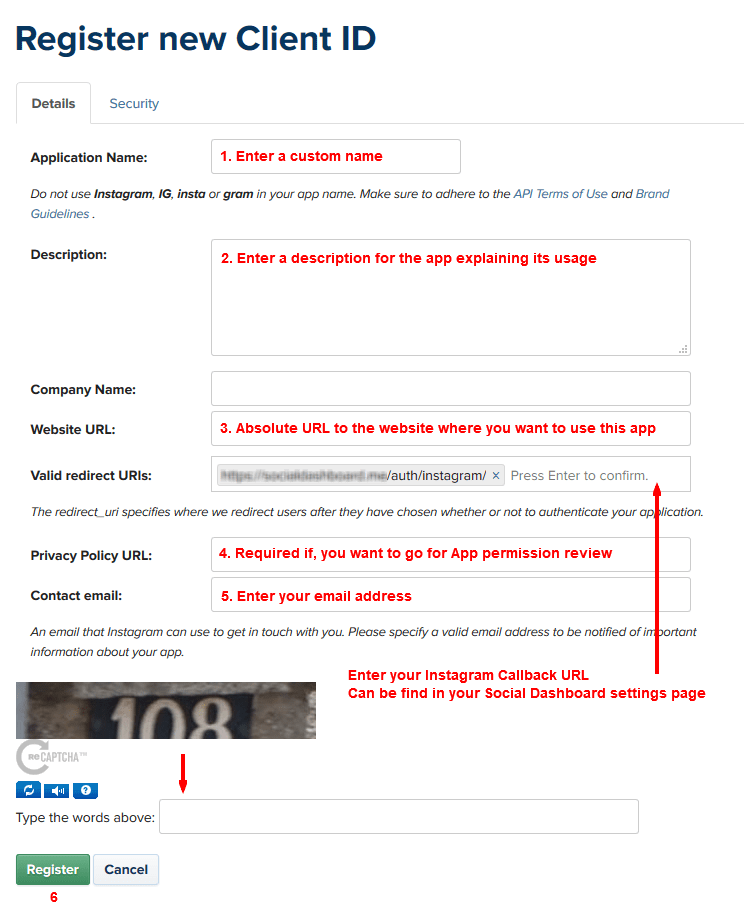
- Make sure to set the "Valid Redirect URIs" with your Instagram Callback URL you have got from Social Dashboard Settings page.
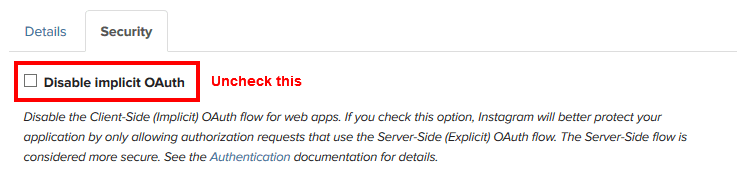
The reason you should use a Valid Redirect URL is for security so when Instagram redirects your users to your Redirect URL, all of your sensitive information is passed from Instagram's servers directly to your computer. - Go to Security tab and uncheck the "Disable implicit OAuth" box or else this method will not work.
- Once all of the fields are filled out click Register.
- You have already created an Instagram client. Go back to the Manage Clients page.
- Copy your CLIENT ID and CLIENT Secret and paste into corresponding fields in your Social Dashboard configuration form and save.
- You are also required to create and add a "Privacy Policy URL" if you want to go for App Permissions Review process.
App Permissions Review!
App Permissions Review is required for your Instagram App if you want to allow more than 10 other Instagram users in addition to your own Instagram user, to work with Social Dashboard on your website. Read more about on, how to go for Permissions Review?
Add more users
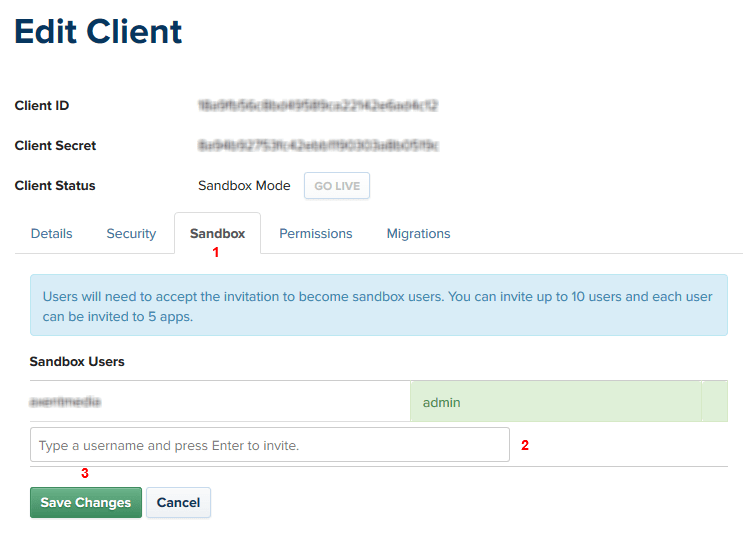
- Edit your App from Instagram Manage Clients page and go to Sandbox tab.
- Add users you want to allow their access to your App and let them use Social Dashboard on your website not up to 10 users and Save Changes.
Permissions Review
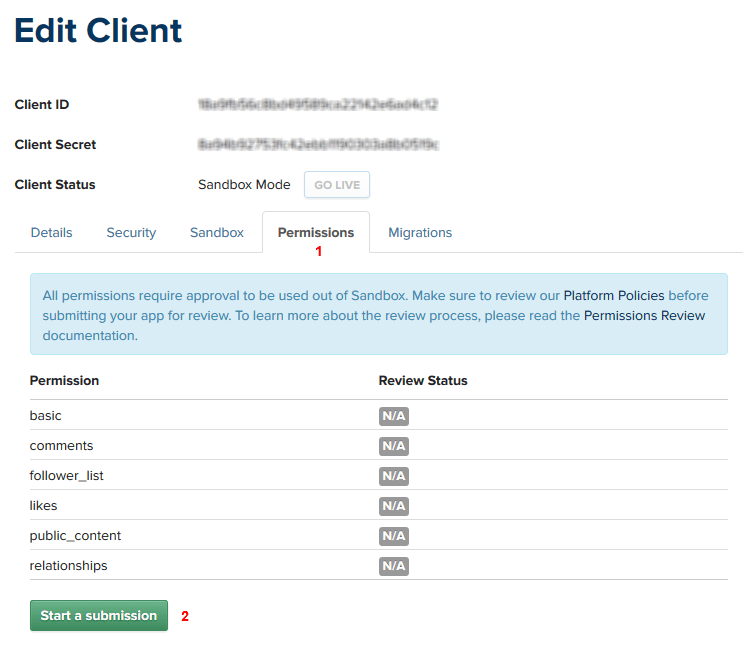
- Edit your App from Instagram Manage Clients page and go to Permissions tab.
- Click "Start a submission" button and fill out the step by step form to complete the process. You will need to produce a screencast video for your app behaviour showing that how your website uses Instagram.
LinkedIn API Credentials
To create and obtain your LinkedIn API Credentials:
- Browse to https://www.linkedin.com/developer/apps and log in, if necessary.
- Click on Create Application on top right of the page.
- Enter all required fields, according to the picture below and press Submit button.

- After you created the App, you will be redirected to the App Authentication page.
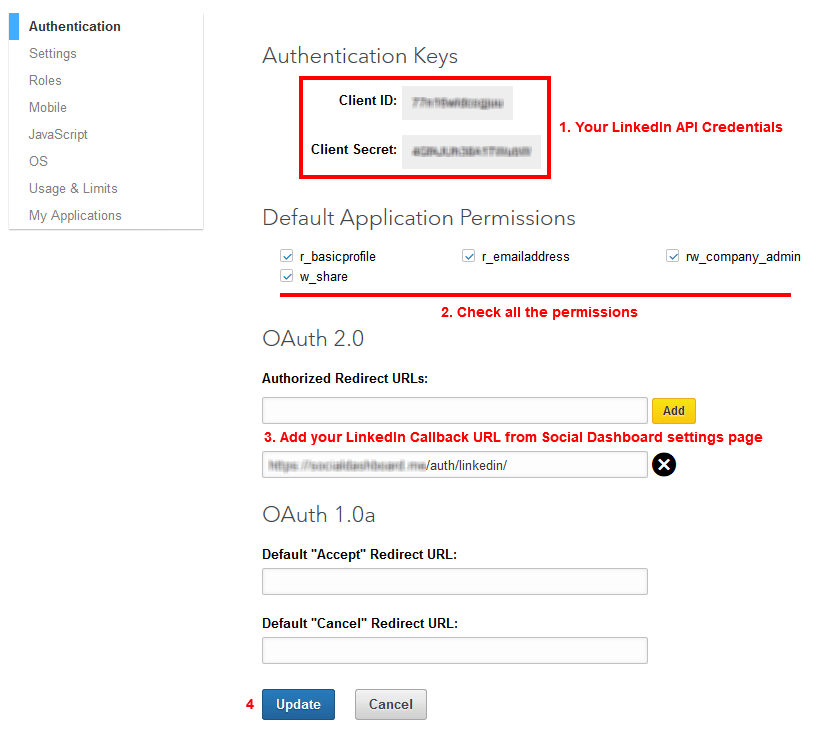
- Copy your "Client ID" and "Client Secret" and paste into corresponding fields in your Social Dashboard Settings LinkedIn API Credentials form and save.
- Make sure to check all Default Application Permissions.
- Fill in the "Authorized Redirect URLs" with your LinkedIn Callback URL that you have got during the installation process or from the Social Dashboard setting page.
- Do not forget to click the Update button at the end.
Vimeo API Credentials
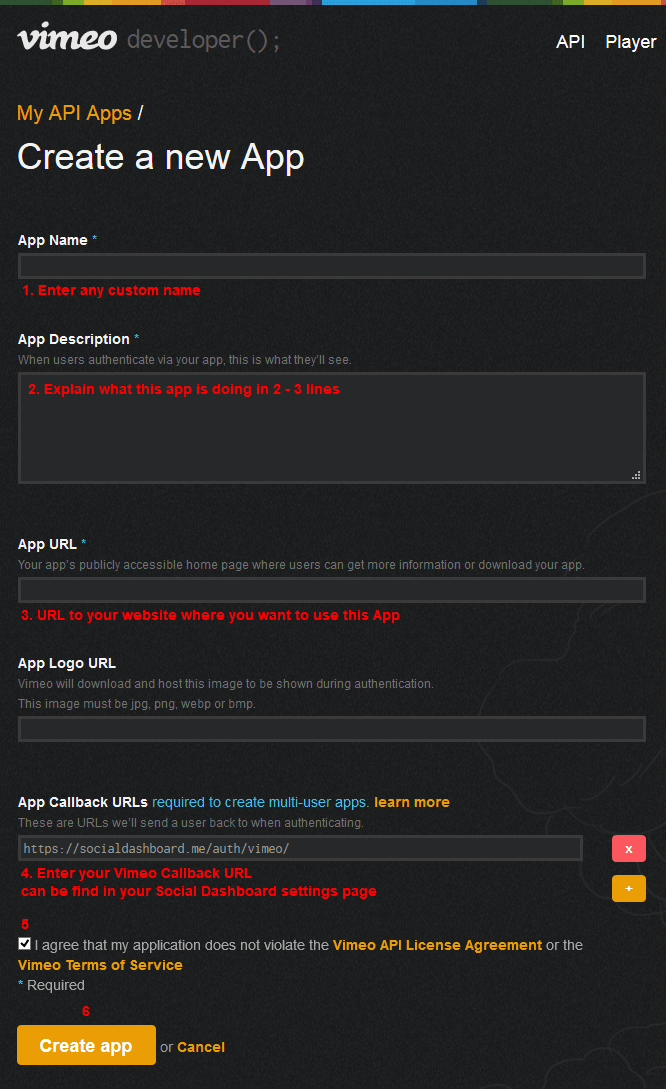
To create and obtain your Vimeo API Credentials:
- Browse to this page: https://developer.vimeo.com/apps/new. You will be redirected to "Sign in" page if you are not login to your account.
- Fill out the form as highlighted below and click on "Create app" button to complete.
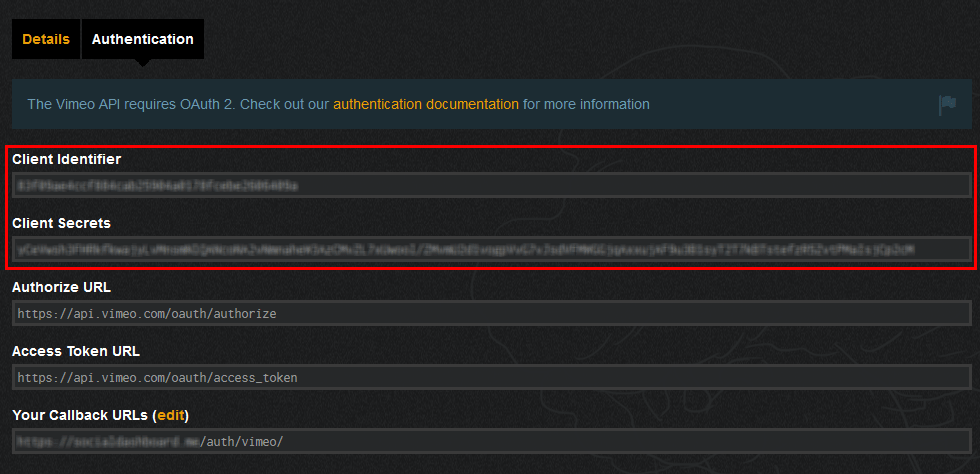
- In the next page, go to the "Authentication" tab and copy the "Client Identifier" and "Client Secrets" strings and paste into their appropriate fields in API Credentials section in Social Dashboard settings page.
Pinterest API Credentials
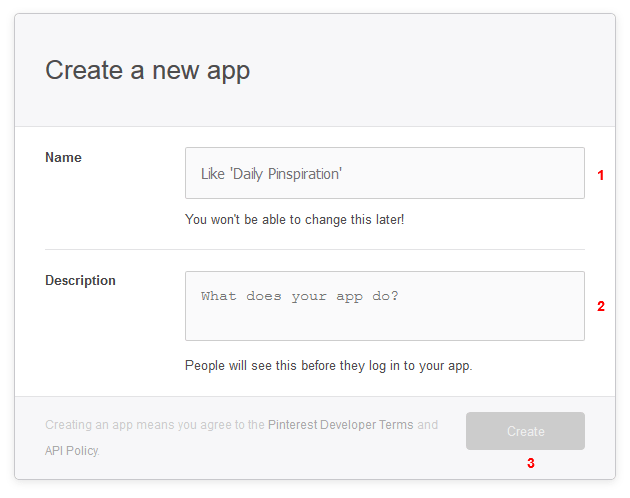
To create and obtain your Pinterest API Credentials:
- Browse to this page: https://developers.pinterest.com/apps/. You will be redirected to "Sign in" page if you are not logged into your account.
- Click on "Create app" button to open the Create a new app from.
- Fill out the form as highlighted below and click on "Create" button to complete.
- In the next page, scroll to the part "Platforms" and in the "Web" section, add the following changes.
- Please note, here you can only add https:// secure URLs that requires you to have SSL installed on your website. If you have not SSL installed on your website, you can buy from Namecheap for $7.95 per year.

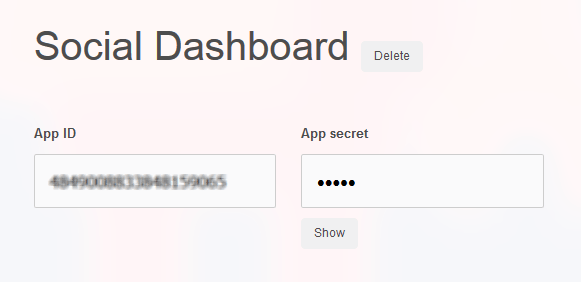
- Copy the "App ID" and "App secret" strings and paste into their appropriate fields in API Credentials section in Social Dashboard settings page.
Website Settings
This section is only accessible for website administrators from Social Dashboard management area.
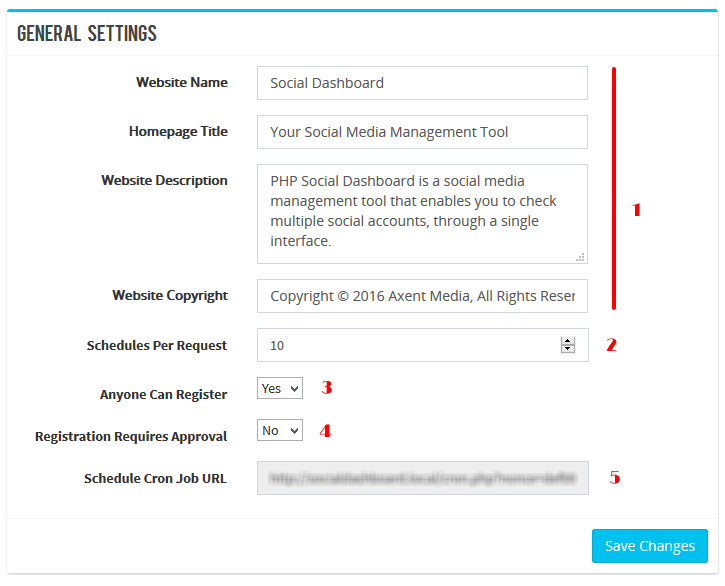
- Here, you can edit your website branding.
- Define, how many API requests will be processed on each cycle.
- Registration form is open to all or not.
- New users require administrator approval to be able to use the website.
- If you want to use schedule status post feature, copy this link, add a new Cron Job in your hosting control panel, set your Cron Job running interval time and use this link as your Cron Job Command.
How to setup, Cron Job in cPanel control panel.
How to setup, Scheduled Task in Plesk control panel.
An example of a Cron command:
/usr/bin/curl {Replace this with your Cron Job URL} >/dev/null 2>&1
But, it may vary in different operation systems. You need to check this also with your hosting service.
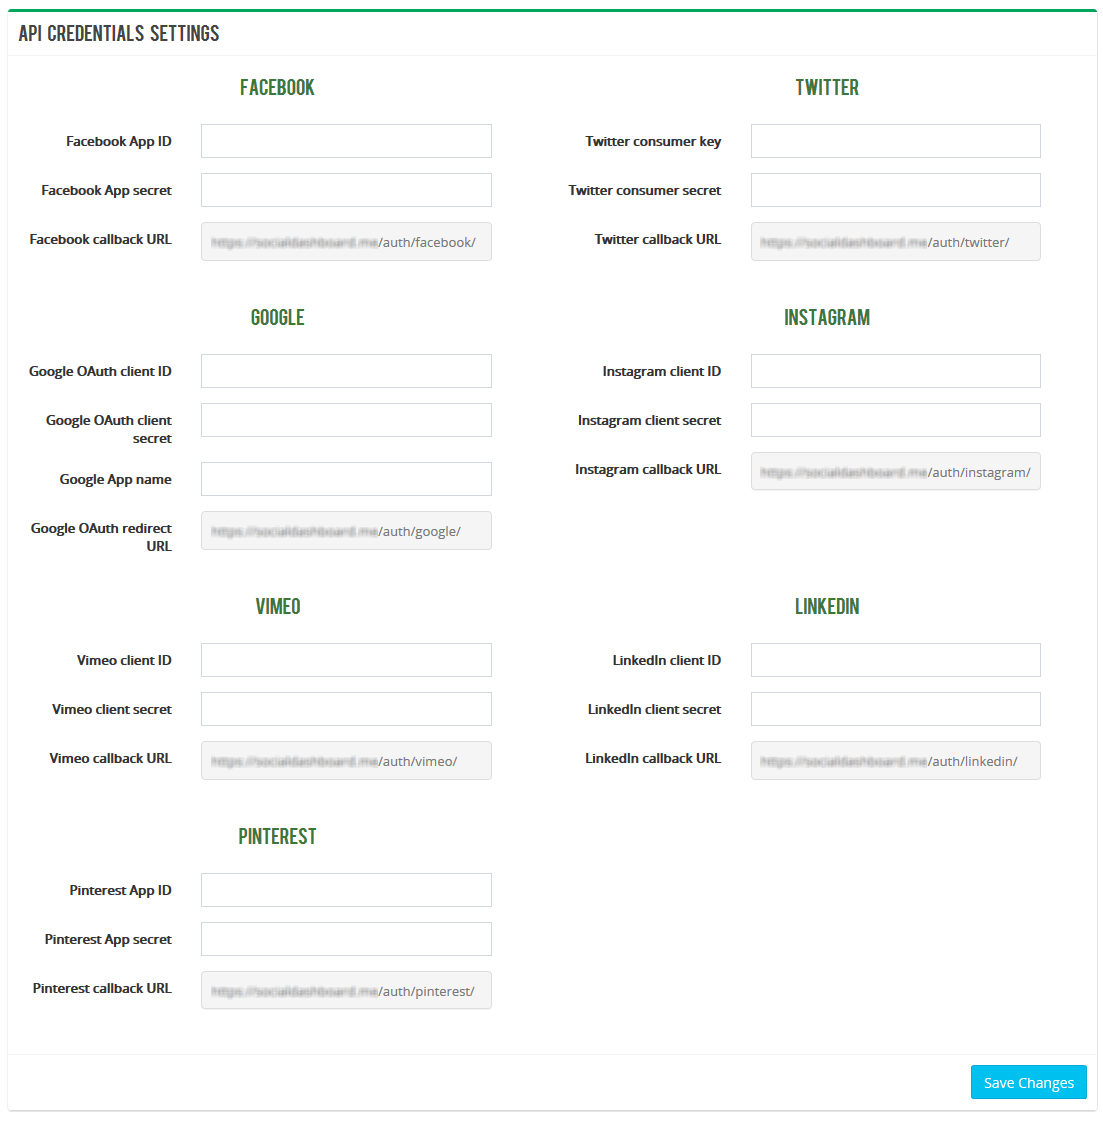
Here, you can edit your API Credentials settings. This section is only accessible for website administrators from Social Dashboard management area.
Read the API Credentials section for more details on how to get your API Credentials for each network and, fill in the following form with the proper data for each network.
Users Management
Here, you can manage your website users. This section is only accessible for website administrators from Social Dashboard management area.
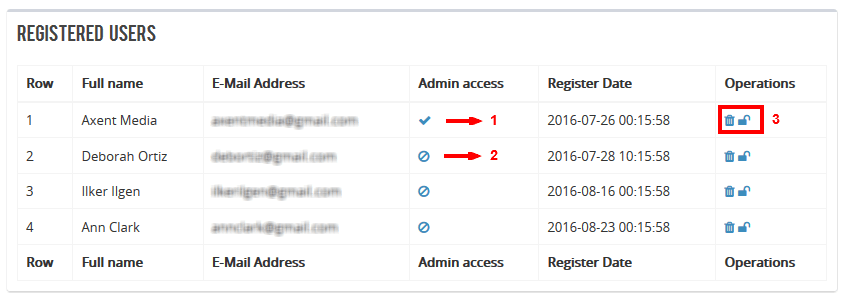
- This icon shows that the user have administrator access.
- This icon shows that the user is a normal user.
- These buttons from left to right are for deleting a user from the website and to deactivate a user.
Translation
To translate the Social Dashboard script to your local language:
- Open the
config.phpfile in an editor. - Set the
LANGUAGEconstant variable to your desired language that you want to create a translation for - e.g.define( 'LANGUAGE', 'nl_NL' );for Nederlands. - Create the relevant directory for this language (if not exist) in
app/languages/folder - e.g.nl_NLand copy all the files fromen(already exists) directory into your newly created language directory. - Open all the files from your new language directory in an editor one by one and translate them to your local desired language.
- Upload the new generated language directory including all its files from your computer into
app/languages/directory on your website using an FTP client.
List of language files:
global.php
login.php
lostpass.php
profile.php
register.php
settings.php
upgrade.php
users.php
wall.php
Example language file:
<?php
$lang['tags']               = 'Tags';
$lang['posted']             = 'Posted';
$lang['show_all']           = 'Show All';
$lang['comments']           = 'comments';
$lang['likes']              = 'likes';
$lang['load_more']          = 'Load More';
$lang['a_long_while_ago']   = 'a long while ago';
$lang['over_2_years_ago']   = 'over 2 years ago';
$lang['over_a_year_ago']    = 'over a year ago';
$lang['about_a_year_ago']   = 'about a year ago';
$lang['d_months_ago']       = '%d months ago';
$lang['last_month']         = 'last month';
$lang['3_weeks_ago']        = '3 weeks ago';
$lang['2_weeks_ago']        = '2 weeks ago';
$lang['last_week']          = 'last week';
$lang['d_days_ago']         = '%d days ago';
$lang['yesterday']          = 'yesterday';
$lang['d_hours_ago']        = '%d hours ago';
$lang['an_hour_ago']        = 'an hour ago';
$lang['d_minutes_ago']      = '%d minutes ago';
$lang['just_now']           = 'just now';
$lang['read_more']          = 'read more (+)';
$lang['read_less']          = 'read less (-)';
$lang['timeline_photos']    = 'Timeline photos';
$lang['added_photos']       = 'Added photos';
$lang['shared_story']       = 'Shared story';
$lang['created_note']       = 'Created note';
$lang['mobile_status_update'] = 'Mobile status update';
?>
Templates & Styling
We have two different type of templates in this application:
- Dashboard Template, that is constructing the style of dashboard.
- Wall Template, that makes the style of social wall.
Dashboard Templates
Creating a new Dashboard Template
- Browse to the
app/templates/dashboard/directory and make a duplicate copy ofdefaultdirectory with your own desired template name - e.g.mytemplate. - Copy your css/js files into
asset/dashboard/directory and address them in your template files. - Upload all the files and directories into your website server using an FTP client.
- Edit the
config.phpfile on your server and, change theTEMPLATEconstant variable into your new created template name e.g.define('TEMPLATE', 'mytemplate');and save the file.
Wall Templates
Creating a new Wall Template
- Browse to the
app/templates/wall/directory and create a new .php file with your own layout name - e.g.My_Layout.php. You can also make a duplicate copy of, one of the already existed layout files. - Edit the
app/templates/wall/config.phpand, add the new layout parameters to the $GLOBALS['layouts'] array and save this file.
Read more in Customizing the Wall Template Skins section. - Edit the
asset/wall/css/styles.cssfile and add your own layout css codes at the end of the file. - Upload all the changes to your website using an FTP client.
- Your new layout will be available as a new layout in Wall Template selection box in Social Dashboard area.
Customizing the Wall Template Skins:
- Edit the
app/templates/wall/config.phpfile in an editor. - Set your appropriate changes or add a new unique layout item into
$GLOBALS['layouts']array and save the file.
// Themes
$GLOBALS['layouts'] = array(
    // Modern Light
    'sb-modern-light' => array( // <-- CSS Class Name
        'layout' => 'Modern_Layout',
        'font_size' => '11',
        'social_colors' => array(
            'facebook' => '#305790',
            'twitter' => '#06d0fe',
            'instagram' => '#295477',
            'linkedin' => '#1884BC',
            'google' => '#c04d2e',
            'youtube' => '#b80000',
            'pinterest' => '#cb1218',
            'vimeo' => '#00a0dc'
            ),
        'social_icons' => '',
        'type_icons' => '',
        'custom_css' => '',
        'wall' => array(
            'background_color' => '',
            'border_color' => '',
            'border_size' => 0,
            'background_image' => '',
            'font_color' => '#000000',
            'link_color' => '#305790',
            'item_background_color' => '#ffffff',
            'item_border_color' => '#e5e5e5',
            'item_border_size' => 1
        )
    )
    // And continue with the rest of file...
    );
General Theme Options
CSS Class NameThis is the unique layout name. You will also use it as your CSS class selector.
| Parameter | Default Value | Alternative Values | Description |
|---|---|---|---|
| layout | default, flat, modern, modern2, metro | Social Wall Layout The social wall layout is the main displaying structure of the output feed items. We have created 4 different built-in layouts for the social wall. You can also create your own layout and put in the app/templates/wall/ folder to use here. For more information on how to create your own custom wall template click here. |
|
| font_size | 0 - ∞ | Font Size In order to set a font size (in px) for the Social Wall. This is the base font size for all type of social walls. |
|
| social_colors | Social Networks Color You can change the background colors used for each social network. Enter network colors as an array in, RGB hex format - e.g. array('facebook' => '#305790', 'twitter' => '#06d0fe', ...). These colors apply to network icons, block footers or anywhere defined in layout files. |
||
| social_icons | Social Networks Icons You can change the icon used for each social network. To change the network icons, enter the direct URL of the icon files as an array - e.g. array('http://icon1', 'http://icon2', ...). Some layouts do not use image icons. |
||
| type_icons | Post Type Icons You can change the icon used for each post type. To change the type icons, enter the direct URL of the icon files as an array - e.g. array('http://icon1', 'http://icon2', ...). |
||
| custom_css | Custom CSS Custom CSS for styling the Social Wall can be entered into this text field. Any CSS rules included here, will automatically be inserted into the page. As an example you can write your CSS code something like this: .<class-name> .sb-item { font-family: Arial, sans-serif; }Replace <class-name> with the "CSS Class Name" in the current theme. |
Dedicated Theme Options
The social wall has also it's dedicated options separately.
| Parameter | Default Value | Alternative Values | Description |
|---|---|---|---|
| background_color | Body Background Color This color applies to your Social Wall background. Select the background color in RGB hex format - e.g. #f3f3f3. |
||
| border_color | Body Border Color Select the border color of the Social Wall in RGB hex format - e.g. #d9d9d9. |
||
| border_size | Body Border Size In order to set a border size (in px) for the Social Wall. |
||
| background_image | Body Background Image In order to set a background image for the Social Wall. |
||
| font_color | Font Color Select the font color for the feed item in RGB hex format - e.g. #000000. |
||
| link_color | Link Color The font color for the links in feed item. Add color in RGB hex format - e.g. #305790. |
||
| item_background_color | Item Background Color Select the background color for the feed item in RGB hex format. |
||
| item_border_color | Item Border Color Select the border color for the feed item in RGB hex format. |
||
| item_border_size | Item Border Size In order to set a border size (in px) for the feed item. - e.g. 1 |
Social APIs Restrictions
There are some restriction from social network APIs that is made some limits for us on building this application. All the features that are supported or not supported by any social network are listed here.
| Feature / Network | YouTube | Vimeo | |||||
|---|---|---|---|---|---|---|---|
| User Timeline | + All pages | ||||||
| Home Timeline | |||||||
| Status Update | Unofficial, 80% of servers | ||||||
| Add Comment | Page only | ||||||
| Add Like/Dislike | Page only | ||||||
| Display Comments | Pages, All comments Users, only their own comments |
||||||
| Display Likes | Pages, All likes Users, only their own likes |
||||||
| Likes/Comments Count | |||||||
| Delete Update |
Product License
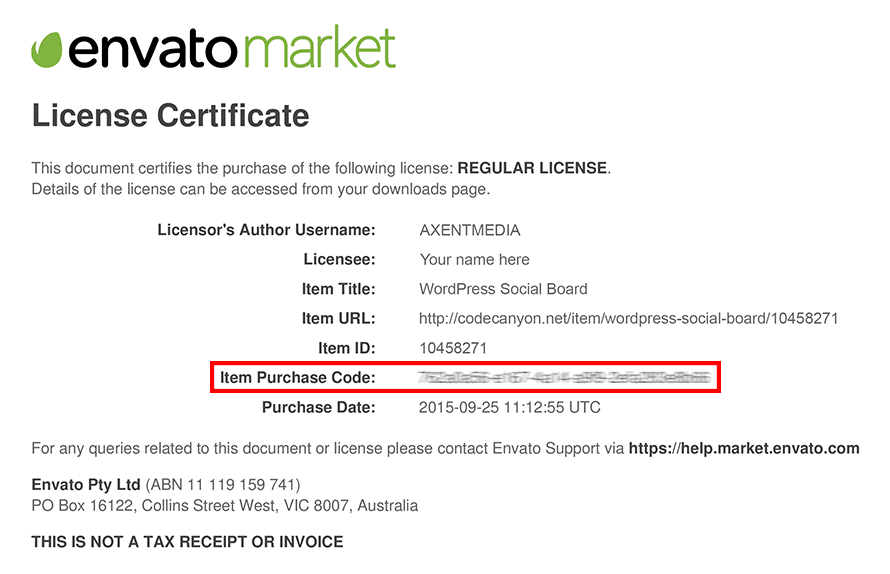
To receive the product support you will need your purchase code.Where Is My Purchase Code?
- Log into your Envato Market account.
- Hover the mouse over your username at the top of the screen and click.
- 1. Click ‘Downloads’ from the user menu items according to the picture.
- 2. Click the ‘Download’ green button and 3. click ‘License certificate & purchase code’ (available as PDF or text file) from the drop down list.
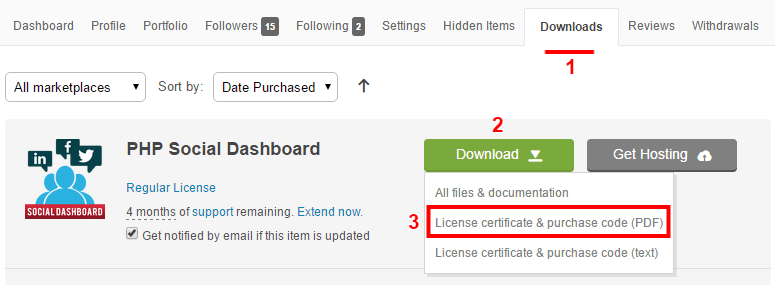
- Below is an example of a PDF License certificate and purchase code.
FAQ
There is no feed to display or you are not connected to the world wide web?
This message is usually caused for one of the following reasons:
- You or your user has not connected any social media account to your Social Dashboard from Manage Social Accounts page. Read the Managing Social Accounts section for more information.
- You or your user's social accounts connection is lost or expired. You need to reconnect them again from Manage Social Accounts page.
- API Credentials for social apps is not correctly set, is not valid or do not have enough permissions to read your social data. Read the API Credentials section for more information.
The social account is connected successfully but, my timeline items do not appear on the dashboard?
- Social account is new and there isn't anything found in its feed or there is no activity to show.
- You have not granted the requested permissions to Social Dashboard social app to read your stream during the authentication process. Please, disconnect and connect again your account in Manage Social Accounts page.
I do not see Instagram, YouTube, Vimeo trying to post an status update?
Instagram, YouTube, Vimeo and Google APIs do not provide this feature. Please, read the Social APIs Restrictions section for more information.
I do not have like, dislike and comment buttons for Pinterest?
Pinterest API does not provide this feature. Please, read the Social APIs Restrictions section for more information.
I do not have like, dislike and delete buttons for LinkedIn?
LinkedIn API does not provide these features. Please, read the Social APIs Restrictions section for more information.
I do not have delete button for Instagram?
Instagram API does not provide this feature. Please, read the Social APIs Restrictions section for more information.
Why do I need to create API credentials?
Without creating apps and adding API tokens and keys, your website will not be able to connect to the Social Networking servers. The token authentication makes a secure channel via Social Network server and your website to get the permission to access your social profile and fetch your social feed.
How many sites can I use PHP Social Dashboard on?
You need to purchase one license for each site you want to use PHP Social Dashboard on.
1 site = 1 license, 2 sites = 2 licenses, 3 sites = 3 licenses and so on.
It doesn’t matter if they are all in use by the same company, on the same server, by the same developer, etc. The license terms are single use – one license per site.
Is there a developer/multi-use license for this pruduct?
Currently, the only option is to purchase an individual Regular License for each site on which PHP Social Dashboard will be used.
The CodeCanyon standard (Regular/Extended) licenses both are only for individual (single) usage. The only difference is about to charge or not to charge the end customer.
We can not also provide you with a developer/multi-use license directly as we have an exclusivity agreement with CodeCanyon that means, we can only distribute our products through them.
At this time, for every website that you have PHP Social Dashboard installed and activated on, you need to purchase an individual Regular or Extended License. 1 site = 1 license, 2 sites = 2 licenses, 3 sites = 3 licenses, etc.
For more information please read this article: http://codecanyon.net/licenses/faq
Credits
Design & Development:
PHP Social Dashboard - Created By Axent Media - CodeCanyon license.
Third Parties
Server-Side Scripting
OAuth library - by Andy Smith - MIT license.
OAuth for Twitter's REST API - Created by Abraham Williams.
Class Installer - by Vadim V. Gabriel - GNU Public License.
Instagram's Private API - by Steve Jobzniak
PHPMailer - GNU Lesser General Public License
Class upload - by Colin Verot - GNU Public License.
Facebook PHP SDK - Copyright 2014 Facebook, Inc.
Google API PHP Client - Copyright 2010 Google Inc.
Instagram PHP API class - by Christian Metz - BSD License.
LinkedIn PHP SDK - by Ashwin Surajbali.
Pinterest PHP API - Copyright 2015 Dirk Groenen.
Vimeo PHP SDK - Copyright 2014 Vimeo - Apache License.
Defuse PHP Encryption - by Taylor Hornby and Scott Arciszewski
Client-Side Scripting
AdminLTE - by Almsaeed Studio - MIT license.
jQuery - Released under the terms of the MIT license.
Freewall - Created by Minh Nguyen - Released under the MIT license.
Font Awesome - by @davegandy - Licensed under MIT.
Colorbox - by Jack Moore - Licensed under MIT.
Changelog
Version 1.6.2 - 13.03.2019- Set subset_id database column to be NULL by default.
- Instagram Graph API support added.
- Google+ API deprecated and removed from the plugin.
- Fixing a security bug in status update posting.
- LinkedIn API v2 share on personal timeline feature added.
- LinkedIn image post feature removed.
- Fixing the routing problem when installing under multiple subdirectories.
- Facebook SDK updated to v5.0.
- Have Facebook to load page comments over page token to get the user details for comments.
- The change password problem has been fixed.
- Displaying Twitter replies.
- Displaying retweeted status.
- Replacing reply with comment button.
- The problem of replying on the others' tweets has been fix.
- Instagram API library updated.
- Fixing the HTTPS recognition issue on some server.
- Fixing the publish_actions scope problem removed from Facebook.
- Twitter OAuth image post problem fixed.
- Using message as image caption when posting images to Facebook instead of sharing the photo.
- Upgraded to Facebook graph API v2.10 so, Like and Comment actions are already only possible on pages.
- Adding a feature that stops server gateway timeout problem on huge requests.
- Schedule timezone problem has been fixed.
- Twitter OAuth library updated.
- Empty status picture when posting an image along with a link to Facebook problem has been fixed.
- Problem with sending image posts on some web servers has been fixed.
- Status post to Facebook timeline activated again.
- Status post to Facebook page problem has been fixed.
- Changed Twitter profile image to load over https.
- Feature to edit the .htaccess file for sub-folders during installation.
- Facebook SDK updated to Graph API v2.8.
- Multi account status post problem fixed.
- `Page token is required to ...` problem has been fixed.
- Schedule status post to Pinterest problem fixed.
- Schedule posts management feature added.
- Search and sorting in CRUD tables has been fixed.
- PHPMailer class updated.
- Problem of displaying Facebook pages in left navigation menu has been fixed.
- Fixing some SQL query problems.
- Facebook unrelated pages problem fixed.
- Adding status post scheduler feature.
- Adding Instagram status post feature.
- Application upgrade feature added.
- Registration approval feature added.
- Image manipulation feature added.
- Status post allowed characters limiter.
- Registration limitation feature added.
- Allowing MySQL connection via socket.
- Database duplicate entry problem fixed.
- Installer problem with PHP 7 has been fixed.
- The "No input file specified." problem with some web servers has been fixed.
- Problem with MySQL strict mode has been fixed.
- Incorrect datetime issue on Vimeo has been fixed.
- Problem with displaying Google+ and YouTube username has been fixed.
- First release.
Copyright © 2016 Axent Media, All Rights Reserved.