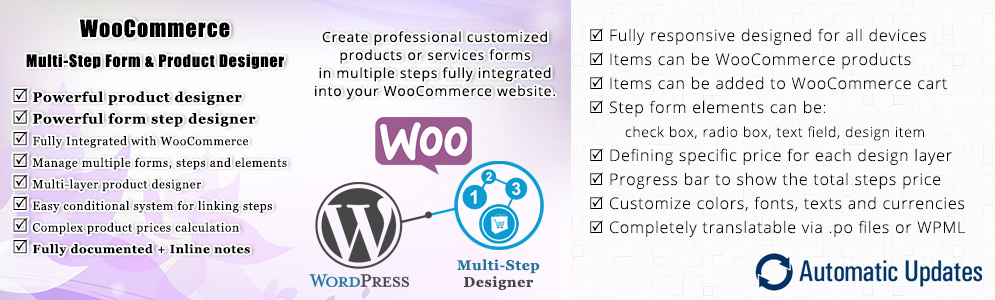
WooCommerce Multistep Form & Product Designer
Congratulations and thank you for choosing WooCommerce Multistep Form & Product Designer!
WooCommerce Multistep Form & Product Designer is a WooCommerce extension (will be installed as a WordPress plugin) that individuals or companies can use to create professional customized products or services forms in multiple steps including multiple items, product designers and cost calculator tools and sell on their WooCommerce website.
With this plugin you can sell any type of products that require customization or need to be designed by the end customer like; gift boxs, products packs, perfumes, t-shirts, gift cards, hats, mugs, promotional gifts; or sell any type of services that require mutiple selections by the customer like; web design, graphic design, social and seo, custom applications, etc.
You can also make relationships between multiple form steps using a powerful conditional system and define specific prices for each design layer that customer adds to his/her custom product.
This plugin is fully integrated into WooCommerce and uses WooCommerce shopping cart, products management, payment and shipping system. You bind your forms to WooCommerce products and they can be automatically added to the WooCommerce cart at the form final step.
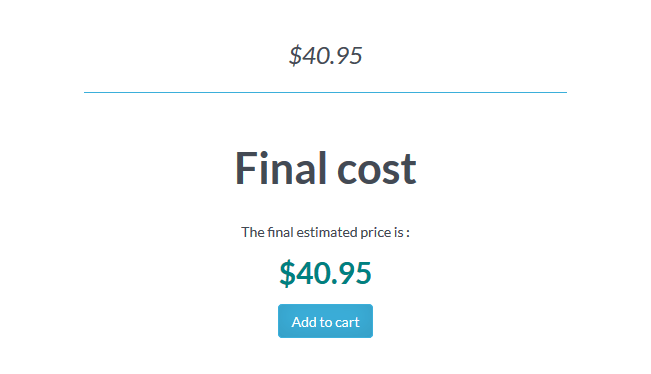
Your customers will get a calculated cost for their requested product/service in each step depending on the features they request or the items they add into their designed product and the final product/service will be finally added to the cart with the total calculated price.
Your customers can also design their desired product using your powerful multi-layer product designer, get the estimated price for their customized product and finally add it to the cart.
![]()
WooCommerce Multistep Form & Product Designer Plugin
Created By: Axent Media
Created On: 20 November 2016
Last Update: 12 November 2017
Version: 1.2.0
If you have any questions or suggestions concerning to WooCommerce Multistep Form & Product Designer plugin, please contact us via our page on CodeCanyon or via our website.
Note: We provide installation and configuration for clients. After your purchase, simply contact our support desk and provide us with your website information if you need to use this service.
Plugin Showcase
Custom product showcase
Custom service showcase
Installation
Installation of WooCommerce Multistep Form & Product Designer is straight forward and on average should take no longer than just a few minutes.
Method 1 (Using WordPress dashboard):
This is by far the easiest way of installing a WordPress plugin.
1. Open your WordPress admin dashboard. Click on Plugins » Add New.

2. Click on the Upload Plugin button and you will see a screen like the one below.
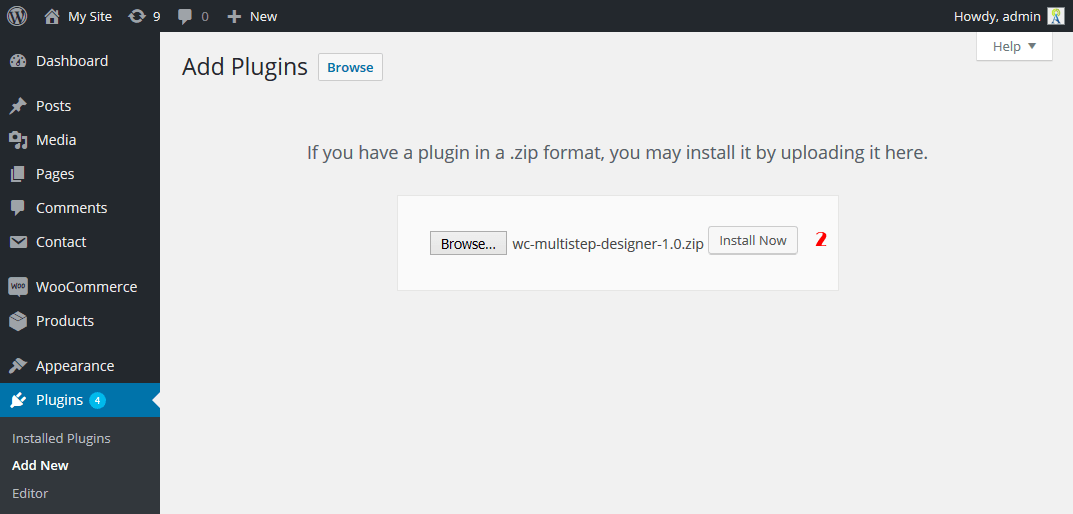
3. Click on the Browse button and select the plugin file (zip files only) from your hard drive and click the Install Now button to upload and install it.
You will be taken to “activate a plugin” page just like this one:
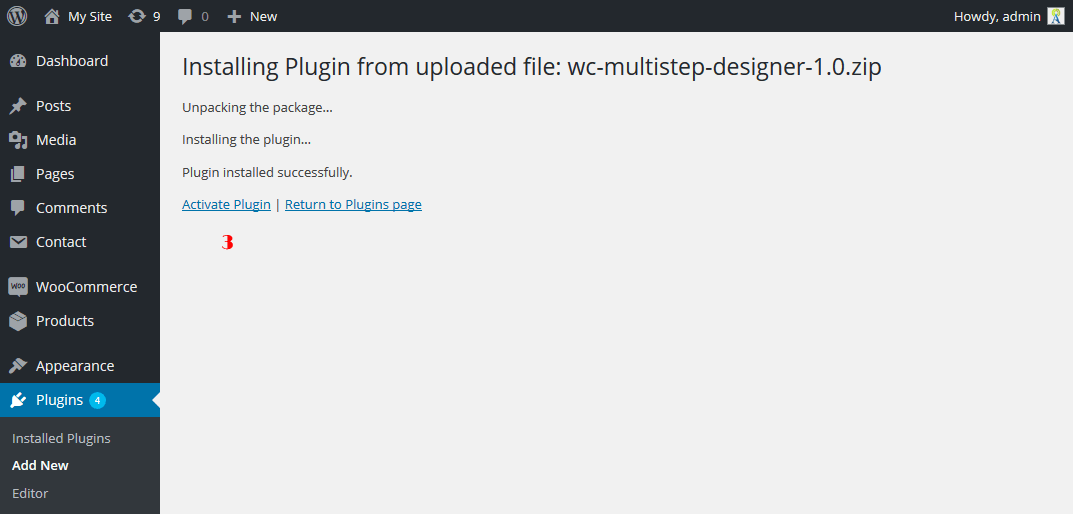
4. Click on Activate Plugin link to complete the plugin installation. You can also activate the plugin by clicking on Activate link later on the Installed Plugins page.
Now you have installed the WooCommerce Multistep Form & Product Designer plugin. You would have to read the quick start guide, create your first multi-step form, manage form steps, and bind your form to a product to fit your needs.
Method 2 (Manual Installation):
You can also install this plugin on your WordPress website manually.
- Open and extract the wc-multistep-designer.zip compressed zip file that you have downloaded from CodeCanyon to a location on your computer.
- Find, extract and upload the contents of the
wc-multistep-designer-x.x.zipfile from your computer to the "./wp-content/plugins/wc-multistep-designer/" directory on your website. You can use an FTP client or use your web hosting control panel file manager. - Open your WordPress admin dashboard and click on
Installed Plugins. - You can see the "WooCommerce MultiStep Designer" plugin available in your plugins list on this page.
- Click on the Activate link right below the plugin name.
Installing On WordPress Multisite (WPMU)
The plugin also works with WordPress Multisite.
- Go to your WordPress Network Admin panel and install the plugin on the network sites.
http://yourwebsite.tld/wp-admin/network/plugin-install.php?tab=upload - After installation, you will be taken to the “activate a plugin” page. Click on
Network Activatelink to complete the plugin installation.
Requirements
- The plugin requires the PHP version 5.2.4 or higher.
- The plugin requires the WordPress version 4.3 or higher.
- The plugin requires the WooCommerce version 2.5 or higher.
Quick Start Guide
Here we will explain you that how to create different type of products/services and add to your website.
Create a custom product
In this topic we create a sample mug and bind it into a WooCommerce product.
- Browse to, WordPress admin dashboard.
- Go to
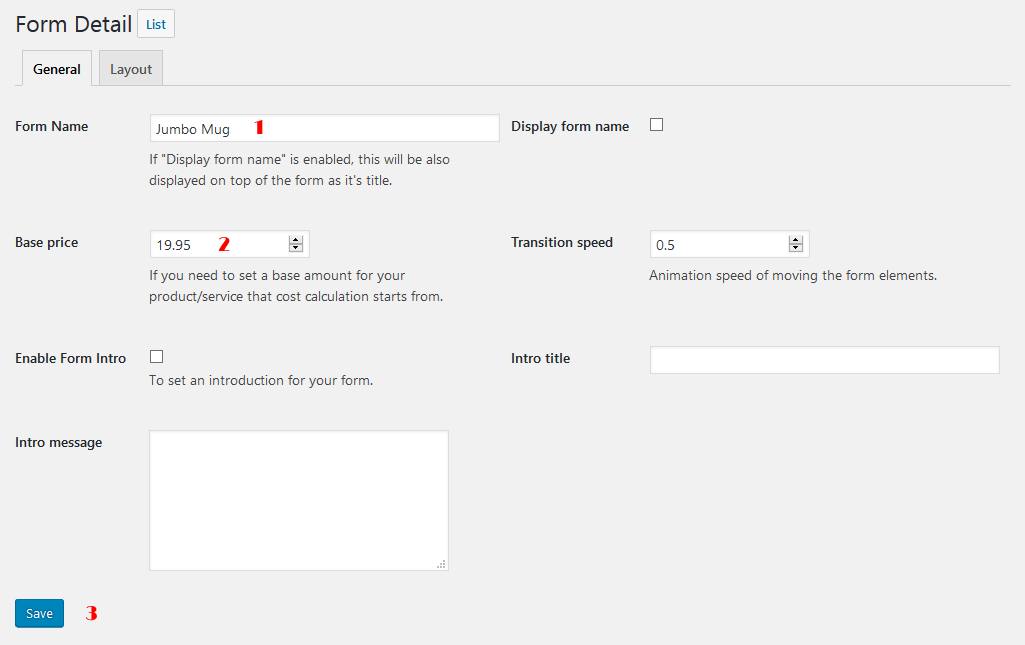
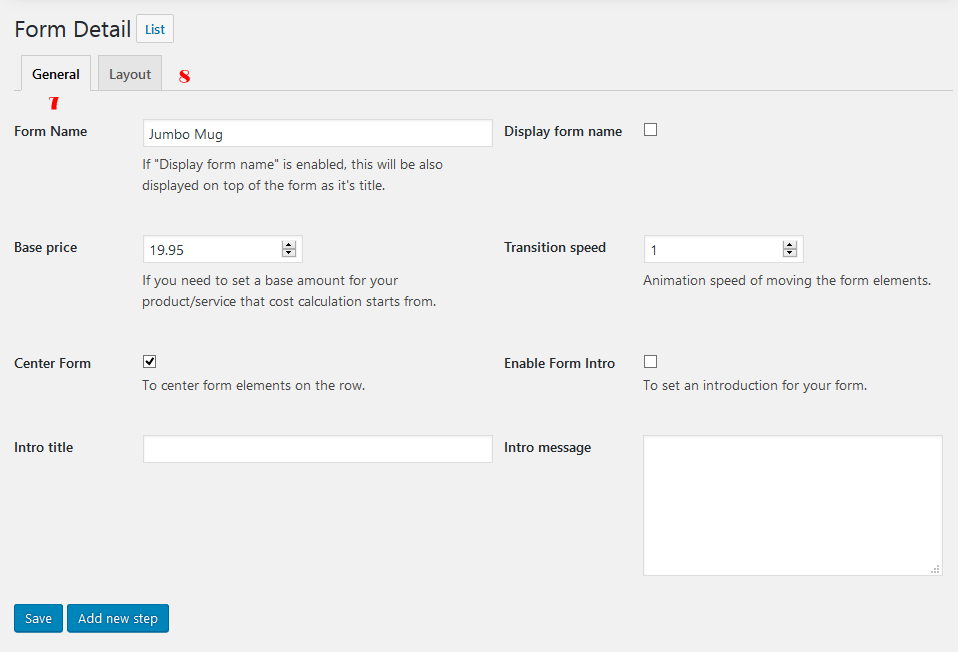
WC Multi-Step » Add Form, fill out the "Form Detail" section according to the image below and save the form.
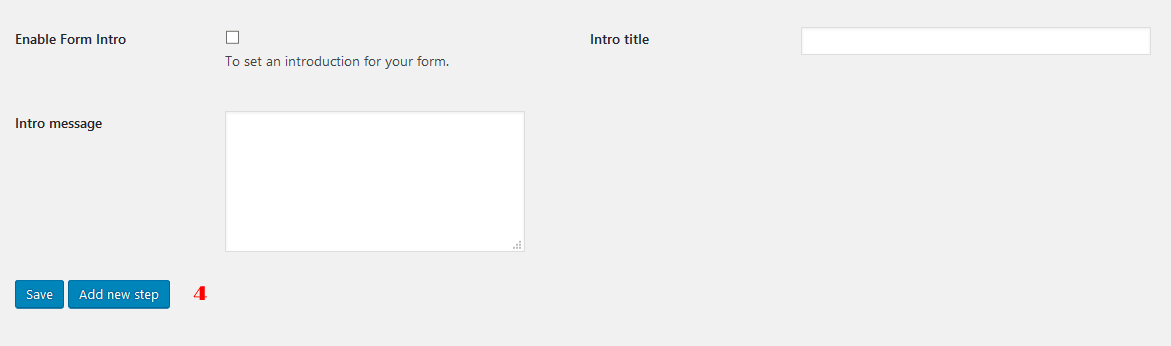
- According to the image below, click on the
Add new stepbutton to create a new step.
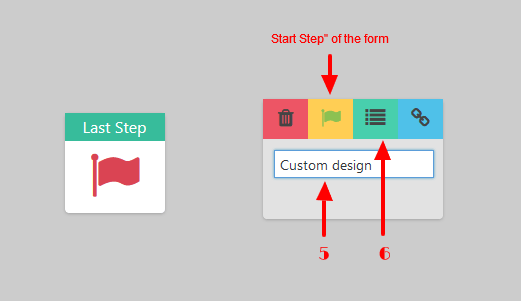
- You will find your created step right beside the "Last Step" with a green flag that refers to the "Start Step" of the form.
- Click on the "Step" input box and change the step name to
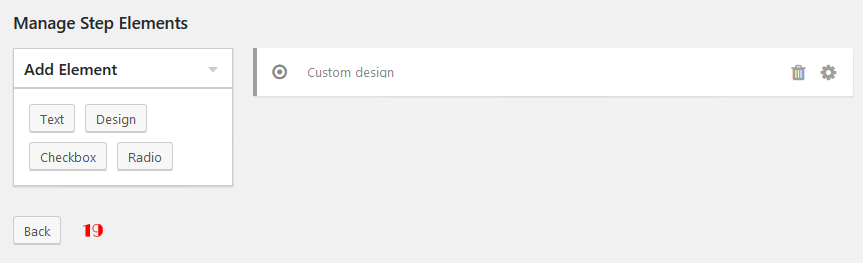
5. Custom designas follows. - Click on
6. List step elementsbutton right above the step box.
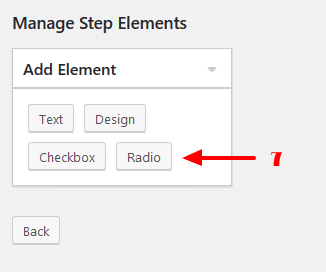
- On the "Manage Step Elements" page, click on the
7. Radiobutton. You will get redirected to the "Element Details" page to create a radio option group.
- Fill-in the "Element Details" page according to the image below and click on the
10. Add Optionbutton to create a radio option.

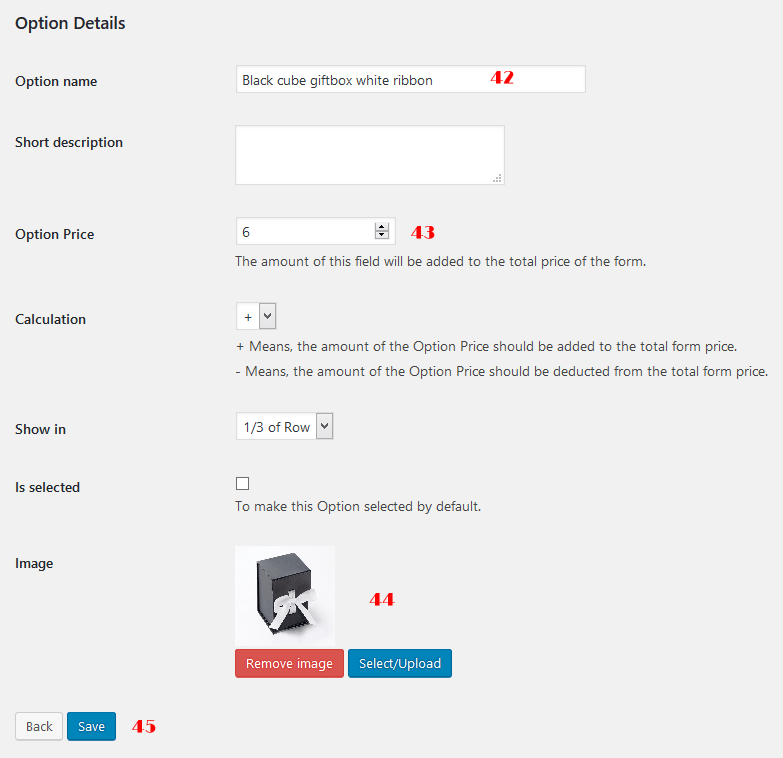
- Fill-in the "Option Details" form according to the image below and save.
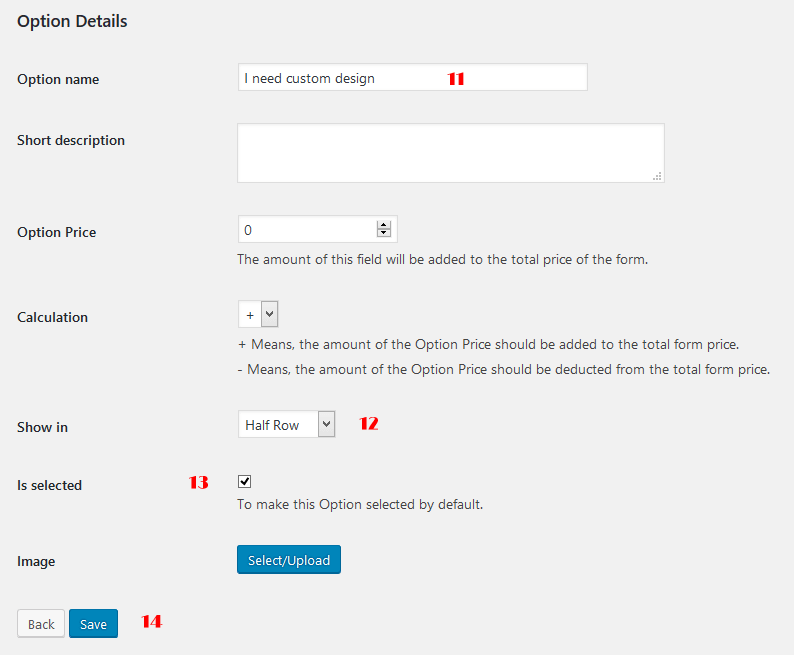
- You will be redirected back to the "Element Details" page again.
- Click on
10. Add Optionbutton once again and fill-in the "Option Details" according to the image below and save.
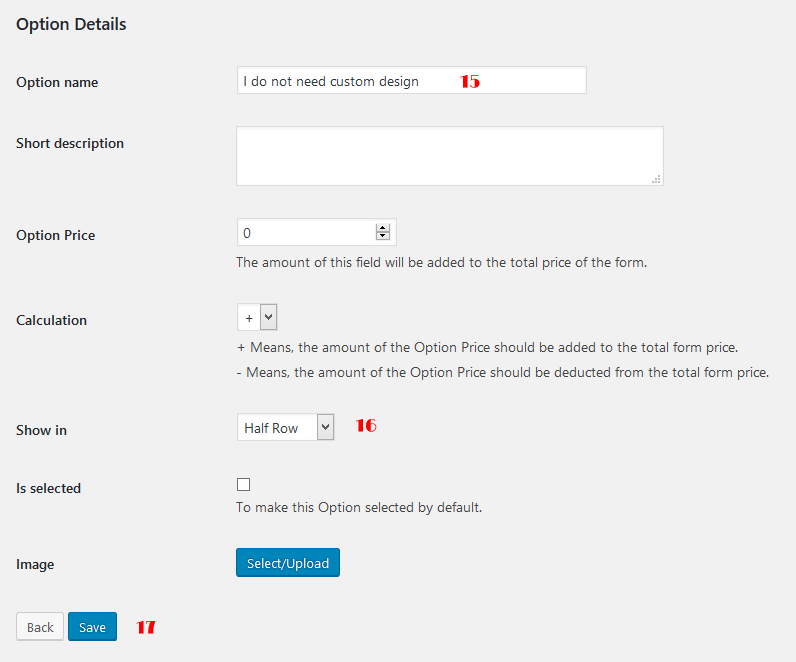
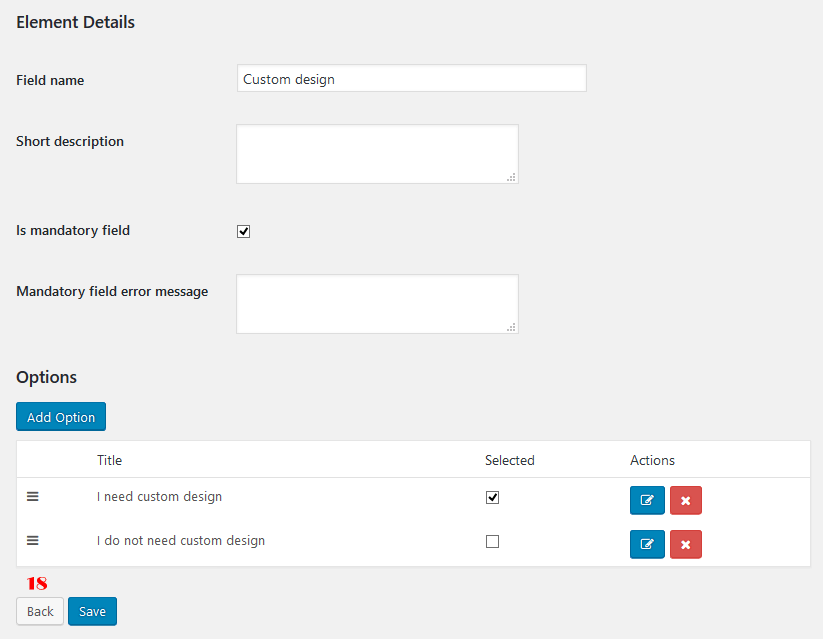
- You will be redirected back to the "Element Details" page again and you can see your step form elements as below.
- Click on the
18, 19. Backbutton twice to come back to the step designer page.
- On the step designer page, click on
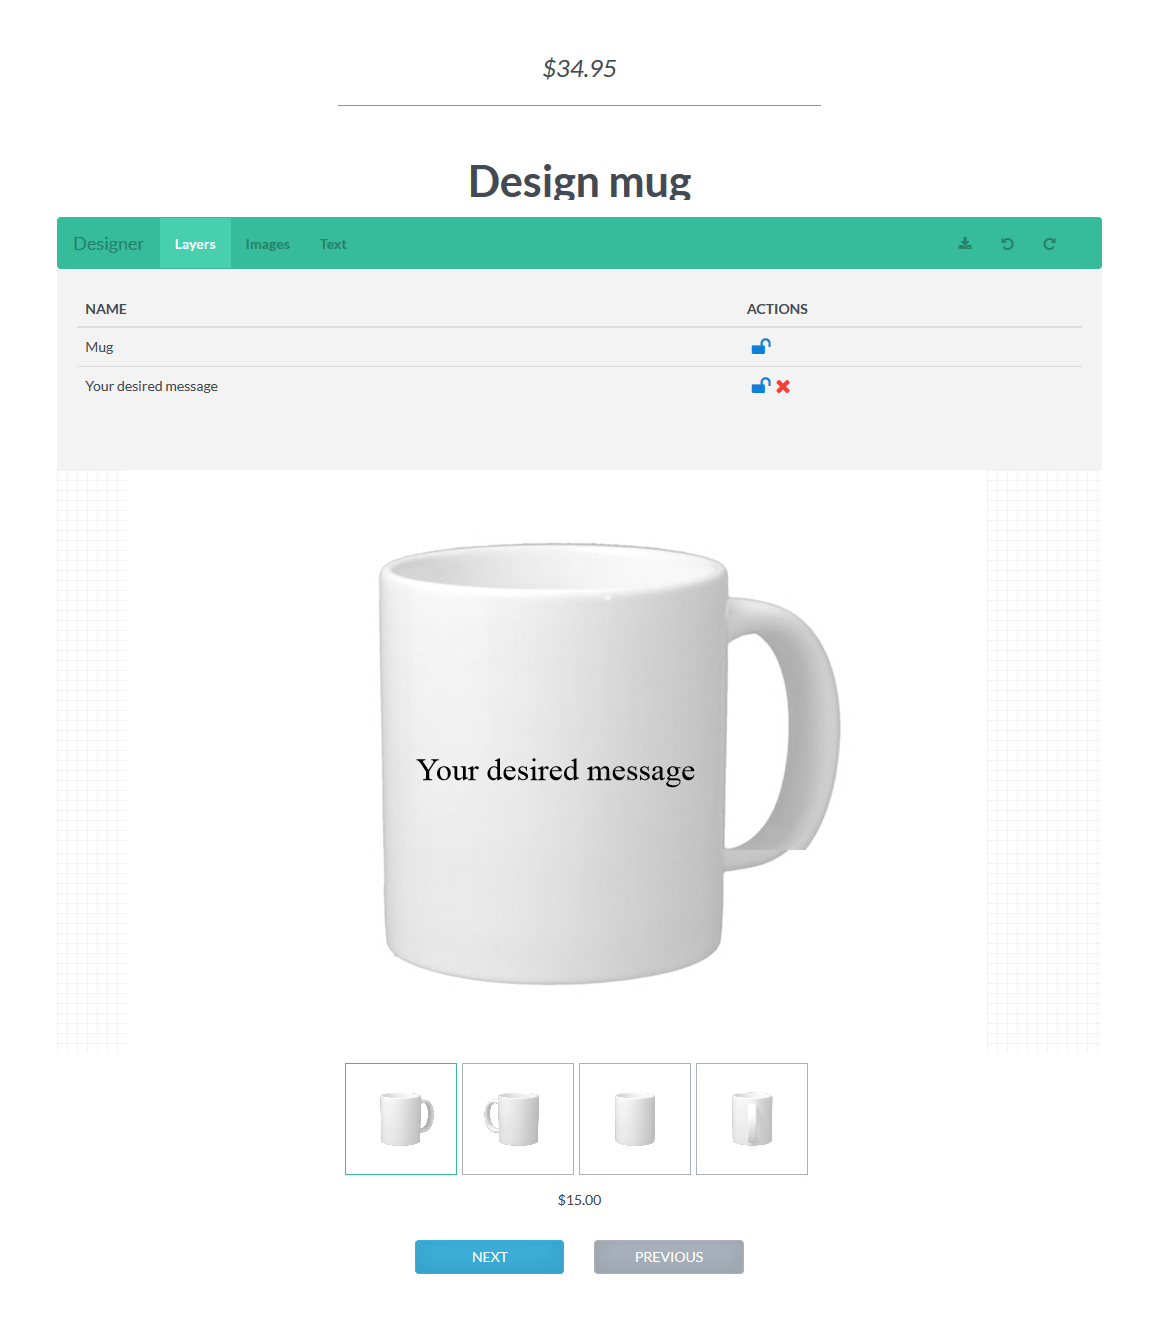
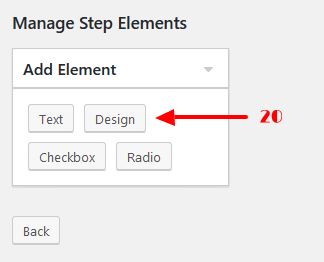
4. Add new stepbutton once again, rename the step to "Design mug" and click the6. List step elementsbutton. - On the "Manage Step Elements" page, click on the
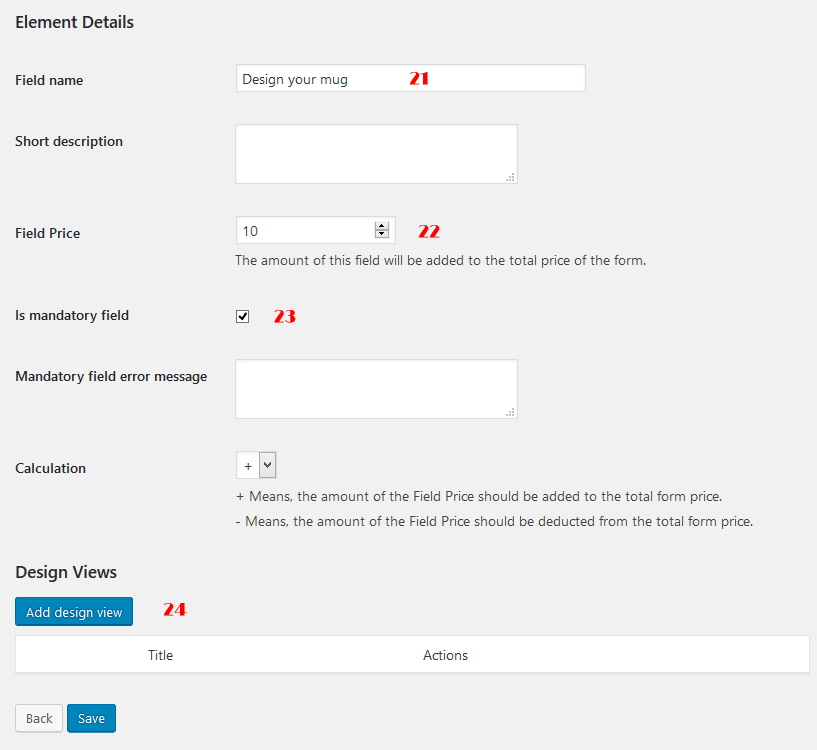
20. Designbutton. You will get redirected to the "Element Details" page to create a design element.
- Fill-in the "Element Details" form according to the image below and click the
24. Add design viewbutton.
- Fill-in the "Design View Details" form according to the image below and
27. Save.
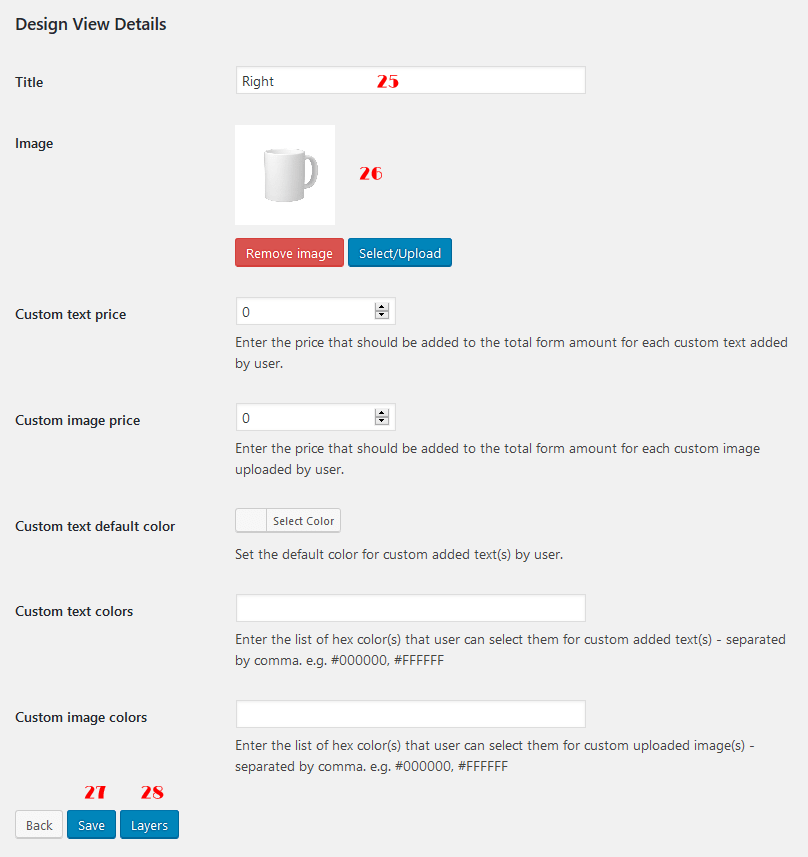
- Click on the
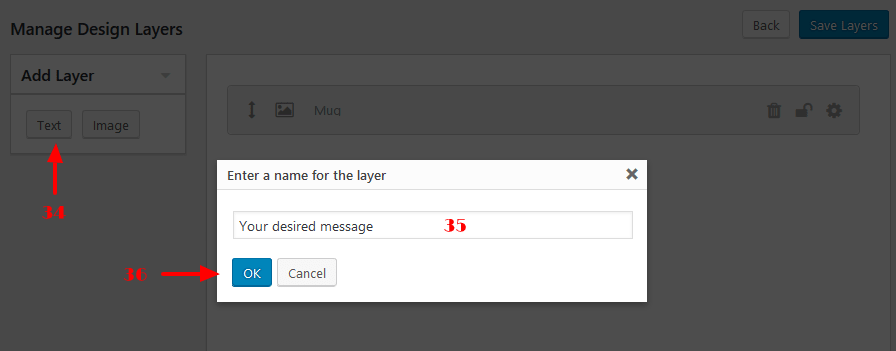
28. Layersbutton to open the "Manage Design Layers" page. - Click on the
29. Imagebutton, enter a title for your new layer and click OK.
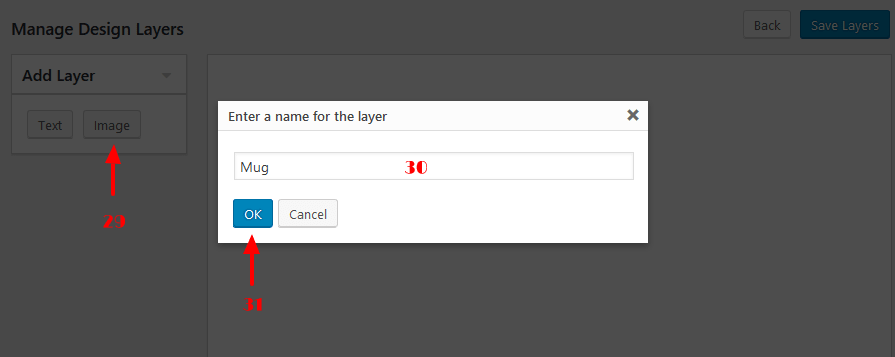
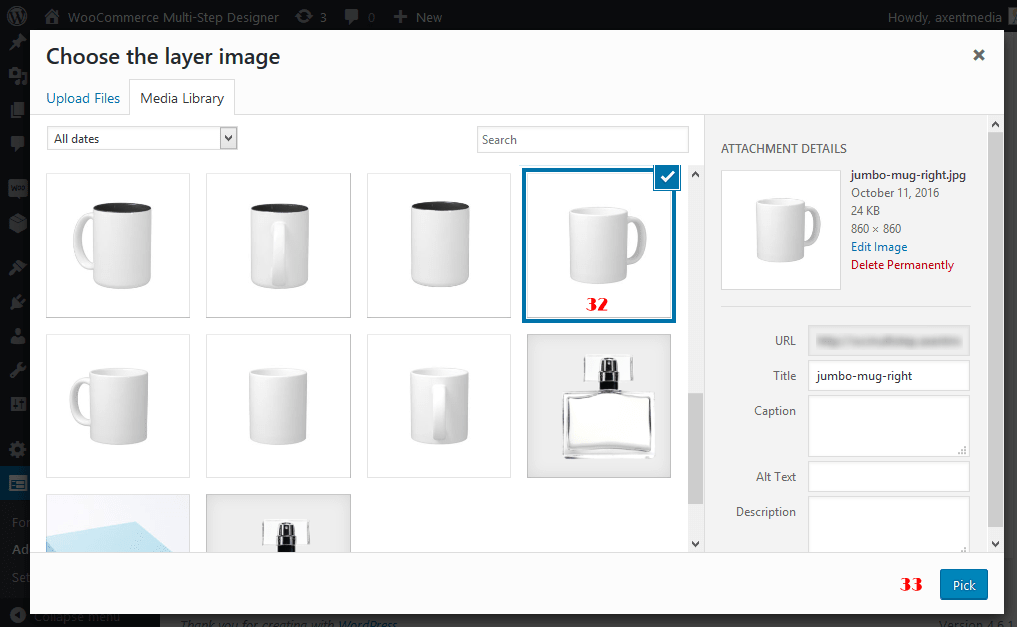
- The media library window will be opened and you should upload/select the image for your layer and
33. Pick.
- Click on the
34. Textbutton to create a new text element, enter a title for your new text layer and click OK. - Click the
37. Save Layersbutton to save your layers.

- Come back to the "Element Details" page again by clicking the
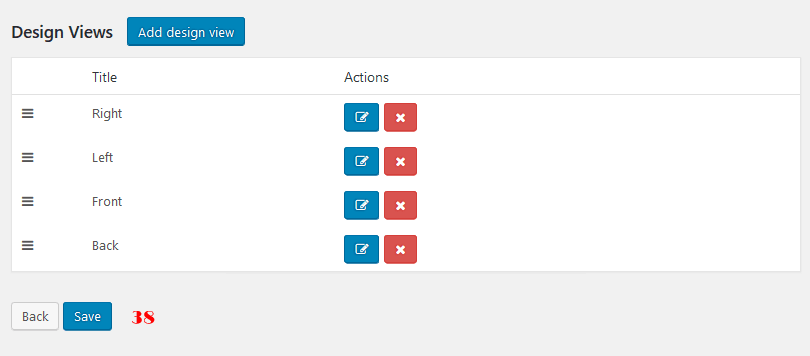
Backbutton for twice. - According to the screenshot below, try adding the Design Views for all the other viewports of your product if you need.
- Click the
Backbutton twice to come back to the step designer page again. - On the step designer page, click on
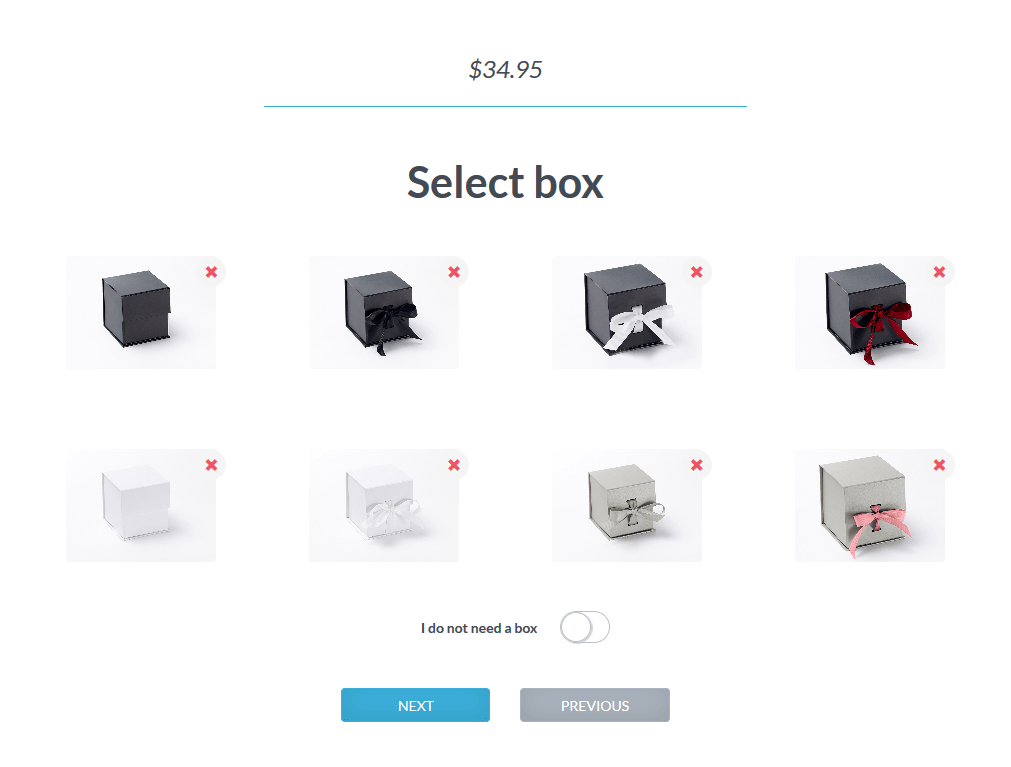
4. Add new stepbutton once again, rename the step to "Select box" and click on6. List step elementsbutton once again. - On the "Manage Step Elements" page, click on the
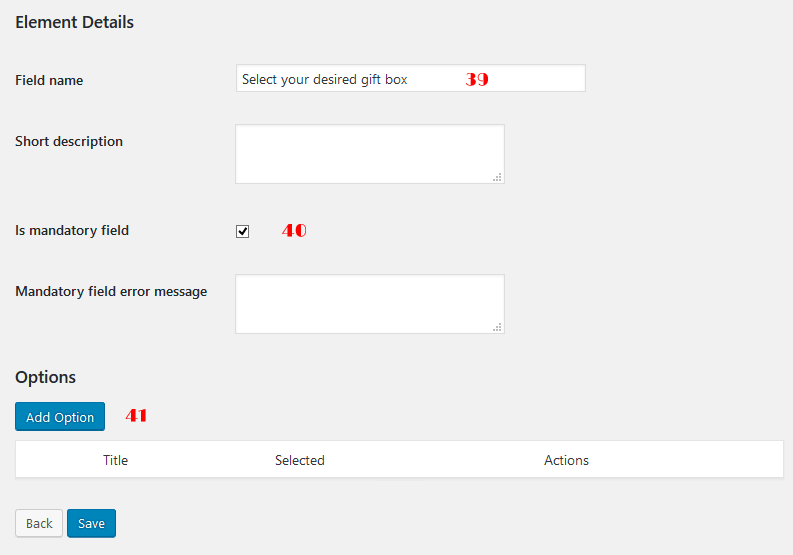
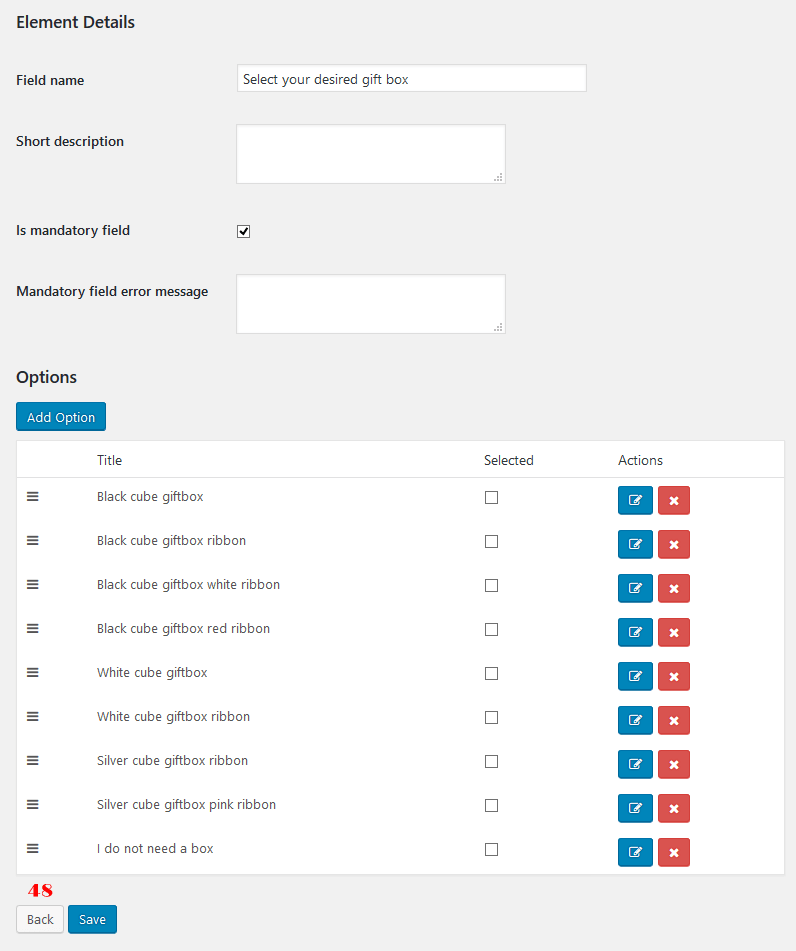
7. Radiobutton. You will get redirected to the "Element Details" page to create a radio option group. - Fill-in the "Element Details" form according to the image below and click
41. Add Optionbutton.
- Fill-in the "Option Details" form according to the image below and save.
- You will be redirected back to the "Element Details" page again.
- Click on
41. Add Optionbutton once again and fill-in the "Option Details" form according to the image below and save.
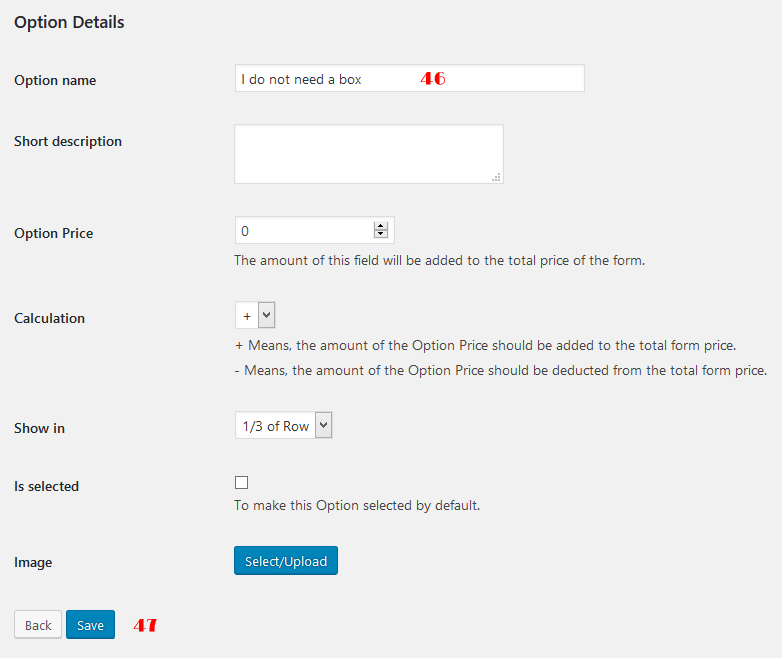
- You will be redirected back to the "Element Details" page again and you will see your create radio options in the Options tables.
- According to the screenshot below, try adding the radio options for all the other gift boxes you desire.
- Click on the
48. Backbutton for twice to come back to the step designer page at the end.
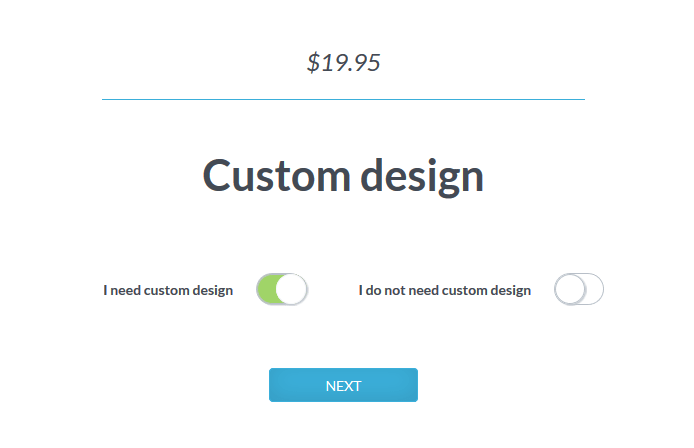
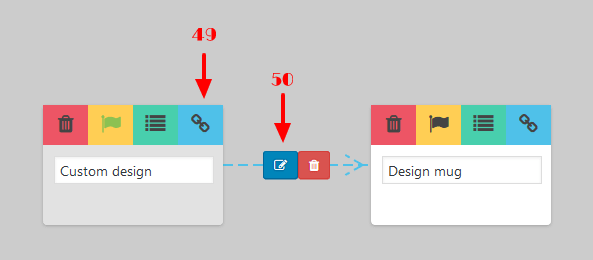
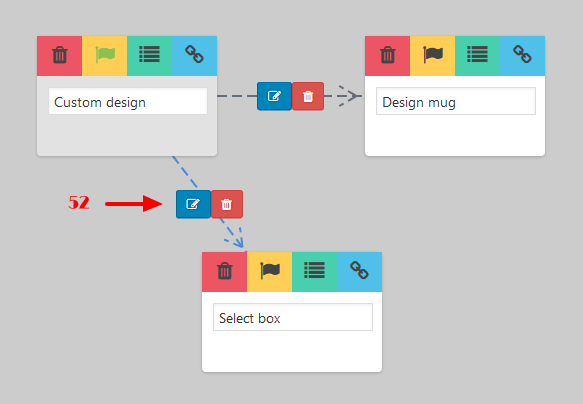
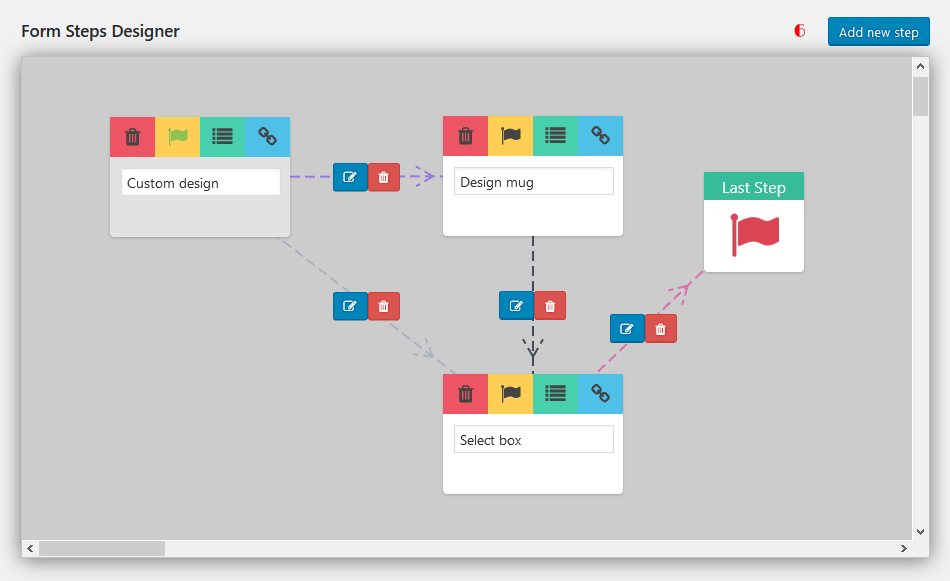
- Move your mouse on the "Custom design" step and click the
49. Anchoricon titled "Connect this step to another step" inside the "Custom design" step rectangle box. After clicking the Anchor icon, a dashed line will be appear under your mouse pointer that you can move it on the another step "Design mug" and click to make a connection between these two steps. - Click on the
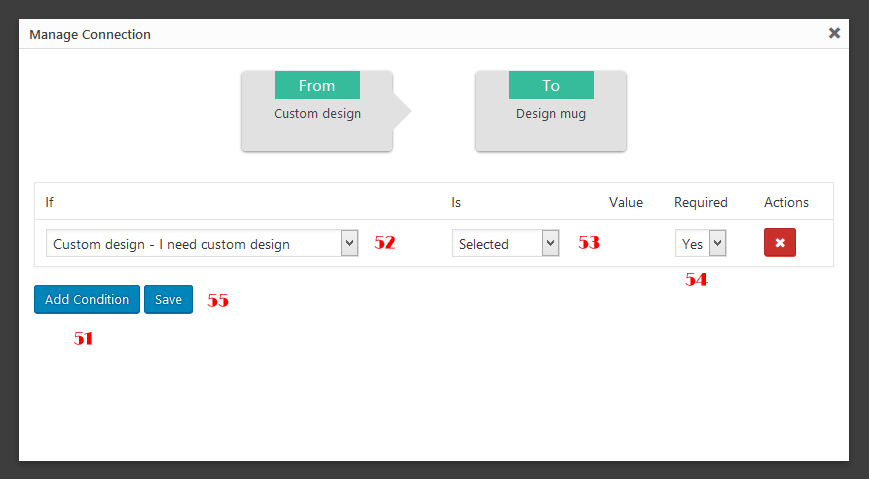
50. Edit Connectionpencil icon to open the "Manage Connection" popup.
- On the "Manage Connection" popup, click on the
51. Add Conditionbutton to create a new connection condition. - Create a condition according to the screenshot below and save.
- Close the popup window and come back to the "Form Steps Designer" again.
- Move your mouse over the "Custom design" step, click the
49. Anchoranchor icon once again and make a connection between "Custom design" and "Select box" steps too. - Click on the
52. Edit Connectionpencil icon between "Custom design" and "Select box" steps to open the "Manage Connection" window again.
- Create a condition according to the screenshot below and save.

- Close the window and come back to the "Form Steps Designer".
- Make just a connection (without any condition) between "Design mug" and "Select box" steps too.
- Make just an another connection between "Select box" and "Last Step" steps too.
- You will finally have all the steps related like the screenshot below.

Important!
You would already need to assign your multi-step form to a WooCommerce product.
To assign a form to a product, continue reading this topic
To see how your multi-step form would be displayed on your website after assigning to a product, click here.
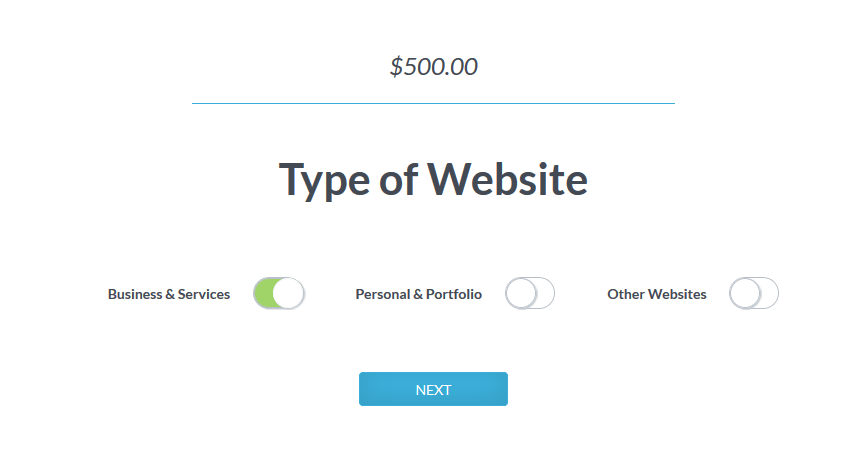
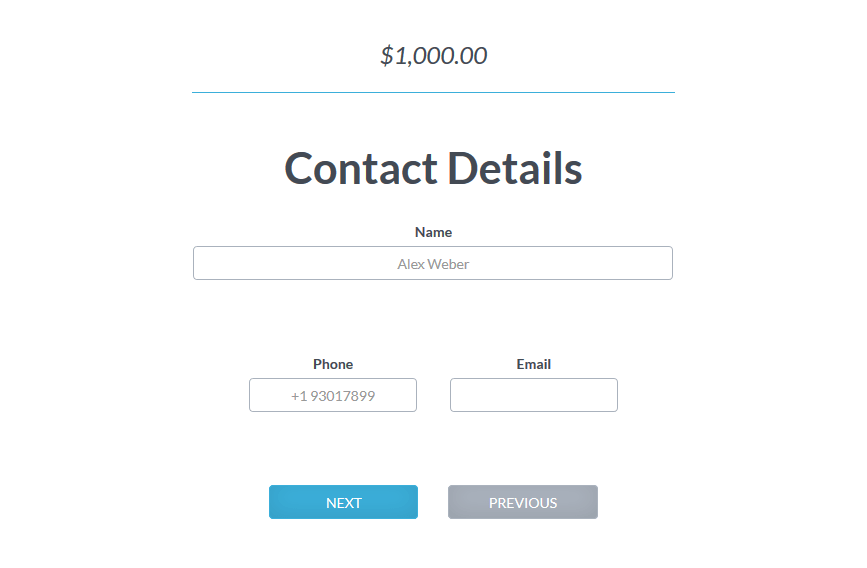
Create a custom service
In this topic we create a sample web design service form and bind it into a WooCommerce product.
- Browse to, WordPress admin dashboard.
- Go to
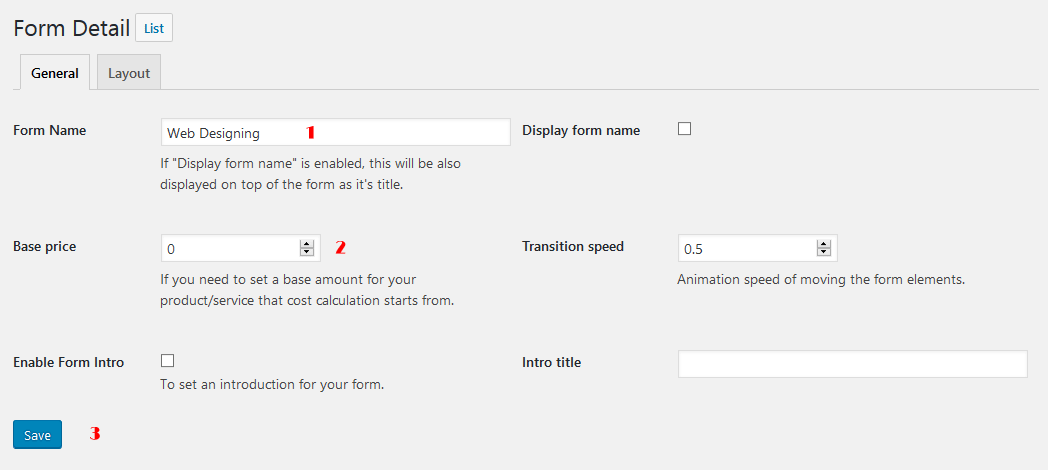
WC Multi-Step » Add Form, fill out the "Form Detail" section according to the image below and save the form.
- According to the image below, click on the
Add new stepbutton to create a new step.
- You will find your created step right beside the "Last Step" with a blue flag that refers to the "Start Step" of the form.
- Click on the "Step" input box and change the step name to
5. Custom designas follows. - Click on
6. List step elementsbutton right above the step box.

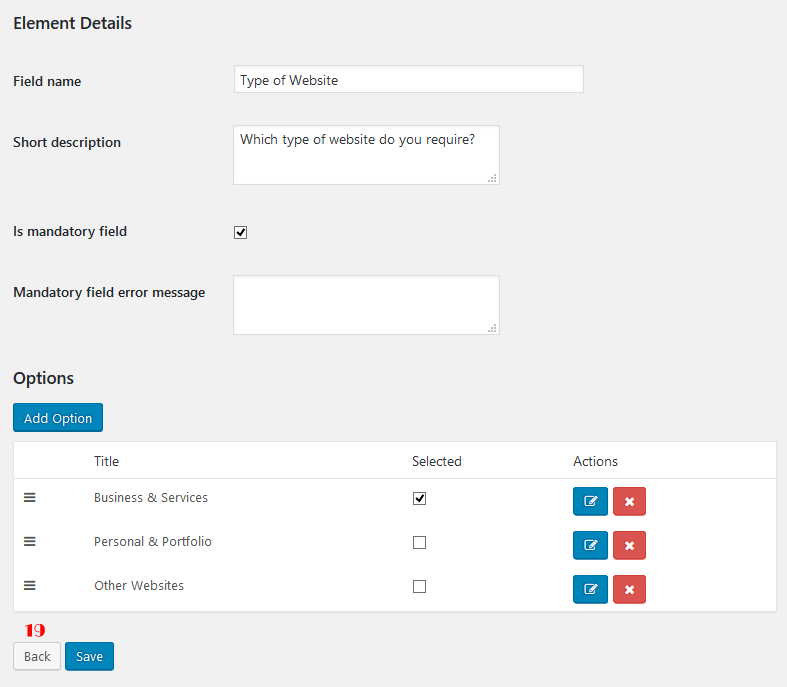
- On the "Manage Step Elements" page, click on the
7. Radiobutton. You will get redirected to the "Element Details" page to create a radio option group.
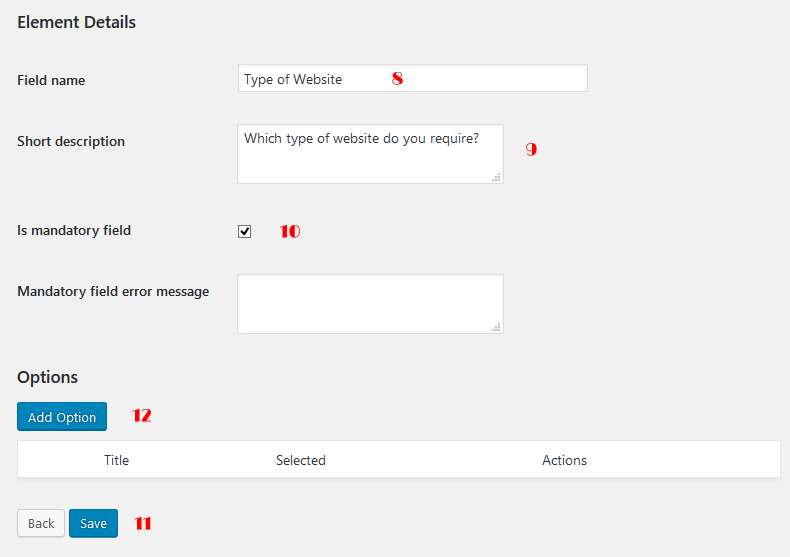
- Fill-in the "Element Details" page according to the image below and save then, click on the
12. Add Optionbutton to create a radio option.
- Fill-in the "Option Details" form according to the image below and save.
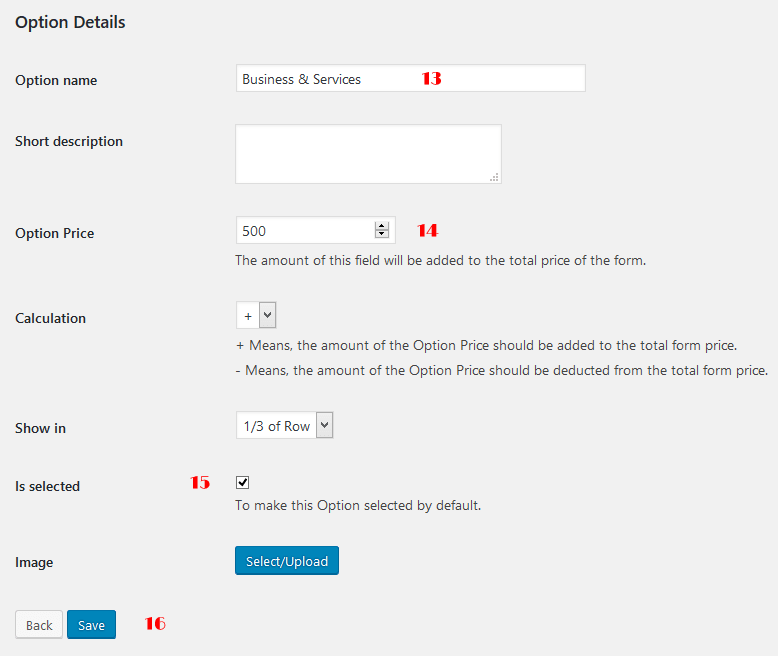
- You will be redirected back to the "Element Details" page again.
- Click on
12. Add Optionbutton once again and fill-in the "Option Details" form according to the image below and save.
- You will be redirected back to the "Element Details" page again.
- According to the screenshot below, try adding the Form Items for all the other type of websites if you require.
- Click on the
19. Backbutton to come back to the step designer page.
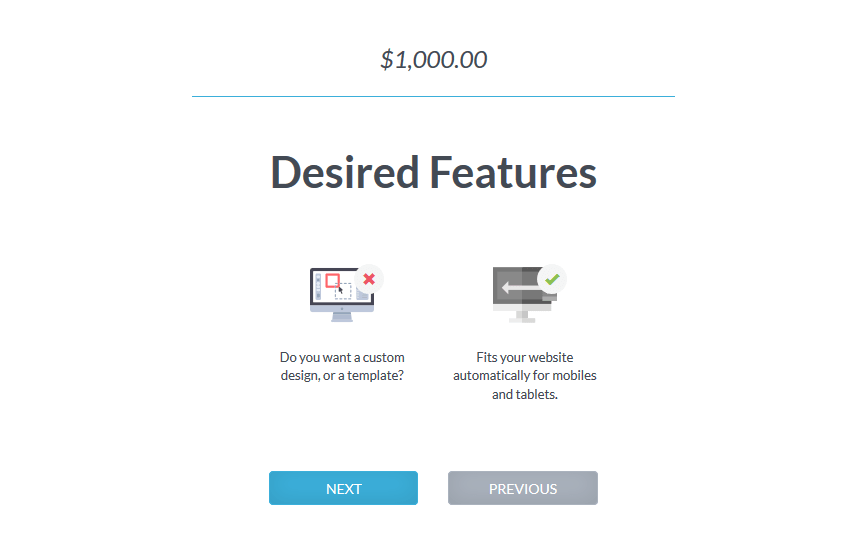
- On the step designer page, click on
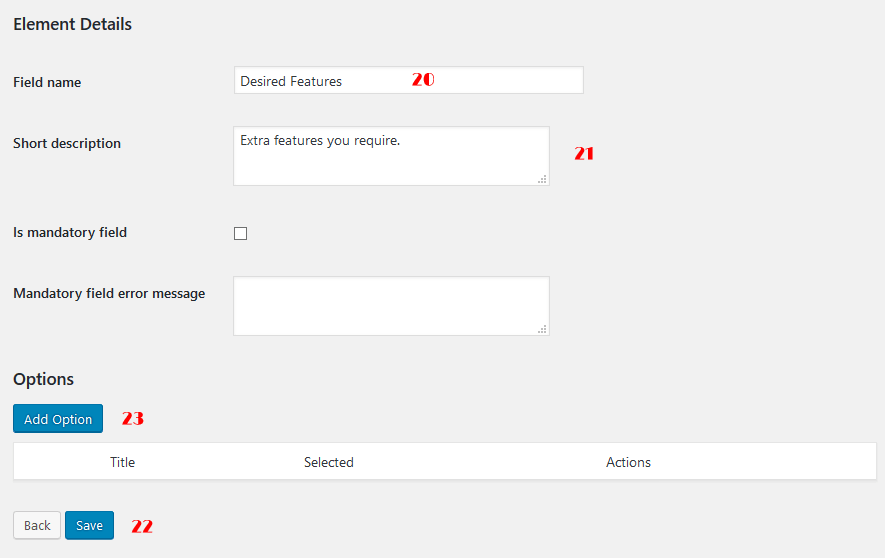
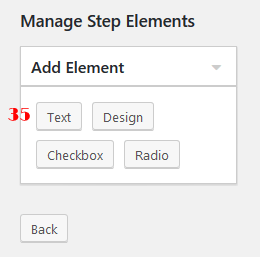
4. Add new stepbutton once again, rename the step to "Desired Features" and click the6. List step elementsbutton. - On the "Manage Step Elements" page, click on the
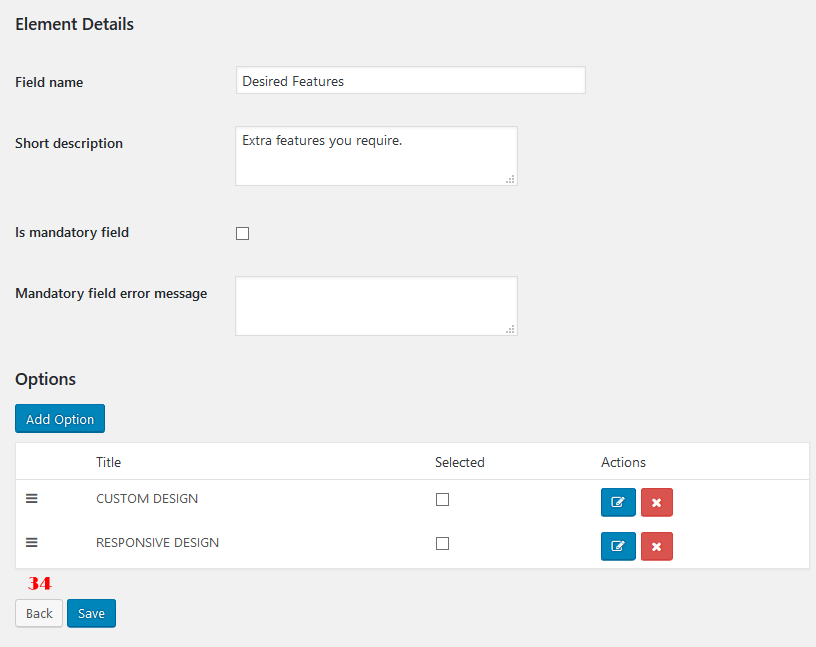
7. Radio button. You will get redirected to the "Element Details" page to create a radio option group. - Fill-in the "Element Details" page according to the image below and save then, click on the
23. Add Optionbutton to create a radio option.
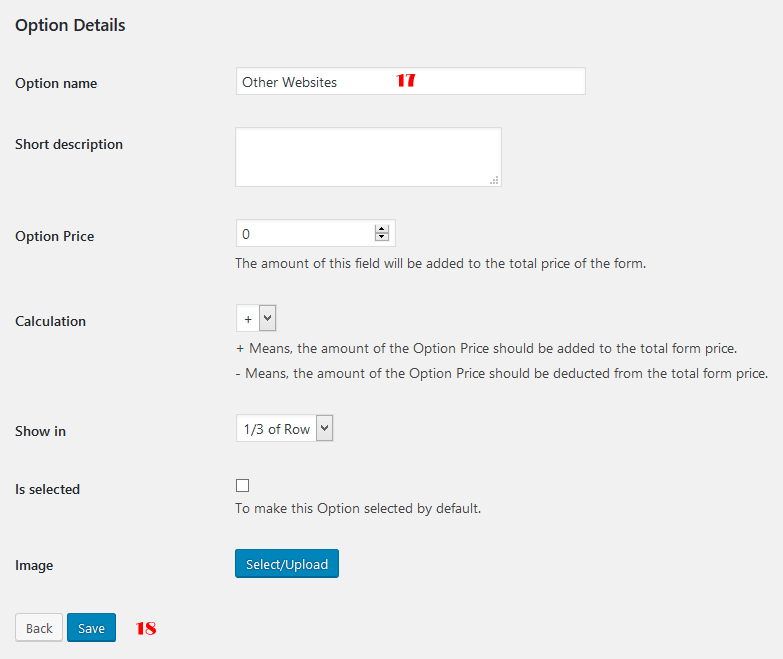
- Fill-in the "Option Details" form according to the image below and save.
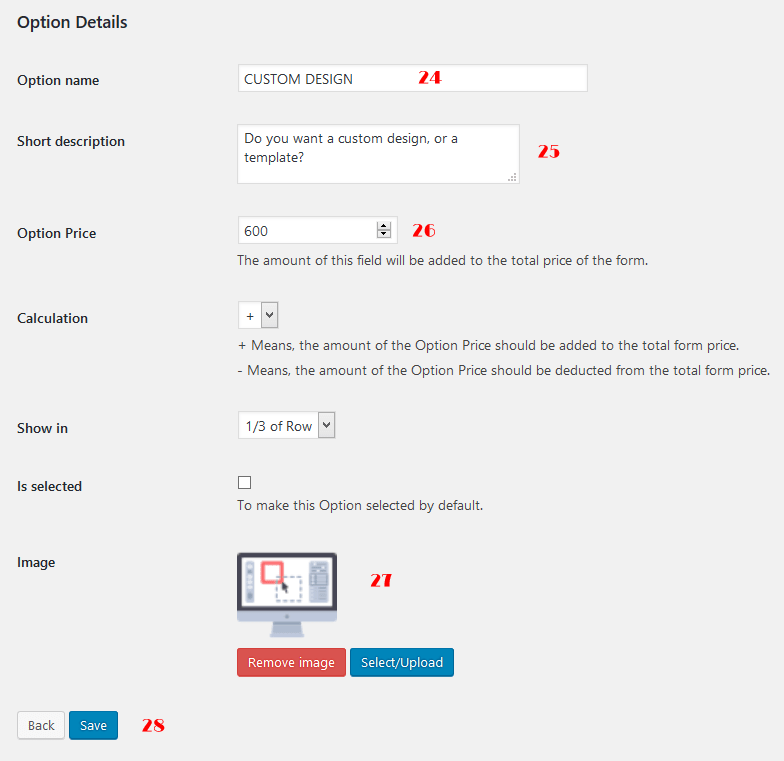
- You will be redirected back to the "Element Details" page again.
- Click on
23. Add Optionbutton once again and fill-in the "Option Details" form according to the image below and save.
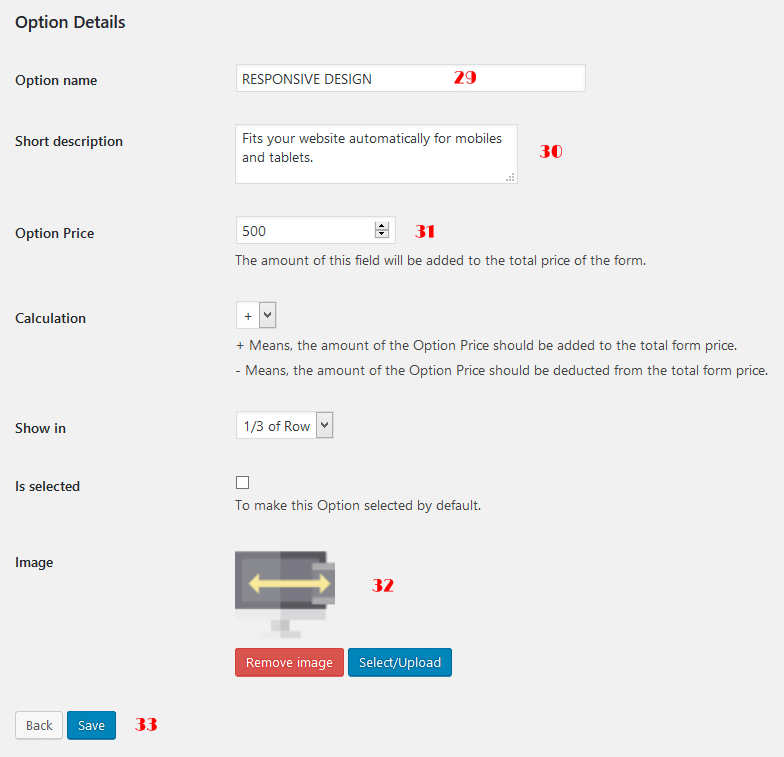
- You will be redirected back to the "Element Details" page again and you will find your step form radio options listed in Options section.
- Click the
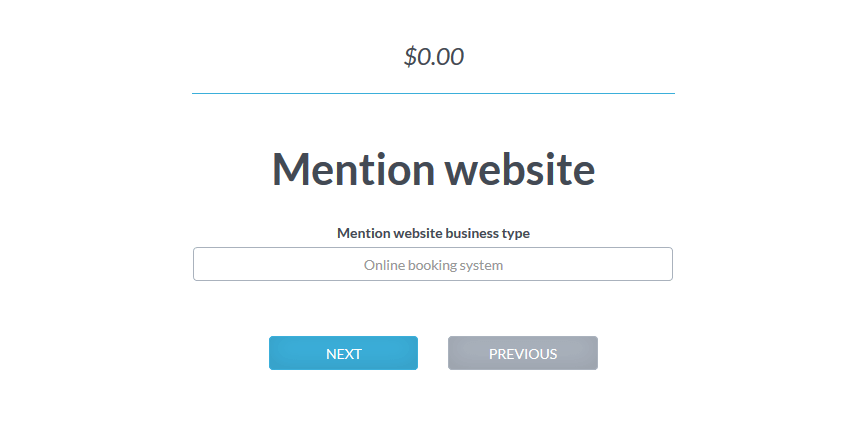
34. Backbutton to come back to the step designer page. - On the step designer page, click on
4. Add new stepbutton once again, rename the step to "Mention website" and click the6. List step elementsbutton. - On the "Manage Step Elements" page, click on the
35. Textbutton. You will get redirected to the "Element Details" page to create a text input.
- Fill-in the "Element Details" page according to the image below and save.
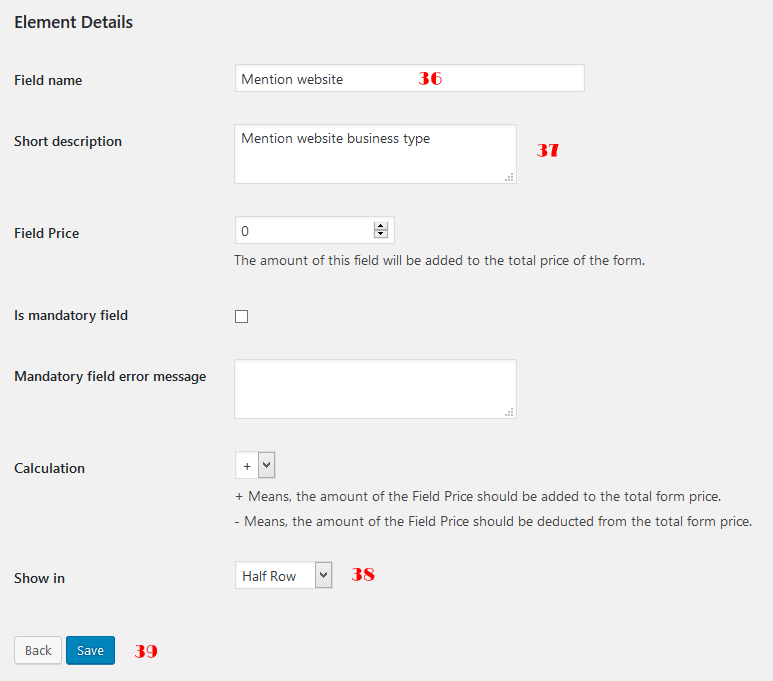
- You will be redirected back to the "Manage Step Elements" page again and you can see your step form items as below.
- Click on the
40. Backbutton to come back to the step designer page.

- On the step designer page, click on
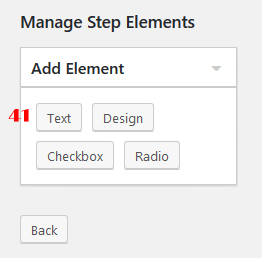
4. Add new stepbutton once again, rename the step to "Contact Details" and click the6. List step elementsbutton. - On the "Manage Step Elements" page, click on the
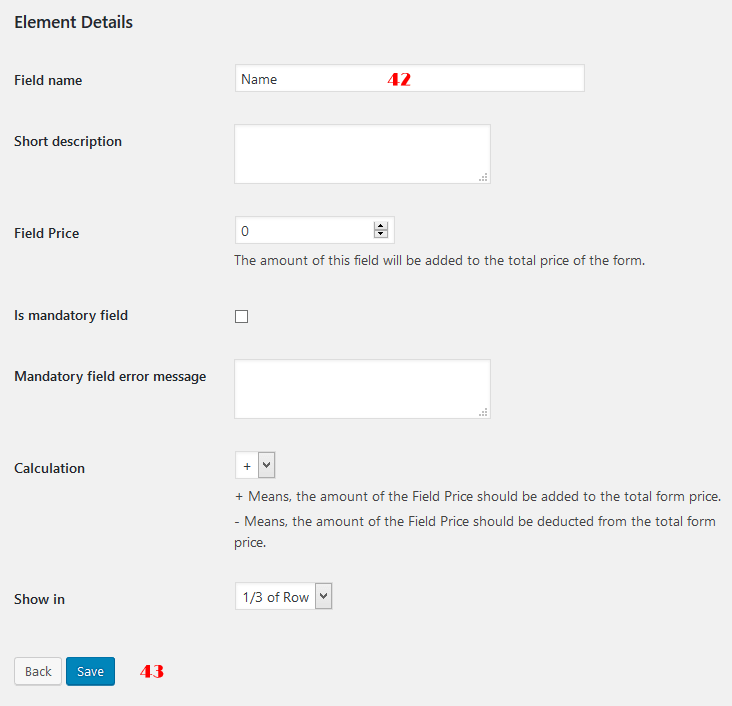
41. Textbutton. You will get redirected to the "Element Details" page to create a text input.
- Fill-in the "Element Details" form according to the image below and click the
43. Savebutton to redirect back to the "Manage Step Elements" page.
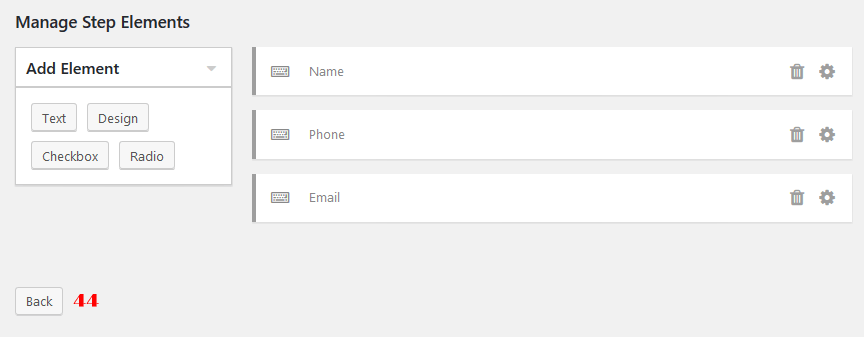
- According to the screenshot below, try adding the Form Elements for all the contact information you want to ask from the customer.
- Click the
44. Backbutton to come back to the step designer page.
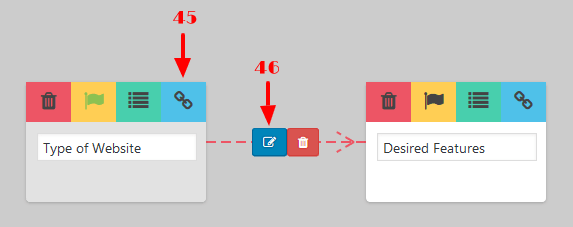
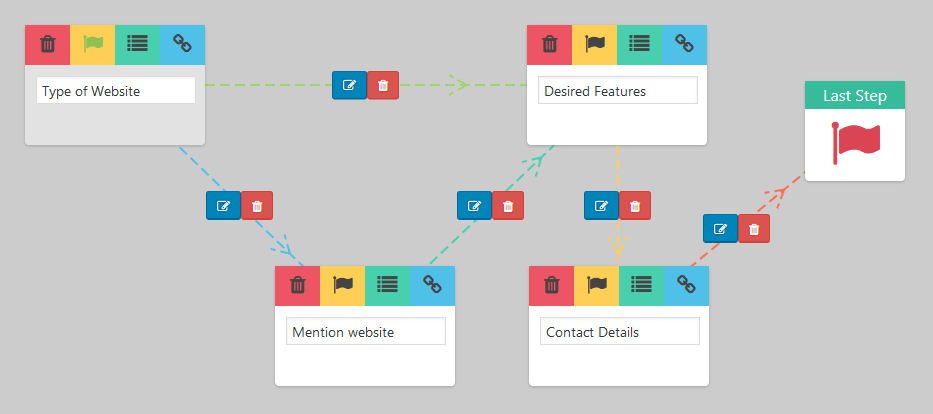
- On the "Form Steps Designer", move your mouse over the "Type of Website" step and click the
45. Anchoricon inside the step rectangle. After clicking the Link icon, a dashed line will be appear under your mouse pointer that you can move it on the another step "Desired Features" and click to make a connection between these two steps. - Click on the
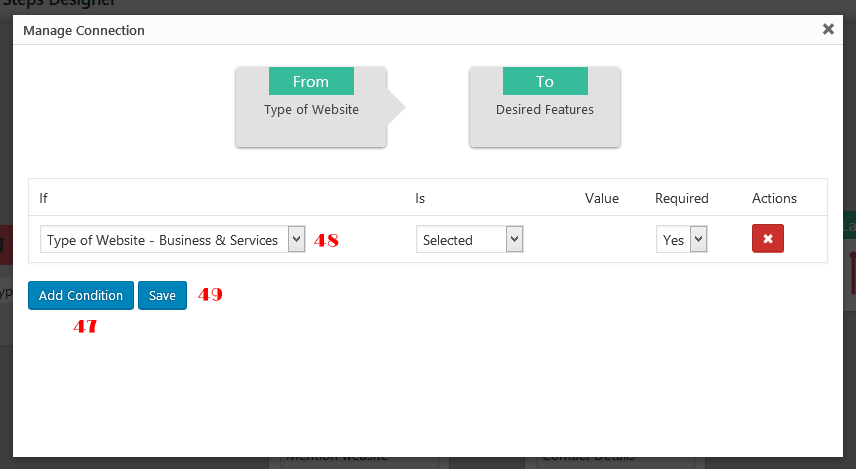
46. Edit Connectionpencil icon between these two steps to open the "Manage Connection" window.
- On the "Manage Connection" window, click on the Add Condition button
- Create a condition according to the screenshot below and save.
- You will be come back to the "Form Steps Designer" again.
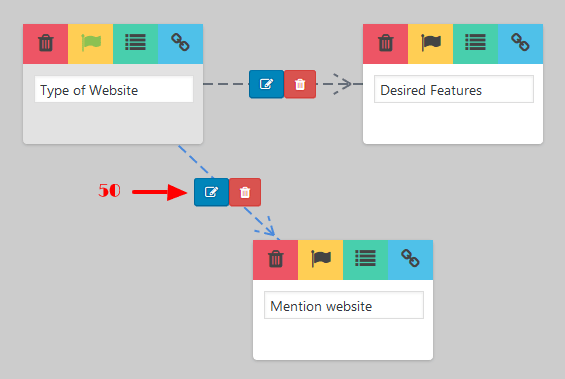
- Move your mouse over the "Type of Website" step, click the
45. Anchoricon again and make a connection between "Type of Website" and "Mention website" steps too. - Click on the
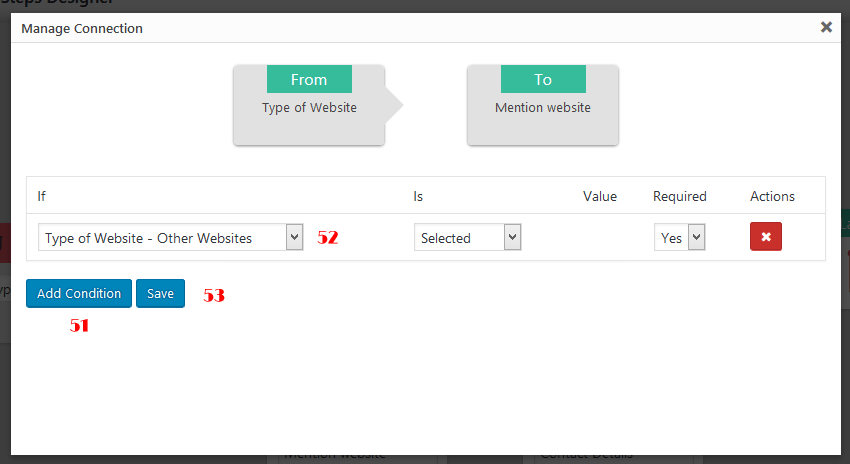
50. Edit Connectionpencil icon between "Type of Website" and "Mention website" steps to open the "Manage Connection" window again.
- Create a condition according to the screenshot below and save.
- Come back to the "Form Steps Designer".
- Make just a connection (without any condition) between "Desired Features" and "Contact Details" steps.
- Make just an another connection between "Mention website" and "Desired Features" steps.
- Make just an another connection between "Contact Details" and "Last Step" steps too.
- You will finally have all the steps related like the screenshot below.
Important!
You would already need to assign your multi-step form to a WooCommerce product.
To assign a form to a product, continue reading this topic
To see how your multi-step form would be displayed on your website after assigning to a product, click here.
Create/Manage Forms
From WordPress admin panel, browse to the WC Multi-Step » Forms to access your multi-step forms.
You can 1. edit or 2. delete forms or view a 3. preview of the form simply by move your mouse over the form name in each row.
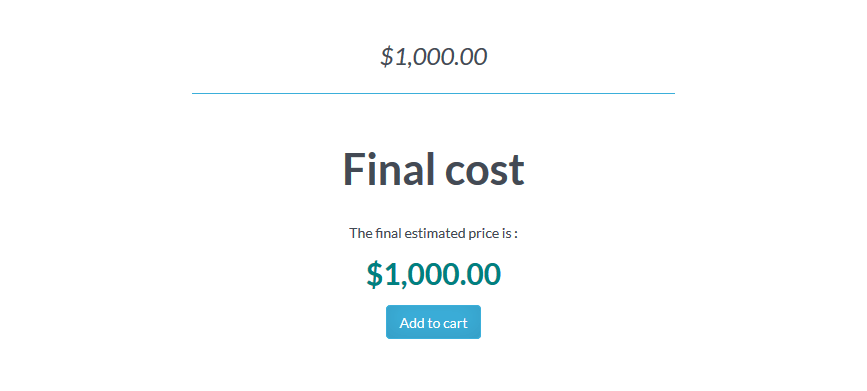
The 4. Price in this list is the base amount for your product/service that cost calculation will start from.

You can click on 5. Add new button to create a new form or click on the form name to edit an existing form.
On the "Form Steps Designer" area, you can add/edit any of steps making your product/service form. To create a new step, simply click on the 6. Add new step button located on top of the step designer or at the very bottom of the page.
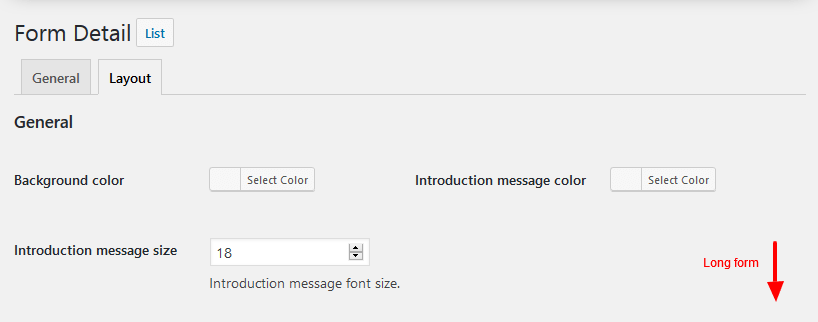
You can set the details and default options of your form in the 7. Form Detail » General tab section. You can also change the default colors, picture sizes, font sizes and styles of the form in the 8. Layout tab.
Manage Steps
To access the "Form Steps Designer" area, you should add/edit a form. In this area, you can add/edit/delete any of steps making your product/service form.
To create a new step, simply click on the "Add new step" button located on top of the step designer or at the very bottom of the page.
Click on the 1. List step elements pencil icon inside the step rectangle to edit a step. You can also remove a step using the 2. Delete step trash icon.
You can make a step as the "Start Step" of the form by clicking the 3. Flag inside the step square.
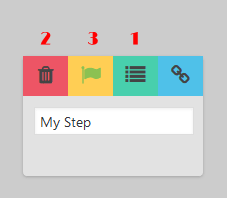
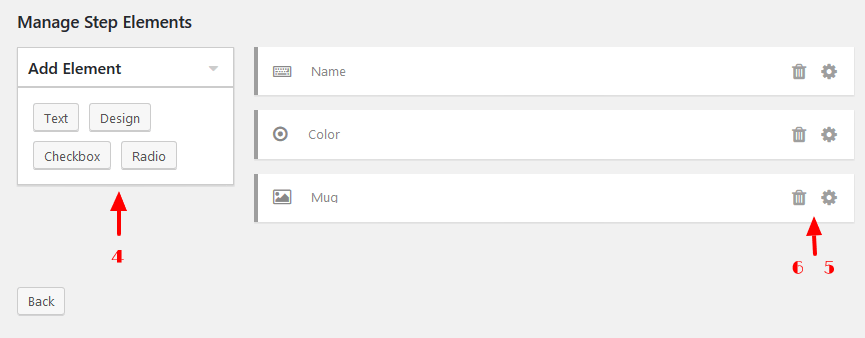
You can add elements/items to the form by clicking the appropriate button from inside the 4. Add Element sidebar and 5. Edit or 6. Delete an element using the buttons located in each row.
You can simply create any type of form elements you like including option groups (radio buttons or check boxes), text box or design item. Design item allows customer to create his/her prefered product. To find out more about design items please, read the quick start guide topic.
Adding form elements/items
Here we will explain the different parts of the "Element Details" page.
1. Field name: Represents the name of element on the form.
2. Short description: Small description written under the field name.
3. Field Price: The amount of this field will be added to the total price of the form.
4. Is mandatory field: If checked, the field must be filled/checked by the customer to continue.
5. Mandatory field error message: If, the field is not filled/checked by the customer we will show this message.
6. Calculation:
+ Means, the amount of the Field Price should be added to the total form price.
- Means, the amount of the Field Price should be deducted from the total form price.
7. Show in: The size of your element on the form based on a 12 place grid system.

Steps Relations & Conditions
The main feature of this plugin is the ability to make relations between the form steps and allowing the customer to be redirected to the different steps according to the selections he/she makes on the form.
To make relations between multiple form steps, simply move your mouse on a step and click the Anchor icon titled "Connect this step to another step" inside the step rectangle. After clicking the Anchor icon, a dashed line will be appear under your mouse pointer that you can move it on the another step and click to make a connection between these two steps.
You can make relations between a step to several other steps and in reverse. You can also create several conditions on a connection based on the customer selections and/or total price.
According to the image below, adding conditions to the relation between step A to B means, the step B will be called only if all the created conditions are accomplished.
To add a condition, click on the 1. Add Condition button. You can also remove a condition by clicking the 2. cross icon in its row.
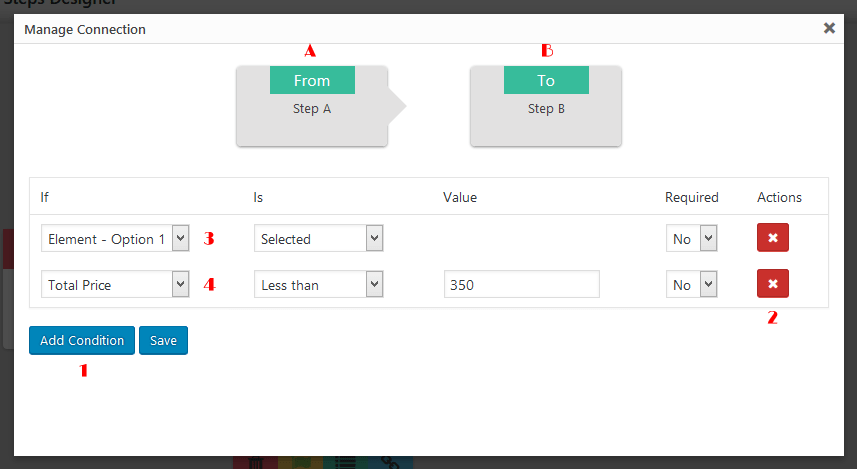
3, 4. These two conditions mean, customer will be redirected from step A to B if, "Option 1" is selected or form "Total Price" is less than 350 (website currency).
To learn more about managing steps please, read the quick start guide topic.
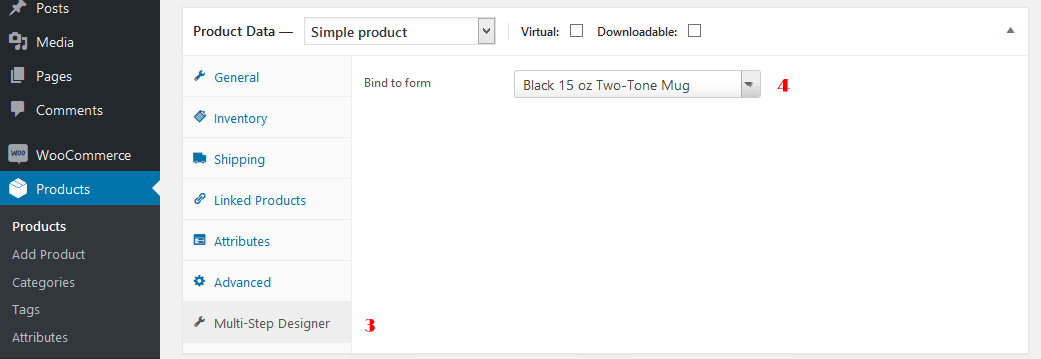
Binding Forms To Products
This plugin works with WooCommerce so, you should assign your multi-step form to a WooCommerce product/service. The product/service page will be automatically filled with the details of the multi-step form you assigned to the product and will finally be added to the WooCommerce shopping cart.
To assign a form to a product follow the steps below:
- From WordPress admin dashboard, browse to
Products. - Edit the product you would like to assign your multi-step form to, from your products list.
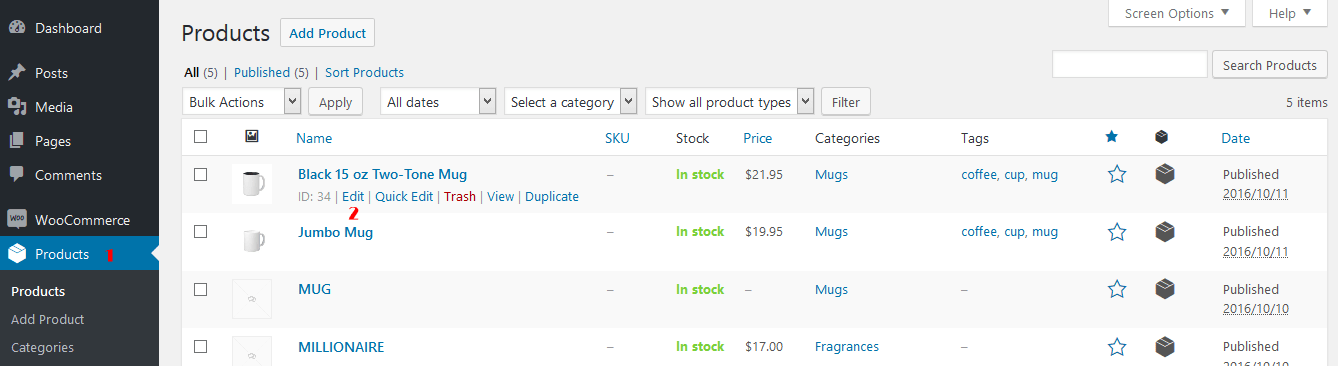
- In the
Product Datablock, selectMulti-Step Designerfrom the left tab. - Select the form you would like to assing to your product/service from the
Bind to formdrop-down list. - Do not forget to save your changes by clicking the Update button.
Default Settings
To set and configure the default settings of the plugin, from WordPress admin panel, browse to the WC Multi-Step » Settings.
The "Settings" page is containing of three different tabs.
Layout
In "Layout" tab, you can set the default layout settings for all of your multi-step forms. Additionally, you can change all these settings in each form separately that will only affects that form.

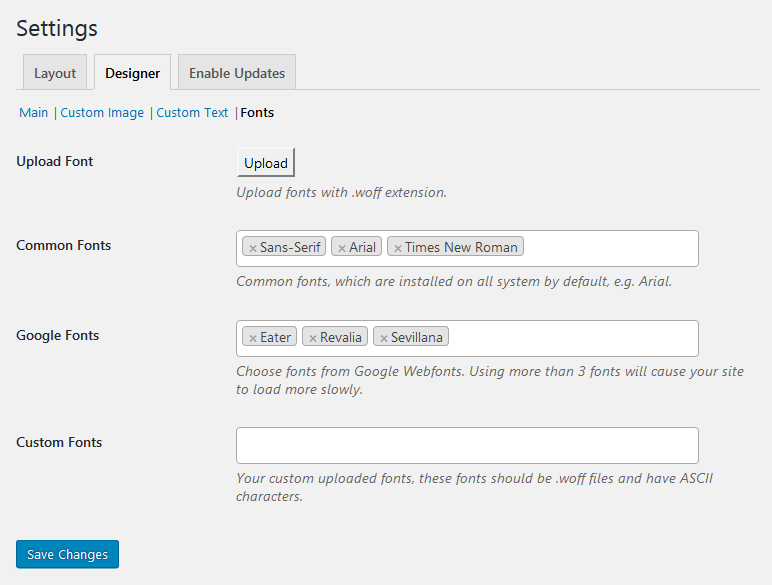
Designer
In "Designer" tab, you can set the settings for your front-end product designer. Additionally, you can change some of these settings in each design item separately that will only affects that item.

Under the "Fonts" tab, you can add any fonts you would like to use in your front-end product designer.
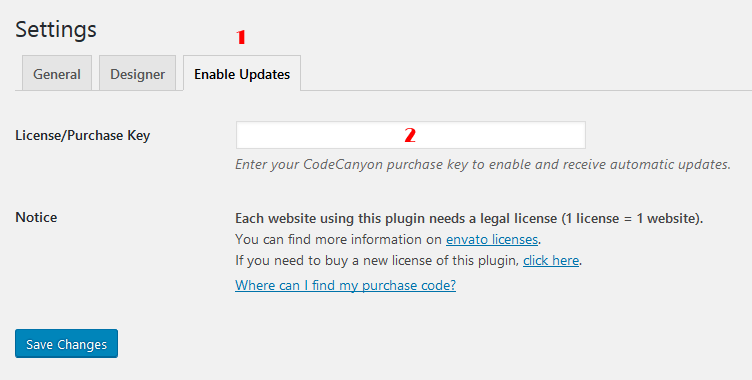
Enable Updates
To receive the product automatic updates you need to register your plugin.
Each website using this plugin needs a legal license (1 license = 1 website). You can find more information on envato licenses.
If you need to buy a new license of this plugin, click here.
Product License
To register the plugin and enable automatic updates, follow the steps below:
- From WordPress admin panel, go to
WC Multi-Step » Settingspage and selectEnable Updatestab. - Enter your CodeCanyon purchase key in the License/Purchase Key text box and Save Changes.
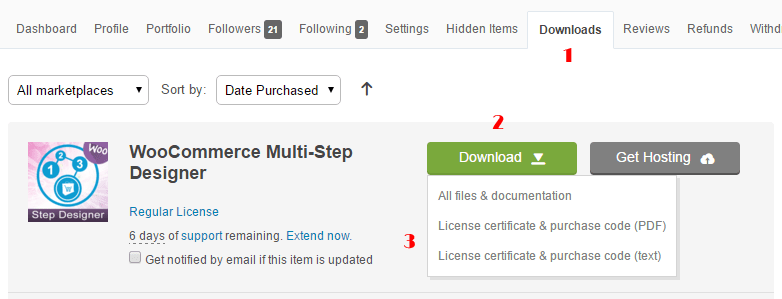
Where Is My Purchase Code?
- Login to your Envato Market account.
- Move the mouse over your username at top of the screen and click.
- Click
1. Downloadsfrom the user menu items according to the picture. - Click the
2. Downloadgreen button and click3. License certificate & purchase code(available as PDF or text file) from the drop down list.
Below is an example of a PDF License certificate and purchase code.

Translation
To translate WooCommerce Multistep Form & Product Designer to your local language:
- Download and install Poedit translations editor. Poedit is an open source program for Windows, Mac OS X and UNIX/Linux which provides an easy-to-use GUI for editing PO and generating MO files.
- Open the
wc-multistep-designer.potlocated in the/wp-content/plugins/wc-multistep-designer/languages/folder, in Poedit. - Click on the
1. Create new translationbutton.
![]()
- Select your desired local
2. languageyou would like to create a translation for and click3. OK.
![]()
- Do, your required changes on translation items.
![]()
- From the File menu, select "Save as".
- In the "Save as" window, select a name for your translation with this rule "wc-multistep-designer-<WP Locale>.po" - eg.
wc-multistep-designer-nl_NL.po, and save the file somwhere into your computer. - From the File menu, select "Complile to MO...".
- Upload the generated .po and .mo files from your computer into
<your-wordpress-site.com>/wp-content/plugins/wc-multistep-designer/languages/(WooCommerce Multistep Form & Product Designer language folder in your WordPress plugin directory) on your website using an FTP client.
To set/use your new translation on your website do the following:
- From WordPress admin panel, go to
Settings » General. - Scroll to the end of the page and select your translation language from the
Site Languagedrop-down list.
Find more info at Translate WordPress.
FAQ
Can I use the plugin in WordPress Multisite (WPMU) mode?
Yes, this plugin works with WordPress Multisite.
But, if you have encountered any problem after installation:
- Please note, you need to install the plugin in network admin section e.g. http://yourwebsite.com/wp-admin/network/plugin-install.php?tab=upload
- Try, activating the plugin in the network admin.
How many sites can I use WooCommerce Multistep Form & Product Designer on?
You need to purchase one license for each site you want to use WooCommerce Multistep Form & Product Designer on.
1 site = 1 license, 2 sites = 2 licenses, 3 sites = 3 licenses and so on.
It doesn't matter if they are all in use by the same company, on the same server, by the same developer, etc. The license terms are single use – one license per site.
Is there a developer/multi-use license for this pruduct?
Currently, the only option is to purchase an individual Regular License for each site on which WooCommerce Multistep Form & Product Designer will be used.
The CodeCanyon standard (Regular/Extended) licenses both are only for individual (single) usage. The only difference is about to charge or not to charge the end customer.
We can not also provide you with a developer/multi-use license directly as we have an exclusivity agreement with CodeCanyon that means, we can only distribute our products through them.
At this time, for every website that you have WooCommerce Multistep Form & Product Designer installed and activated on, you need to purchase an individual Regular or Extended License. 1 site = 1 license, 2 sites = 2 licenses, 3 sites = 3 licenses, etc.
For more information please read this article: http://codecanyon.net/licenses/faq
Credits
Design & Development:
- WooCommerce Multistep Form & Product Designer - Created By Axent Media - CodeCanyon license.
Third Parties
- jQuery - Released under the terms of the MIT license.
- TipTip - This TipTip jQuery plug-in is dual licensed under the MIT and GPL licenses.
- Plugin Update Checker - Released under the MIT license.
- Select2 - The MIT License.
- Bootstrap - Licensed under MIT.
- Fabric.js - MIT License.
- Spectrum Colorpicker - MIT License.
- Webfont.js - Licensed under the Apache Version 2.0 License.
- bootflat - Licensed under the MIT license.
- Font Awesome - SIL OFL 1.1, MIT License.
Changelog
= 1.2.0 - 12.11.2017 =- Adding steps details to checkout page.
- Adding steps details to account order page.
- Fixing an issue in showing uploaded images to designer element in WooCommerce 2.6
- Adding form duplication feature.
- Fixing an issue in plugin service manager.
- Fixing an issue in saving variable products attributes.
- Fixing issue of showing order details in order viewer in WooCommerce 3.1.0 version.
- Fixing images cross origin issue in designer.
- Fixing an issue in greater, greater equal, less and less equal conditions.
- First release.
Copyright © 2016 Axent Media, All Rights Reserved.