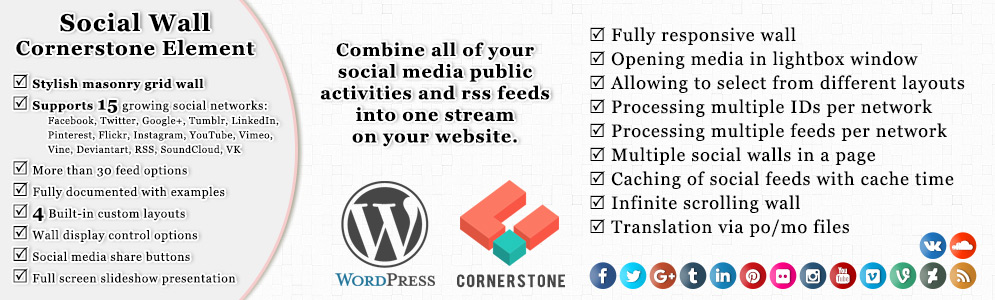
Cornerstone Social Wall
Congratulations and thank you for choosing Cornerstone Social Wall!
Cornerstone Social Wall is an element created for Cornerstone WordPress Page Builder and is the best choice for those who are looking for an easy way to share their social networking updates on their website.
This element gives you a combined social media stream for all of your social network updates, and can display them as a wall. It supports 15 and growing social networks and includes about 30 feed options.
Your visitors will be able to share your posts on Facebook, Twitter, Google or Linkedin from your wall. They will also get the links to reply, retweet or favorite the Twitter posts from your wall. They can even filter your social wall by social network.
You can also change the style of your wall using the display options and/or custom CSS stylesheets, and make it unique to your website.
![]()
Cornerstone Social Wall
Created By: Axent Media
Created On: 09 February 2019
Version: 2.0.0
If you have any questions or suggestions concerning to Cornerstone Social Wall Element, please contact us via our page on CodeCanyon http://codecanyon.net/user/axentmedia or via our website at http://axentmedia.com/support/
Note: We provide free installation and configuration for clients. After purchase, simply contact our support desk and provide us your website information to get this service for free.
Element Showcase
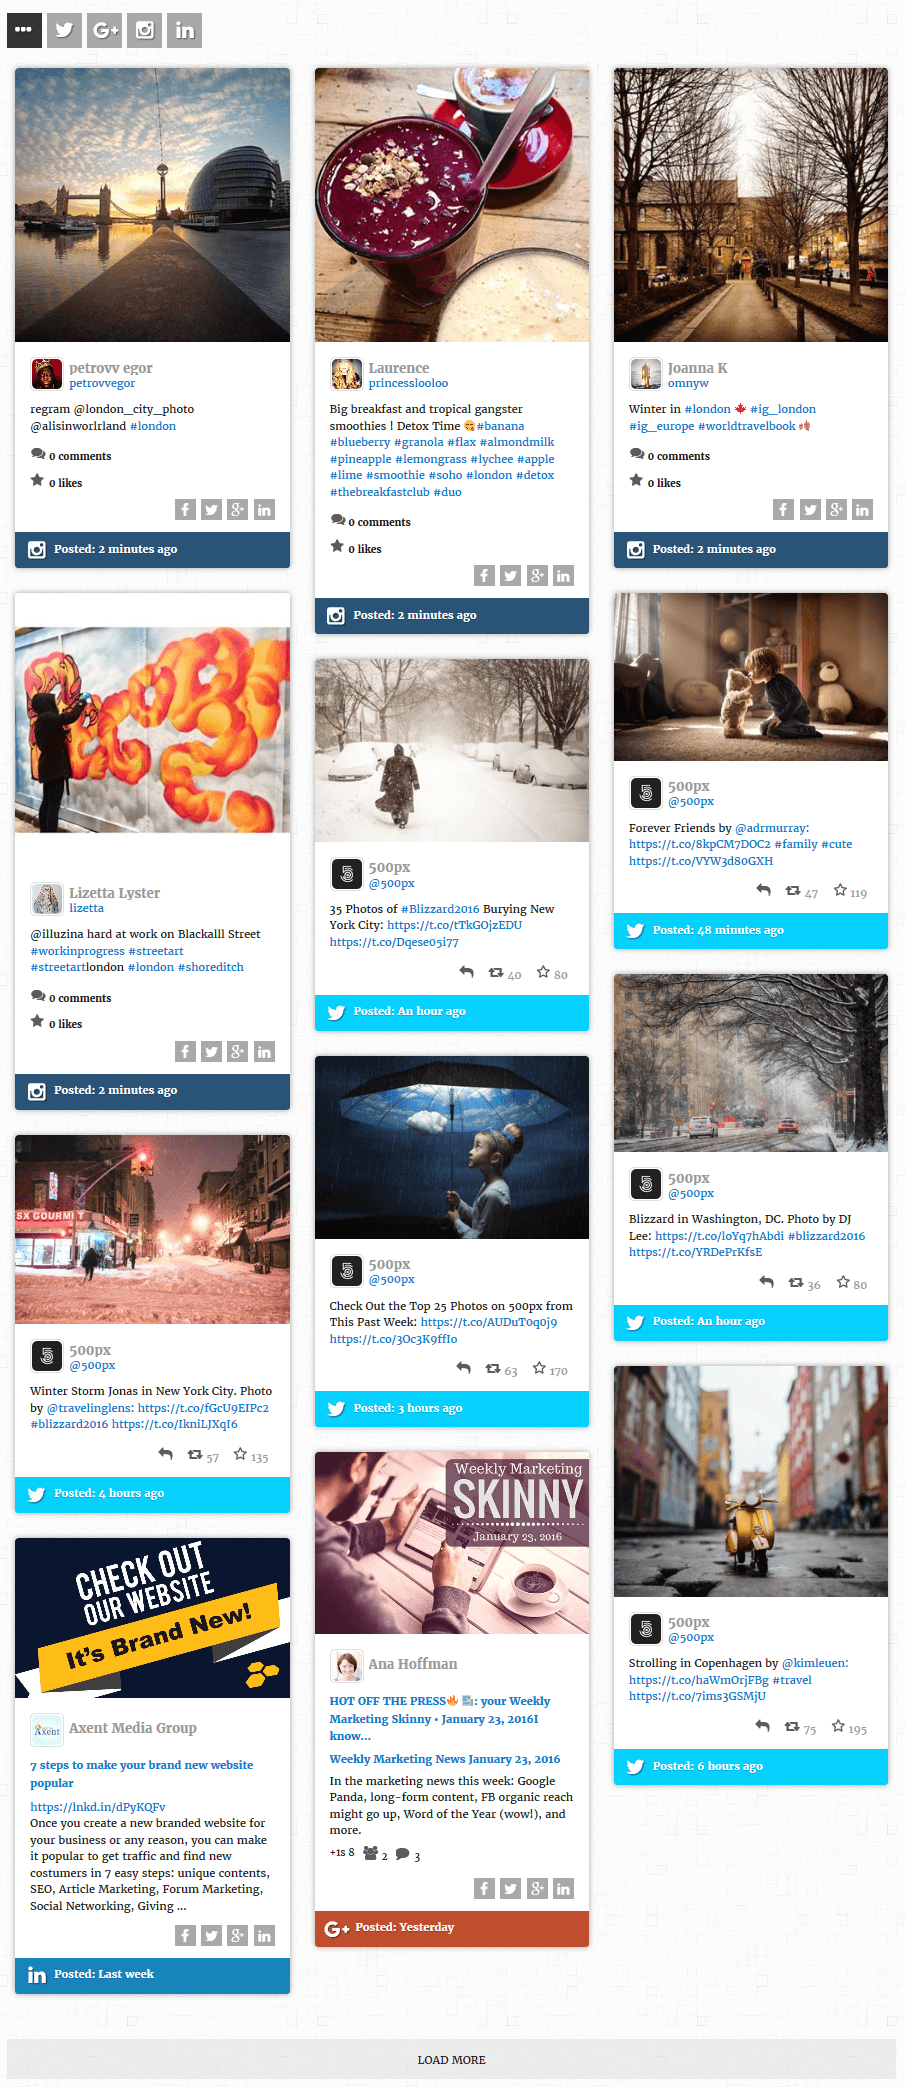
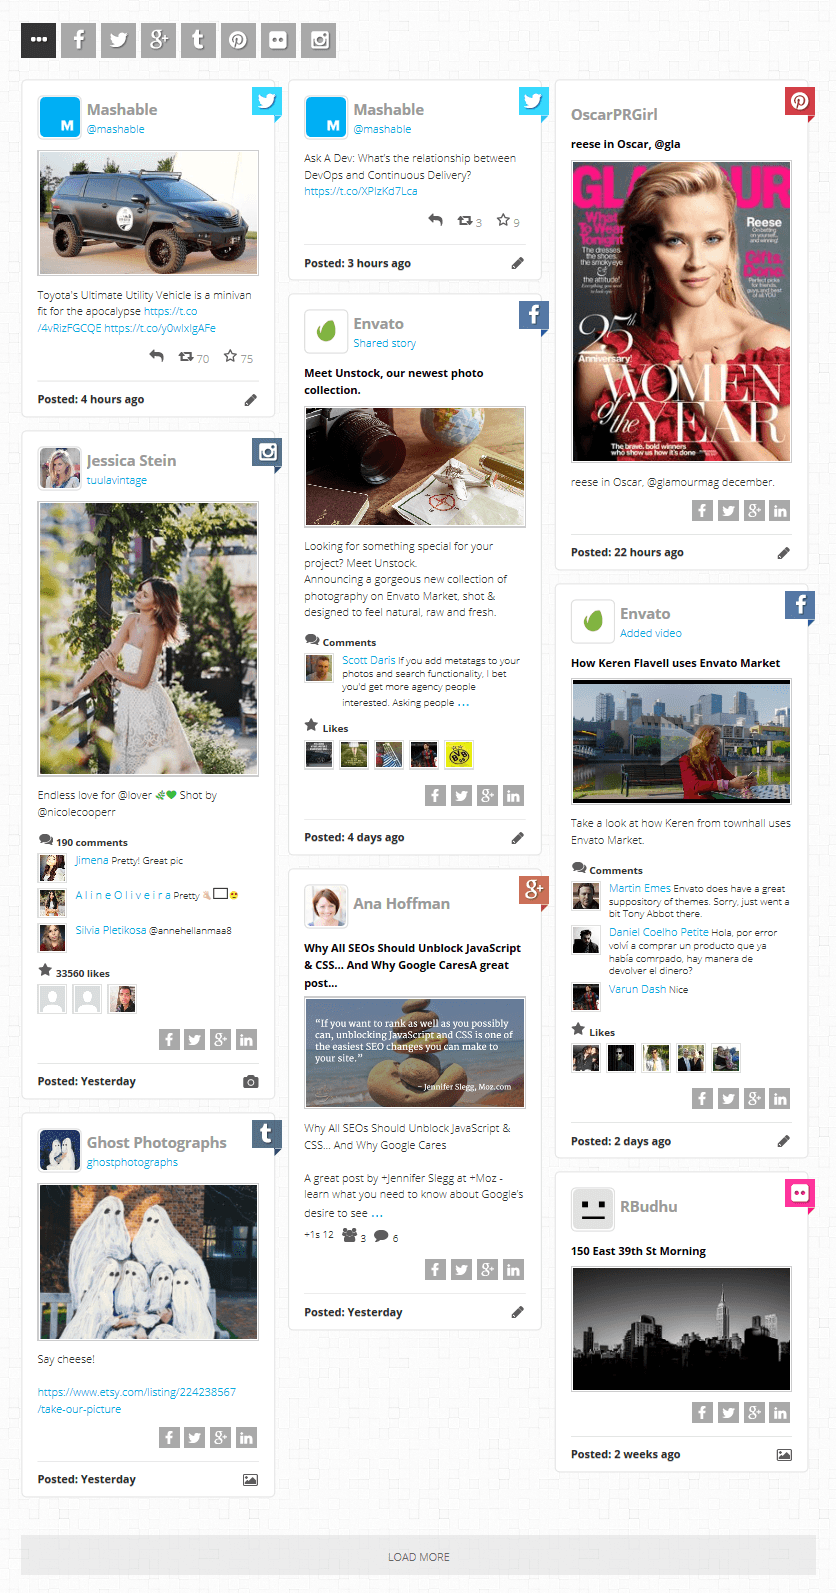
Modern layout

Default layout
Metro layout
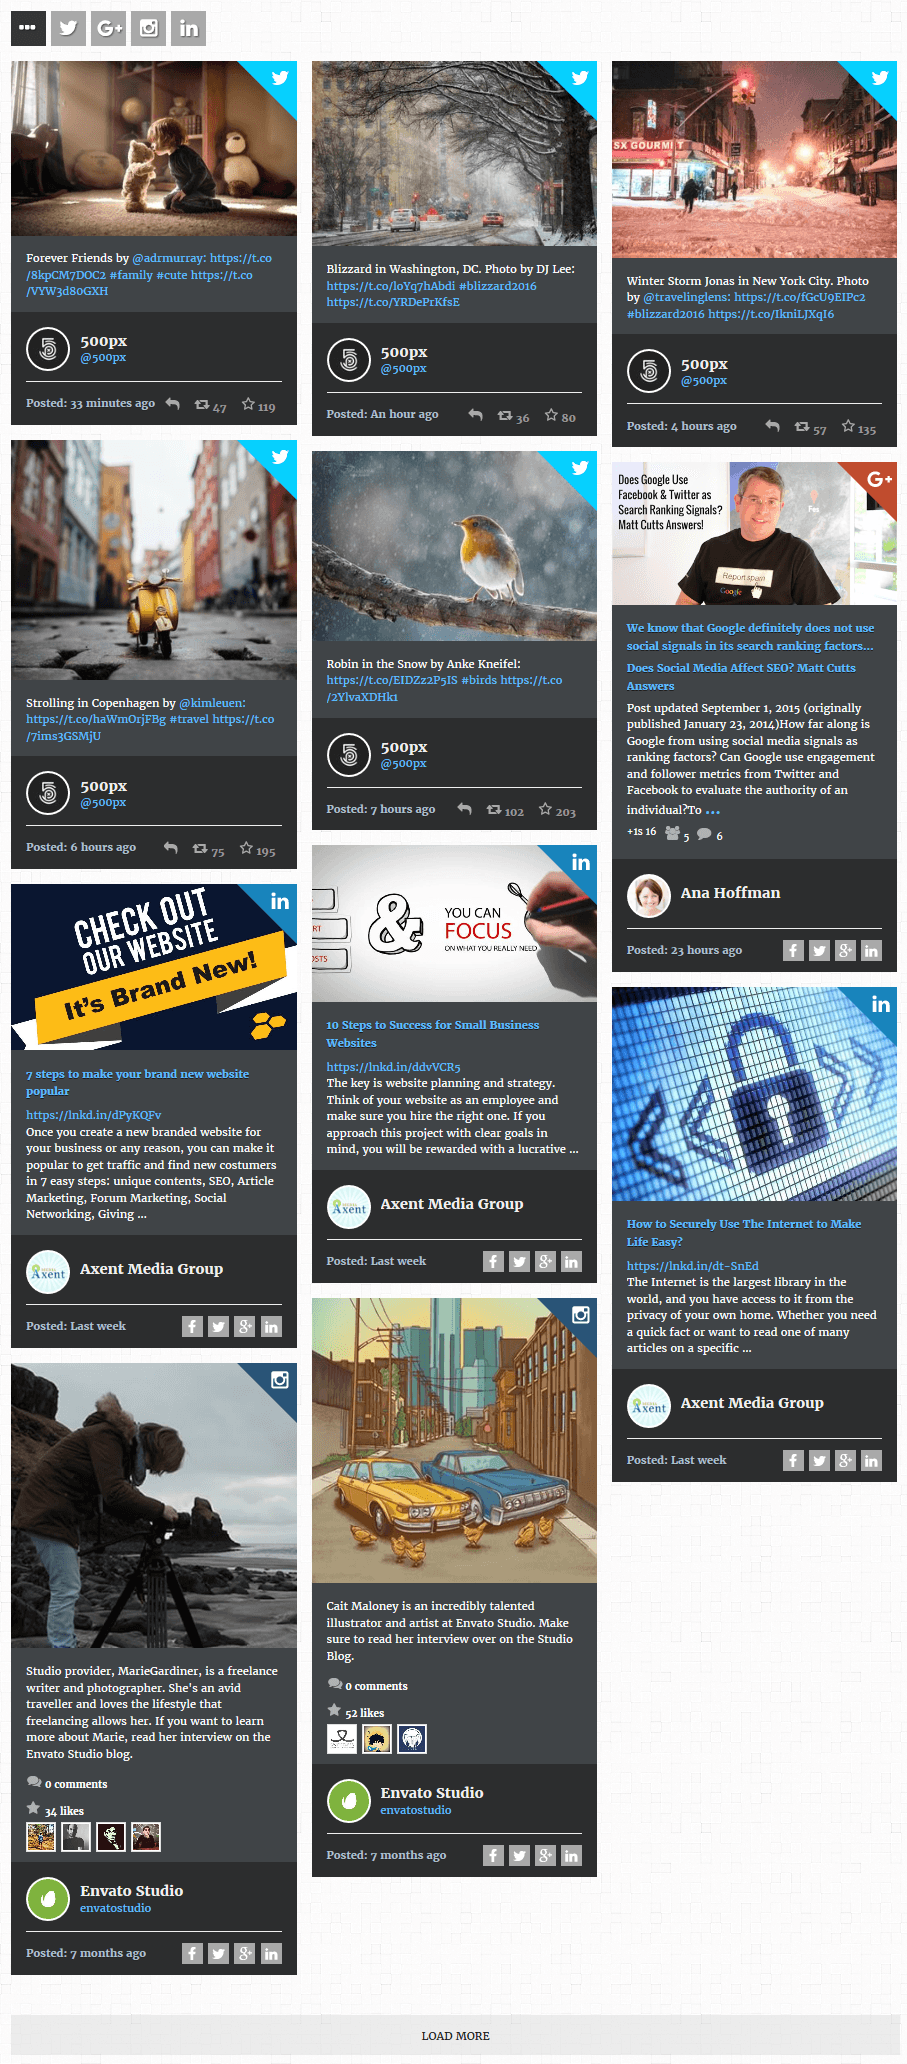
Modern centered images
Installation
This is by far the easiest way of installing a WordPress plugin.
1. First of all, unzip the main "cornerstone-social-wall.zip" file that you have downloaded from CodeCanyon into your hard drive, there is another file named "cornerstone-social-wall-x.x.zip" inside that you can use it for installation.
2. Go to your WordPress admin panel. Click on Plugins » Add New.
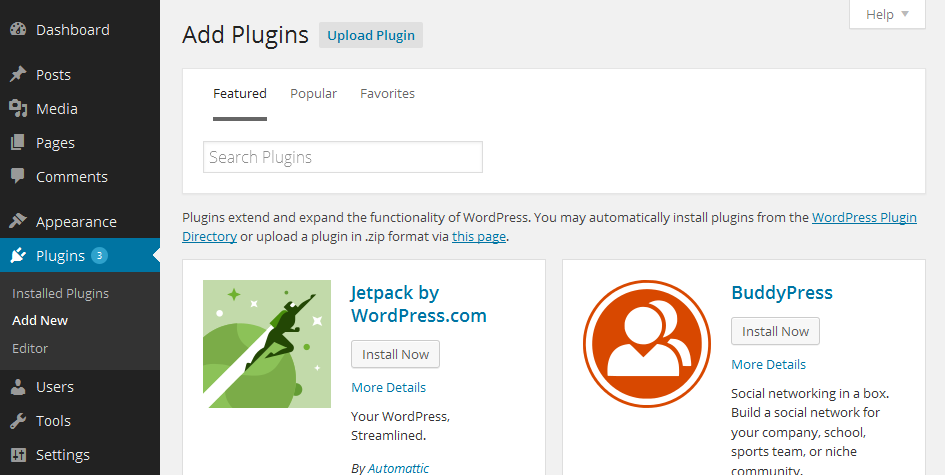
3. Then click on the Upload Plugin button.
You will see a screen like the above one.
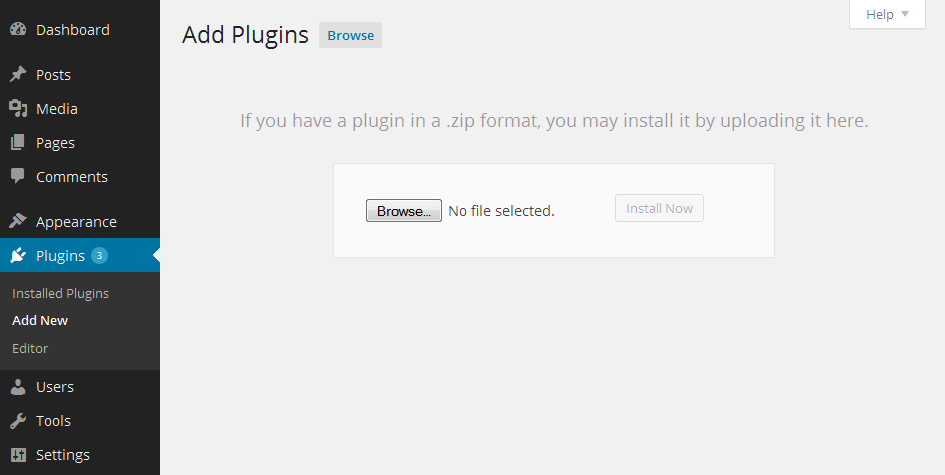
4. Click on the Browse button and select the plugin file "cornerstone-social-wall-x.x.zip" from your hard drive and upload it.
You will be taken to “activate a plugin” page just like the following screenshot:
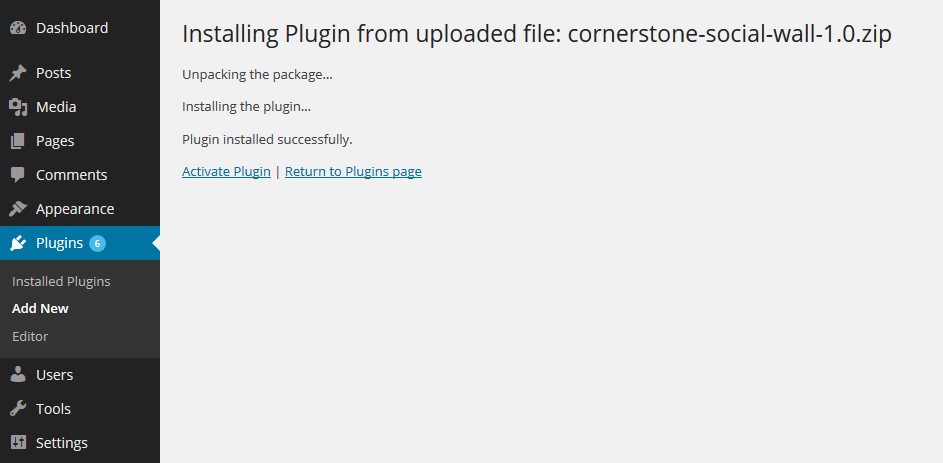
5. Click on Activate Plugin link to complete the plugin installation.
Now you have installed the Cornerstone Social Wall element. You would have to read the quick start guide, setup your Social Feeds, change the display settings, configure the wall settings and configure the API settings to fit your needs.
Upgrading the plugin
If you currently have Social Wall plugin installed on your website and you want to upgrade the plugin to a new version, follow these steps:
- Go to
WP Admin » Plugins, Deactivate and Delete your last "Cornerstone Social Wall" installation. - Install the new plugin using the "cornerstone-social-wall-x.x.zip" new file.
Note: You will not lose any data or configurations during the upgrading process.
Quick Start Guide
After installation, you would have to create your Social Wall. Here we will explain you that how to create a Social Wall using your Facebook and Twitter feed on your website.
- From
WordPress admin panel, select the page/post you would like to add the social wall on it with Cornerstone. - From the Cornerstone panel on the left, click on
Add Sectionto create a section or select a previously created section.


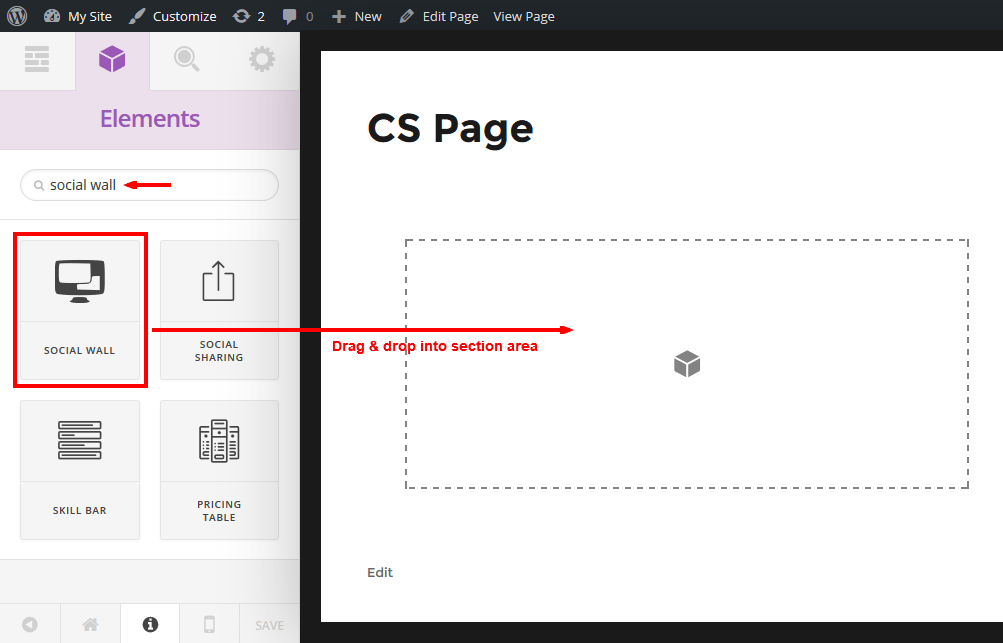
- On the Cornerstone panel, go to the
Elementstab and search for the "social wall" in the search box. - Drag and drop the
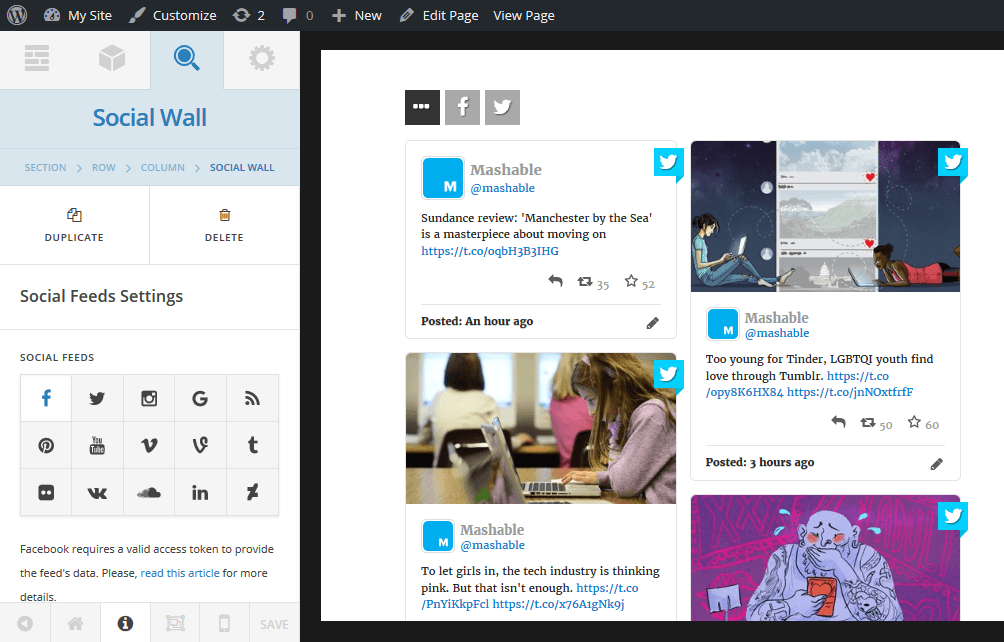
SOCIAL WALLelement into the section area and you will have the Social Wall options panel at the left hand.
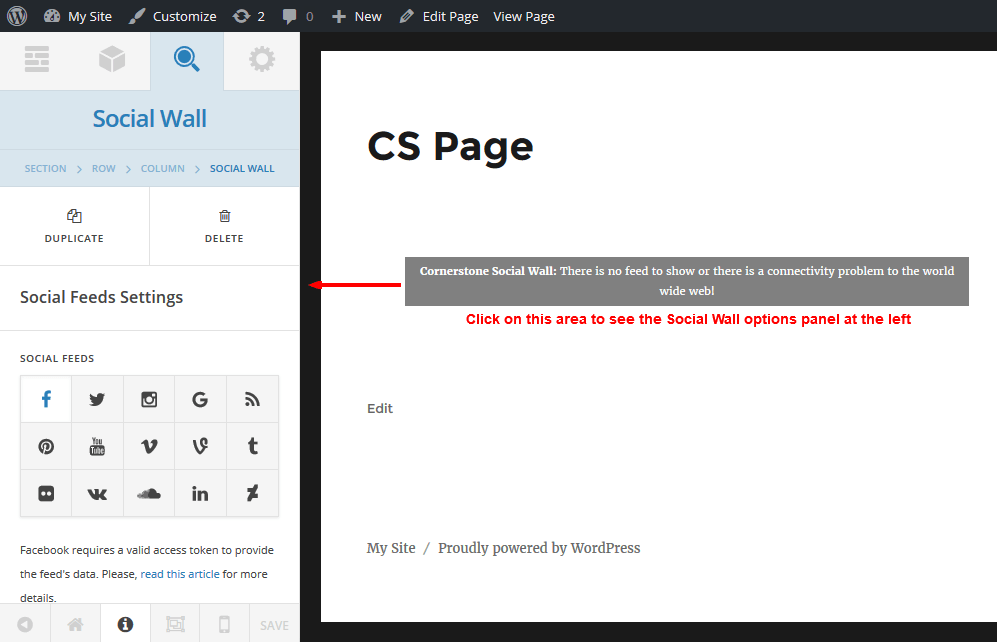
- On the
SOCIAL FEEDSsection, select the Facebook icon. You will get the Facebook feed options blow it. - Fill out the "1. Facebook Page Feed" field with your desired Facebook page ID. e.g. 624290390999239 - You can enter multiple IDs separated by a | pipe character.
- Again, from the
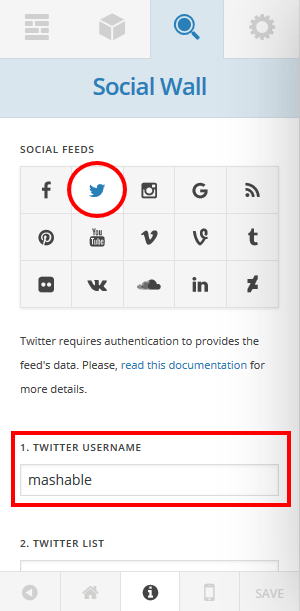
SOCIAL FEEDSsection, select the Twitter icon. You will get the Twitter feed options blow it. - Fill out the "1. Twitter Username" field with your desired Twitter username.
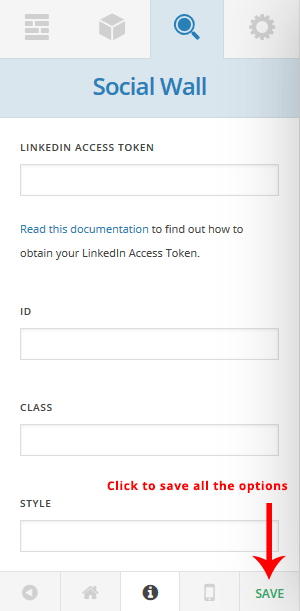
- Head over the API Credentials section/tab from the top of the Cornerstone panel.

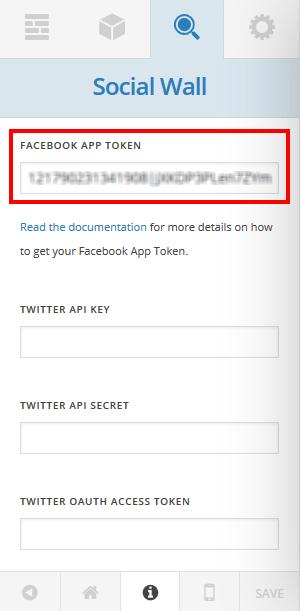
- Fill in the "Facebook App Token" field with your app token. Read this section for more details on how to get your Facebook App Token.
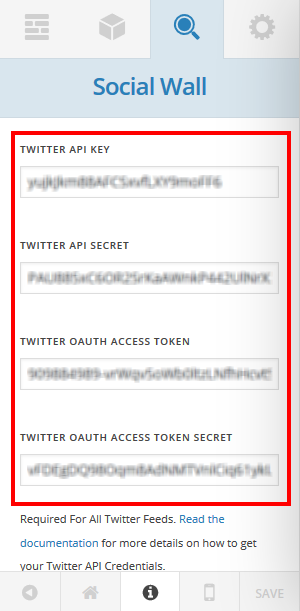
- Scroll down to the Twitter section and fill in the "Twitter API Key", "Twitter API Secret", "Access Token" and "Access Token Secret" field with your proper API credentials. Read this section for more details on how to get your Twitter API Credentials.
- At least click the "SAVE" button to save all the options.
- Your social wall is ready now. The page on the right hand refreshes on any change and you can see the result.
Click here for more information about other existing Social Feeds options.
Social Feeds Settings
Here we will explain various parts of Social Feeds Settings section and all the relevant social networks options. This section allow you to set up the networks that you want to include in your Social Wall.
To add a specific social network feed to your Social Wall, you need to declare it by going to its tab (selecting it's icon) and setup its related configuration options using an option (ID, username, search term, etc) depending on type of the network. Some social networks have multiple type of feeds available. You are required to use at least one of the options available for the social network feed to make it available in your Social Wall output.
Below is a summary of the options available for each network:
Facebook requires authentication to provide the feed's data. Click here for more details.
Facebook provides 4 different feed options:
1. Facebook Page FeedThe feed of posts (including status updates), photos and links on this page.
Enter the page ID - e.g. 624290390999239 - Multiple IDs are accepted, separate IDs by a | pipe character.
You can set here to get sets of posts published by this page, or by others, or by both on this page.
To Get Your Facebook Page/Group ID:Method 1:
You can find it in your Facebook page/group setting.
Method 2:
Obtain it from this website (Page or Group ID both).
Or, from this website (Page ID only).
Method 3:
Type in the following URL in your web browser: https://graph.facebook.com/username
Replace “username” with the name of your Facebook page profile. It should churn out a result including your page ID.
Shows all photos this page is tagged in. Enter the album ID or the page ID.
To find a Facebook album ID:Browse to your Facebook photos page and click on Albums - e.g. https://www.facebook.com/envatomarket/photos_stream?tab=photos_albums
Select an album - e.g. https://www.facebook.com/media/set/?set=a.676459932448951.1073741828.624290390999239&type=3
The album ID is the first set of numbers - in the example above, the album ID would be - 676459932448951
Shows all videos this page is tagged in. Enter the page ID.
Image widthSelect the image width for Facebook gallery album posts. If the selected size was not available, a smaller size will be selected.
Date/Time range (since-until)Get posts that are published within a certain date/time from Facebook feed.
Twitter requires authentication to provide the feed's data. Click here for more details.
Twitter provides 3 different feed options:
1. Twitter UsernameTwitter user latest Tweets - Twitter account should not be set as “Protect my Tweets”!
Enter a Twitter username without “@” - e.g. envato - Multiple usernames are accepted, separate usernames by a | pipe character.
To find your Twitter username, browse to your Twitter page - e.g. https://twitter.com/axentmedia
The Twitter username is the last word in the URL - in the example above, that would be - axentmedia
To use a Twitter list use one of the following methods:
Method 1:
Enter the list ID - e.g. 123456
Method 2:
Browse to the Twitter list - e.g. https://twitter.com/mashable/lists/social-media
Enter the owner screen name, then “/” followed by the list slug - using the example above, that would be - e.g. mashable/social-media
To search enter the search terms/hashtag - e.g. socialmedia
Select the image width for Twitter images.
Extra Feed DataSelect the types of extra data you would like to be included in your Twitter wall output.
Tweet ID range (since-max)Get posts in a certain ID range from Twitter feed.
How to find a specific tweet ID?
- Go to the Twitter home page at http://www.twitter.com/. If you are already logged in, you will be redirected to your Twitter page. Otherwise, login to your twitter account, which will also take you to your Twitter page.
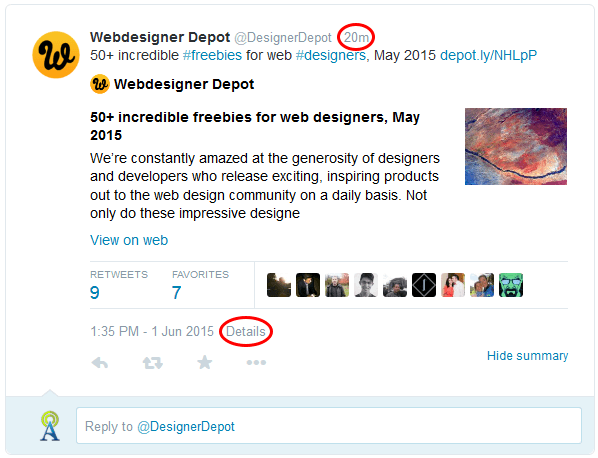
- In the list of all tweets, find the specific tweet for which you wish to grab the ID.
- There is a date/time stamp underneath each tweet as pictured above. Click that date/time stamp.
- This will take you to the page for the single tweet. The URL displayed at the top of your browser will look something like this:
https://twitter.com/DesignerDepot/status/605472728351707136 - The tweet ID is the last set of numbers in the URL - in the example above, that would be -
605472728351707136
Instagram requires your API Access Token to provide the feed's data. Click here for more details.
Instagram provides 4 different feed options:
1. Instagram User Feed
Get the most recent media published by the owner of the Access Token.
Enter self => To get the feed from owner of the Access Token that is set in Board Settings and/or Access Token string => extra Access Token from another Instagram account you want to get its feed.
To search by tag enter the tag name - e.g. wordpress
To show the latest posts by a location, enter the location ID.
4. Instagram geographical locationTo search by geographical location start with the latitude, longitude and distance in meters (up to a maximum of 5000) all separated by a "," - e.g. 48.858844,2.294351,2000
- Browse to this URL: http://www.gps-coordinates.net/
- Enter your location in the "Address" field.
- Click on "Get GPS Coordinates" button.
- You will get the Latitude and Longitude of the entered location on the map.
Google+
Google+ requires an API Key to display feed data. Click here for more details.
Google+ provides 1 feed option:
Google Profile IDEnter your Google+ profile ID.
To find your Google+ profile ID:Browse to your Google+ page - e.g. https://plus.google.com/112592709425670873637
Your Google+ profile ID is the last set of numbers in the URL - in the example above, that would be - 112592709425670873637
RSS Feed
RSS Feeds have 1 feed option:
RSS feed URLRSS feed URL latest entries.
Enter the RSS feed URL - e.g. http://feeds.bbci.co.uk/news/world/europe/rss.xml
Select Snippet for displaying a summary of the post or select Full Text to include any links or images in the feed.
Pinterest provides 2 different feed options:
1. Pinterest usernameTo get a Pinterest username, browse to your Pinterest page - e.g. https://www.pinterest.com/2013TopPins/
The Pinterest Username is the last word in the URL - in the example above, that would be - 2013TopPins
To show a Pinterest board enter the username, then "/" followed by the board name.
Browse to a Pinterest board - e.g. http://www.pinterest.com/2013TopPins/techology-trends/
In the example above, you would select - 2013TopPins/techology-trends
Youtube
Youtube requires an API Key to display feed data. If you have previously generated and added an API Key for Google+ you wil not need to do it again for YouTube as they are both using the same key. Click here for more details.
Youtube provides 4 different feed options:
1. Youtube usernameYouTube user latest uploads.
Enter a YouTube username - e.g. username - Multiple usernames are accepted, separate usernames by a | pipe character.
To get a Youtube username, browse to the desired Youtube profile page - e.g: https://www.youtube.com/user/envatopsd
The Youtube username is the last word in the URL - in the example above, that would be - envatopsd
To get a Youtube playlist ID, on the desired Youtube profile page click on the Playlists tab, select and browse to a playlist - e.g: https://www.youtube.com/watch?v=z4icxr8B7ik&list=PLsBcifUwsKVXunQPoySupBM6QCcWliTKi
The playlist ID is the last set of characters in the URL - in the example above, that would be - PLsBcifUwsKVXunQPoySupBM6QCcWliTKi
To search enter the search terms - e.g. WordPress
Returns a list of videos uploaded by this channel - Enter a YouTube channel ID - e.g. UC1yP5nx6JNEBQI3ps2XFMpz
Thumbnail SizeSelect YouTube image size.
Vimeo
Vimeo requires your API Access Token to provide the feed's data. Click here for more details.
Vimeo provides 1 feed option:
Vimeo usernameTo get a Vimeo username, browse to the Vimeo profile - e.g: http://vimeo.com/bvanpeski
Your Vimeo username is the last name in the Vimeo profile URL - in the example above, that would be - bvanpeski
Size of thumbnail image.
Vine
Vine provides 1 feed option:
Vine User TimelineReturns a list of user timeline updates.
Enter the Vine username or ID - e.g. 974522892907909120.
Tumblr
Tumblr requires an API Key to display feed data. Click here for more details.
Tumblr provides 1 feed option:
Tumblr UsernameTo get a Tumblr username, browse to your Tumblr blog page - e.g. http://ghostphotographs.tumblr.com/
The Tumblr Username is the first word in the URL - in the example above, that would be - ghostphotographs
Select the width of the thumbnail image.
Video WidthWidth of inline video player.
Flickr
Flickr requires an API Key to display feed data. Click here for more details.
Flickr provides 2 different feed options:
1. Flickr User IDTo get your Flickr User ID:
- Find your Flickr photostream page URL - e.g: https://www.flickr.com/photos/ryanbudhu/
- Browse to this website: http://idgettr.com/
- Replace your Flickr photostream URL in the box and click Find and get your ID is result - using the example above, you will get -
46221135@N04
To get a Flickr group ID:
- Find your desired Flickr group page URL - e.g: https://www.flickr.com/groups/spectacular_landscapes/
- Follow the same steps that you did for the Flickr User ID but, use the Flickr Group URL instead - using the example above, you will get -
78842177@N00
Size of thumbnail image.
VK
VK provides 2 different feed options:
1. VK Wall DomainReturns a list of posts on a user wall or community wall.
Enter the user or community short address - e.g. wphelpme or, ID of the user or community that owns the wall - e.g. id999999999. Multiple IDs are accepted, separate IDs by a | pipe character.
Returns a list of posts on a user wall or community wall.
Enter the ID of the user or community that owns the wall. By default, current user ID - e.g. 99999999. Use a negative value - to designate a community ID - e.g. -99999999.
Apply filter and get specific sets of posts from VK wall feed.
Image widthSelect the image width for VK gallery album posts. If the selected size was not available, a smaller size will be selected.
SoundCloud
SoundCloud requires an API Client ID to provide the feed's data. Click here for more details.
SoundCloud provides 1 feed option:
SoundCloud User TracksThe list of tracks of the user. Enter the SoundCloud Username - e.g. mayerhawthorne
Browse to your SoundCloud page - e.g. https://soundcloud.com/axentmedia
Your SoundCloud Username is the last set of characters in the URL - in the example above, that would be - axentmedia
LinkedIn requires an API Key to display feed data. Click here for more details.
LinkedIn provides 1 feed option:
LinkedIn Company Page IDReturns a list of the company updates.
Enter the LinkedIn Company Page ID - e.g. 10354180.
Deviantart
Deviantart provides 1 feed option:
Deviantart usernameEnter a Deviantart username - e.g. abcd
API Credentials
Some networks require authentication to provide feed data.
Facebook API Credentials
In this quick guide we are going to show you how to create an App in Facebook and get the App Token. This is required for all Facebook feeds.
Method 1 (Using our online App):
- Browse to this URL: https://axentmedia.com/facebook-access-token/
- Click on Generate Access Token button.
- You will need to login to your Facebook account and authorize our Facebook App.
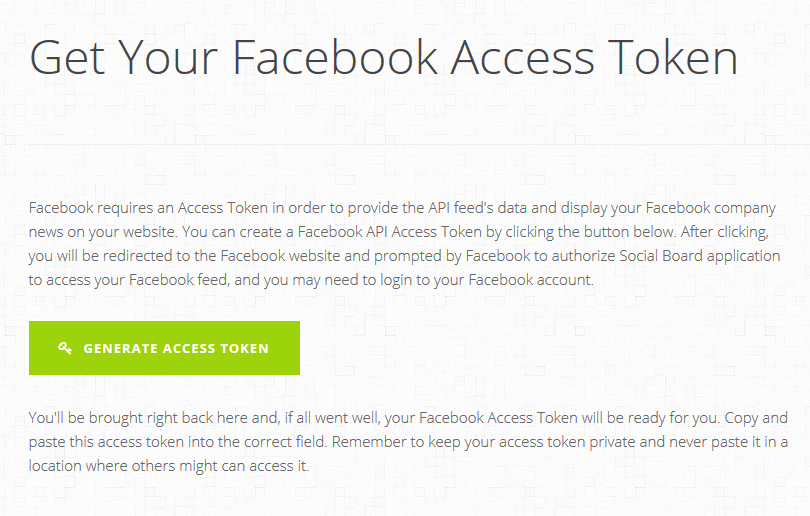
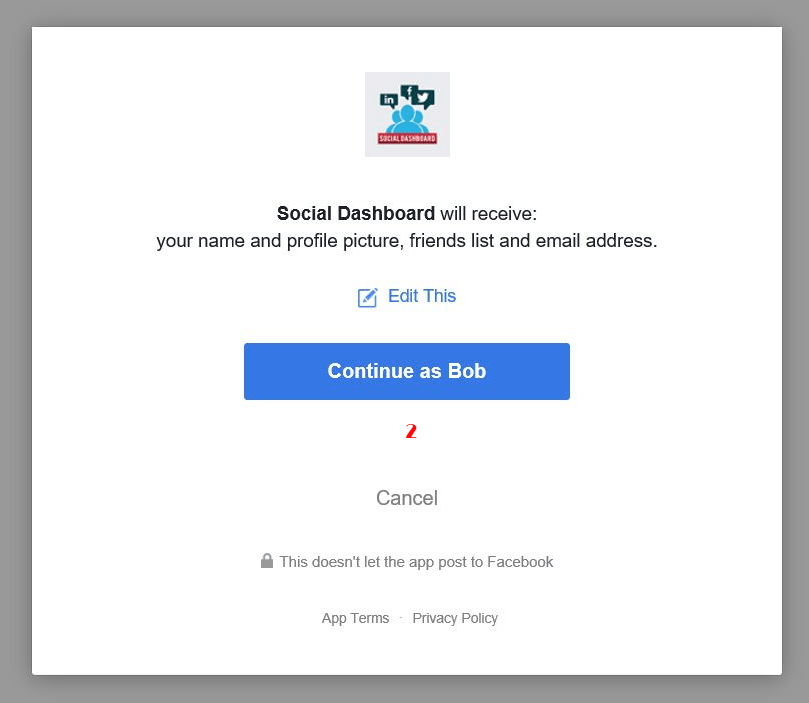
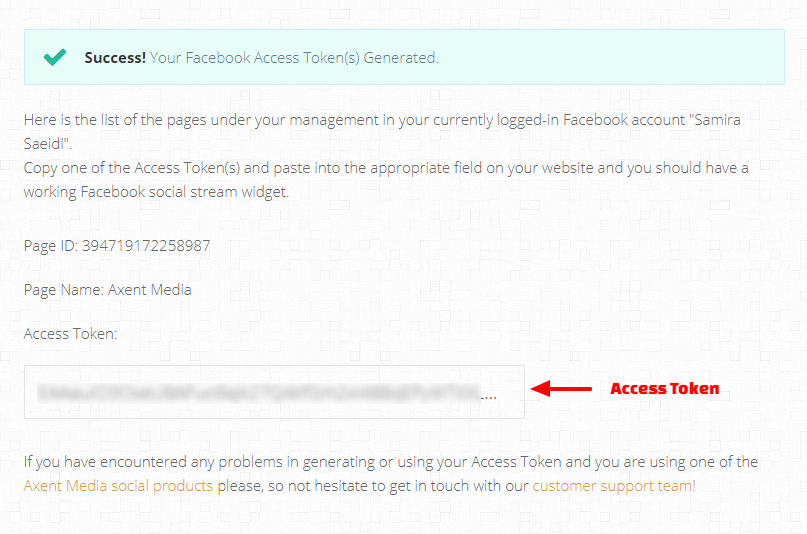
- Then, you will be redirected back to the https://axentmedia.com/facebook-access-token/ page displaying the list of your Facebook pages with Access Tokens.
- Copy one of your Access Tokens and paste into its respective field in FACEBOOK APP TOKEN.
Method 2 (Using your own App):
Attention: If you want to use this method, your app must be reviewed and approved by Facebook for the 'Page Public Content Access' permission.
- Login to your Facebook account.
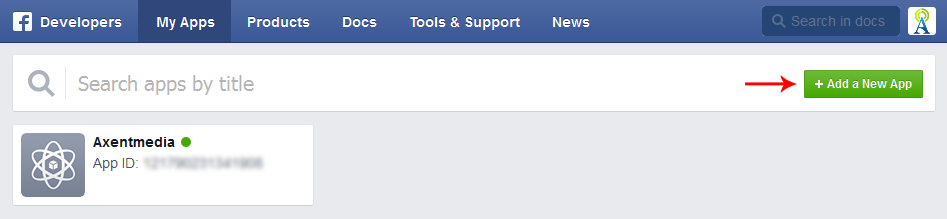
- After login, go to this link: https://developers.facebook.com/apps/ and then click on, Add a New App button.
- If you have not registered to become a developer, you should do that now by pressing the “Register Now” button on the page. It's a quick and easy process to get signed up.
- If you are registered as a developer, the “Create a New App ID” popup will be open.
- Enter a custom name in the “Display Name” input, enter your email address as “Contact Email”, choose any option for “Category” and then click Create App ID button.

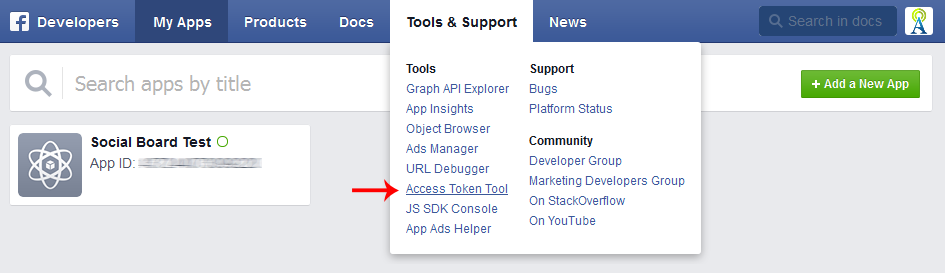
- Your App is created now. You will now get redirected to the app page automatically if not, you can browse to your app page by choosing the menu item “My Apps” from top of the page. Your page should now look something similar to the following image.
- Click on Tools & Support from the top navigation bar.
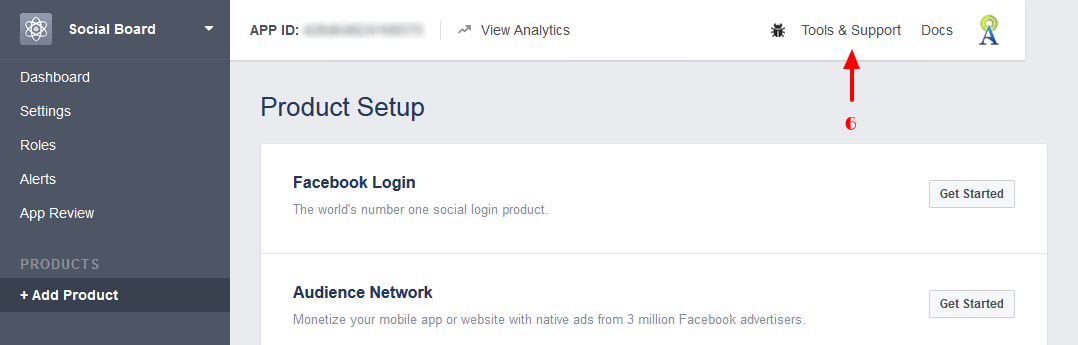
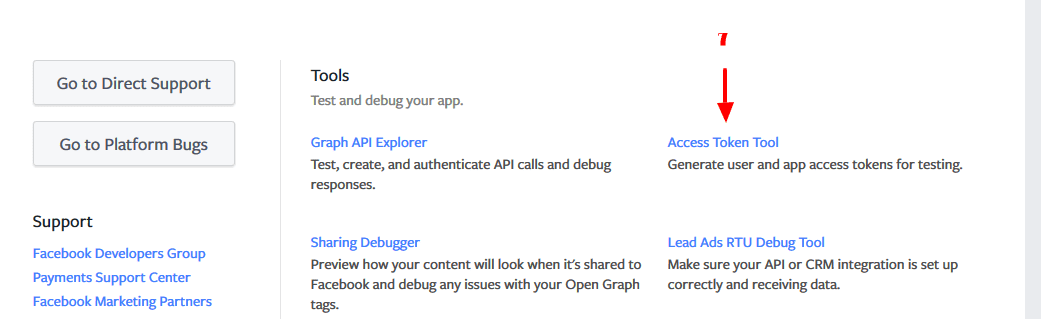
- Click on the Access Token Tool on this page or manually browse to: https://developers.facebook.com/tools/accesstoken/ page.
- On the new page that opens, you can simply grab your App Token or, you can create a User Token by clicking the "need to grant permissions" link according to the picture below and paste into its respective field FACEBOOK APP TOKEN.
- Is more secure.
- Long-lived (never get expired).
- Is only usable for getting "Public" Facebook feeds.
- Is less secure.
- Short-lived (60 days expiration time but, can get easily extended by clicking the Debug button on front of User Token on the Access Token Tools page).
- Can be also used for "Age Restricted and Private" page feeds managed by you.
Twitter API Credentials
Required For All Twitter Feeds.
Method 1 (Using our online App):
- Browse to this URL: https://axentmedia.com/twitter-access-token/
- Click on Generate Access Token button.
- You will need to login to your Twitter account and authorize our Twitter App.
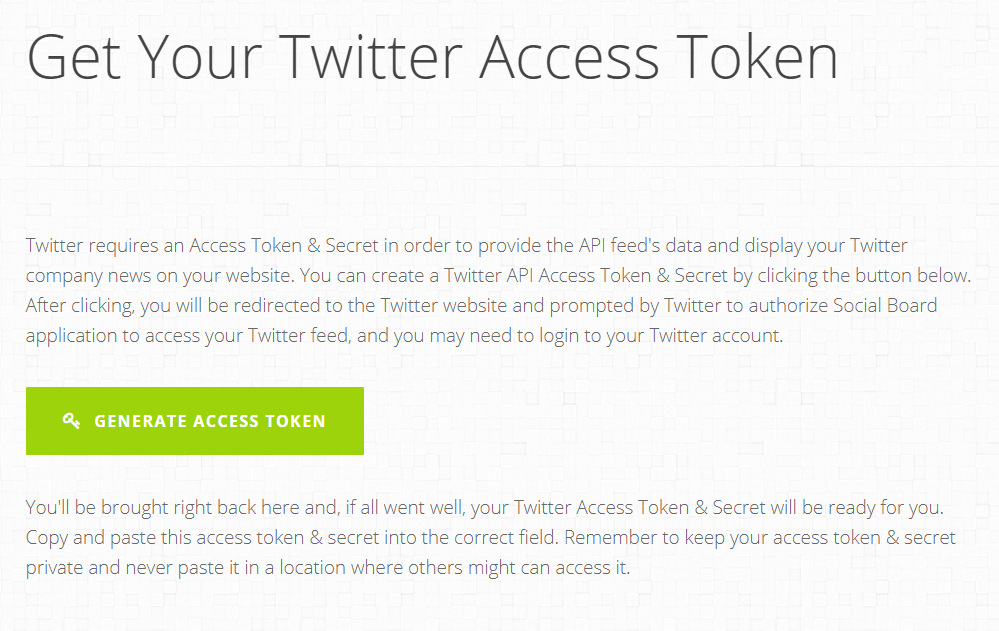
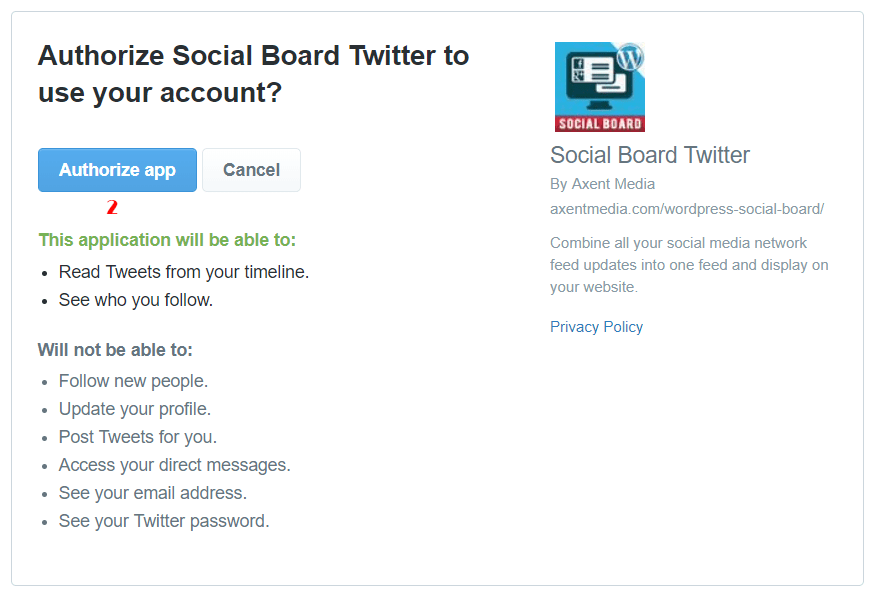
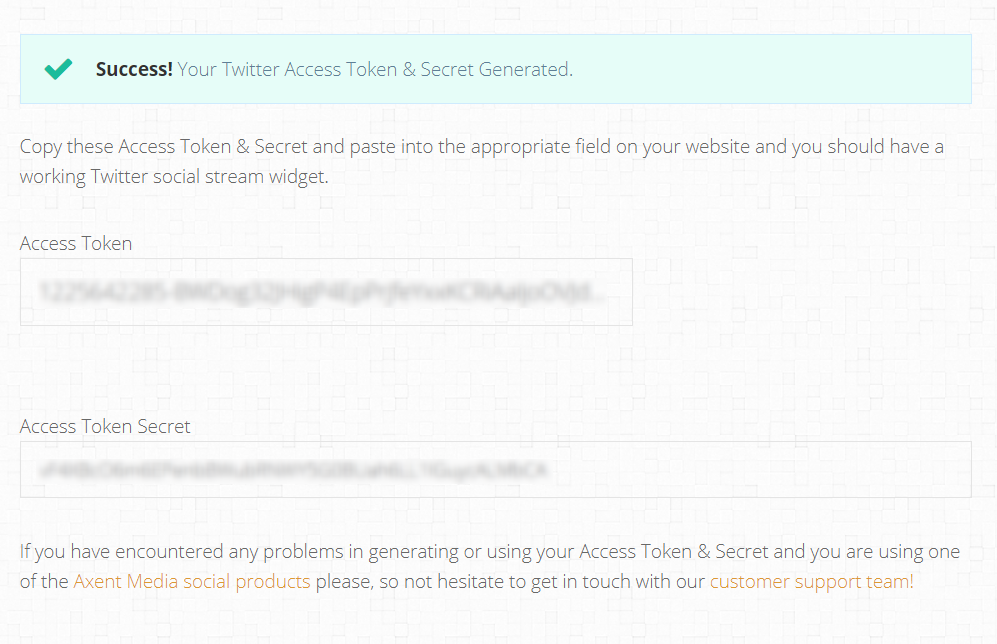
- Then, you will be redirected back to the https://axentmedia.com/twitter-access-token/ page displaying your Twitter Access Tokens.
- Copy your Access Token and Secret and them paste into their respective fields TWITTER OAUTH ACCESS TOKEN and TWITTER OAUTH ACCESS TOKEN SECRET and leave the TWITTER API KEY and TWITTER API SECRET empty.
Method 2 (Using your own App):
Attention: If you want to use this method, your app must be reviewed and approved by Twitter.
- Browse to: https://apps.twitter.com/ and sign in with your Twitter Account.
- You will be redirected to your Twitter Application Management area. Then click on "Create New App" button.
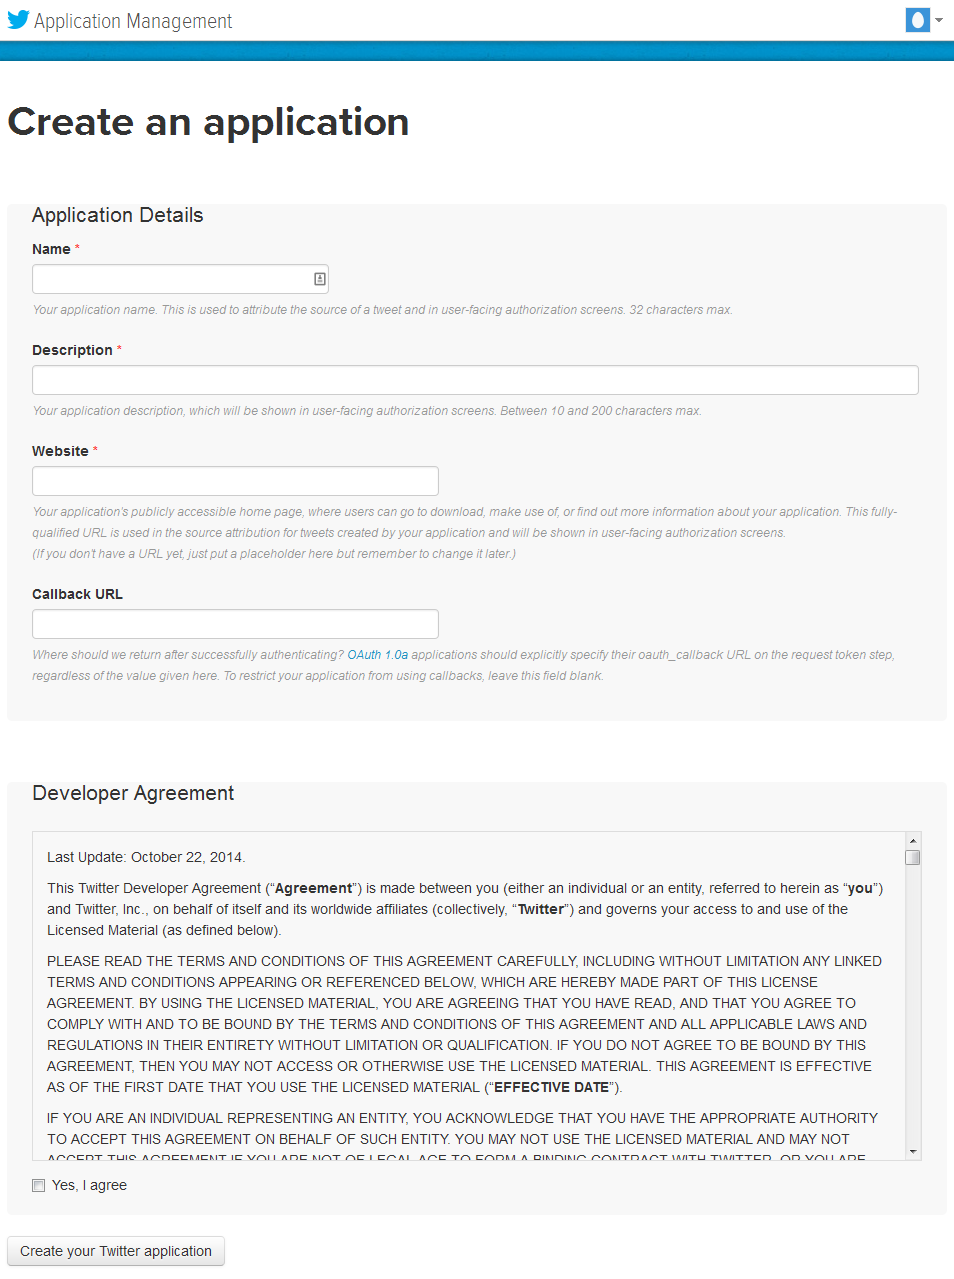
- Fill out the Name, Description & Website fields.
- Read the "Developer Agreement" and check the "Yes I agree" box.
- Click "Create Your Twitter Application" button.
After creating the Application, the Application Details page opens.
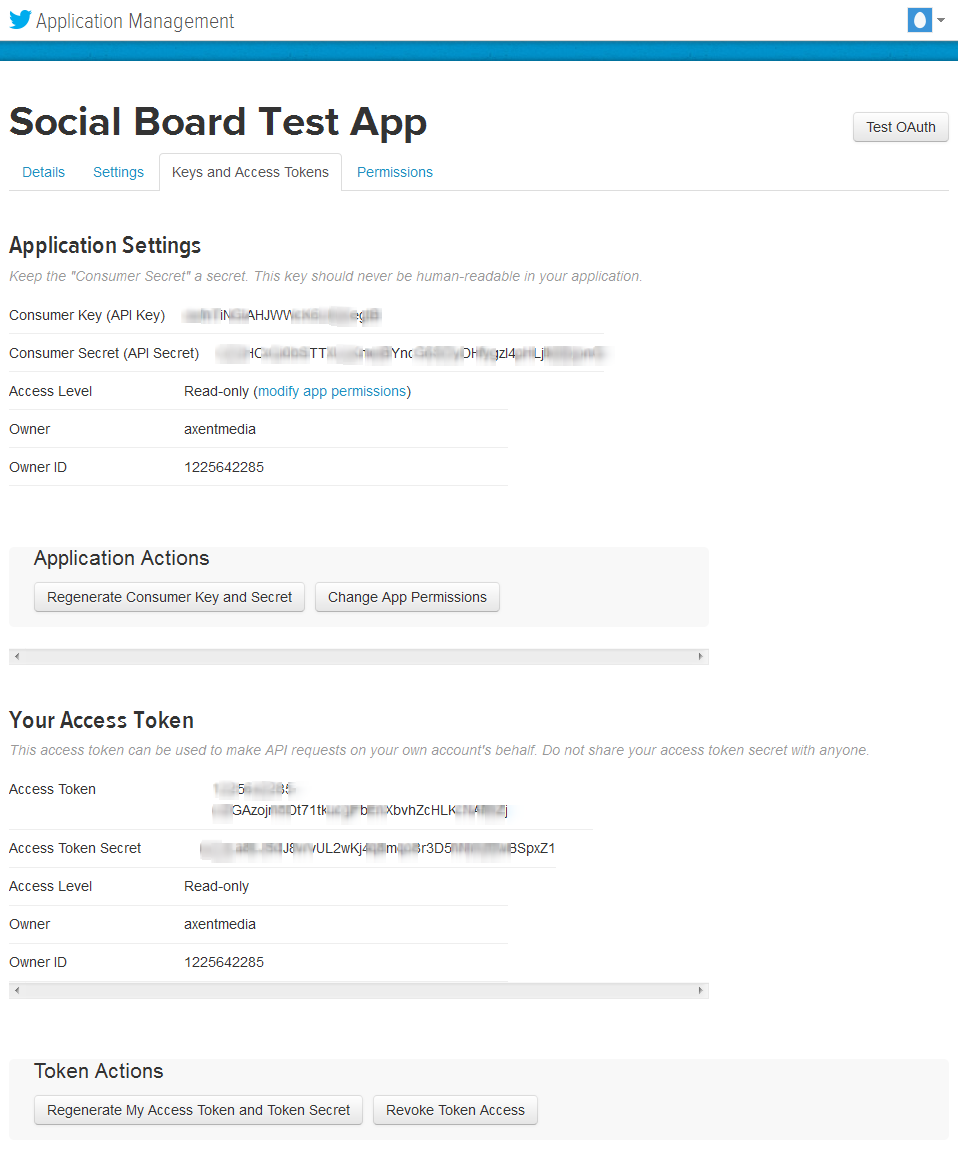
- Go to "Keys and Access Tokens" tab.
- Click on the "Generate Consumer Key and Secret" button.
- Click on the "Generate My Access Token and Token Secret" button.
Copy the API Key, API Secret, Access Token and Access Token Secret values and paste into there relevant inputs in Cornerstone config panel and the extension should now have access to your Twitter feed data.
Google API Credentials
To create and obtain your own Google API Key:
- Browse to your: Google Developers Console and sign-in with your Google account.
- A default project called "API Project" is created for you when you first login to the Developers Console. You can use that project, or create a new one by clicking the "Create Project" button at the top of the window.
- Select one of the projects in the list - e.g. "API Project"
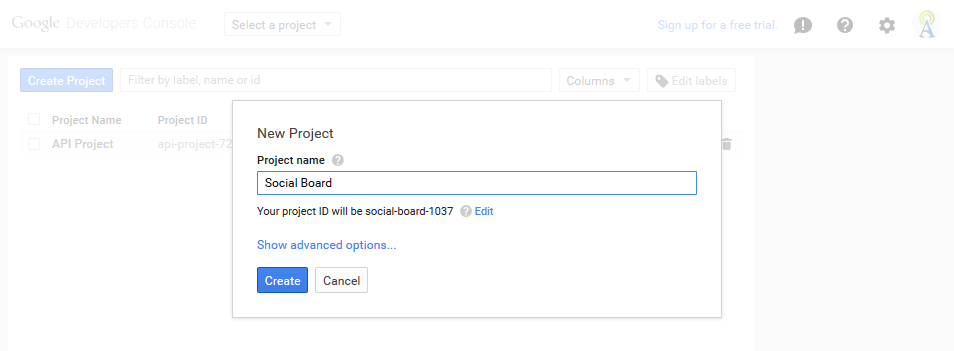
- If you select the previously created "API Project" for the first time, a popup opens asking you to set a Project ID. Click OK and continue.
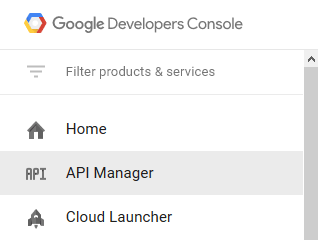
- Click the
 blue bars button and select API Manager from the left sidebar.
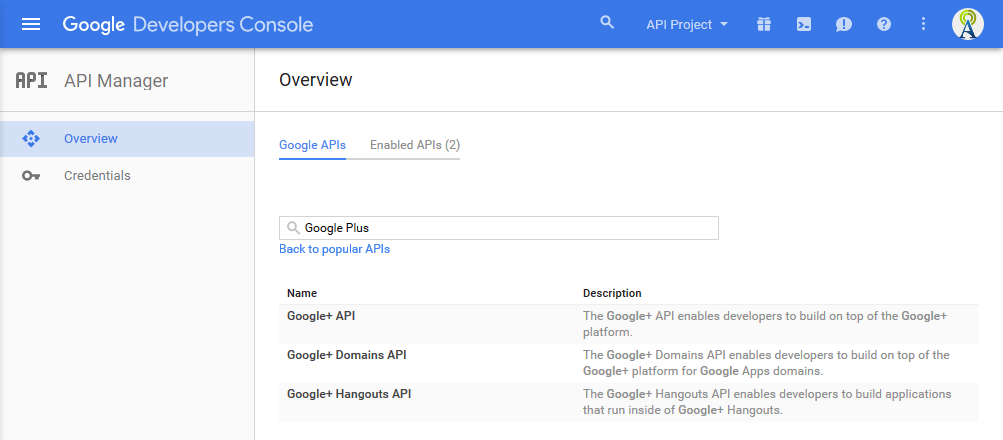
- Under Google APIs, search and click on "Google+ API".
- Click the "Enable API" button on top of the "Google+ API" page to turn it on.

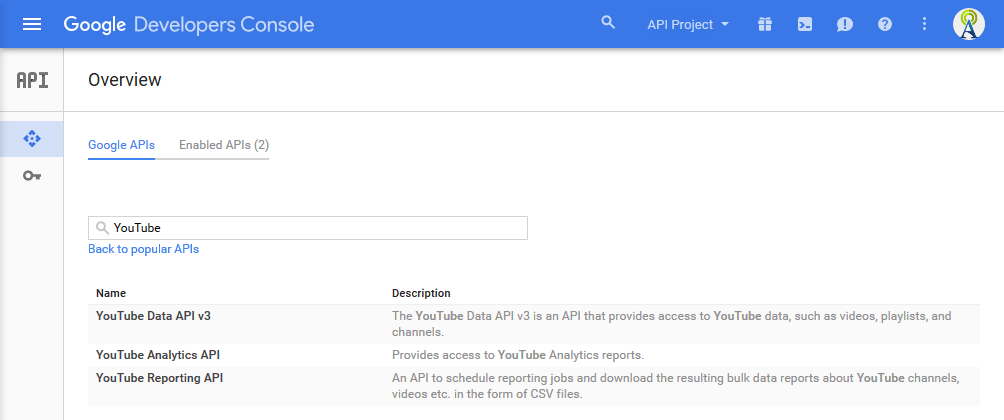
- Click back, search and click on "YouTube Data API v3".
- Click the "Enable API" button on top of the "YouTube Data API v3" page to turn it on.

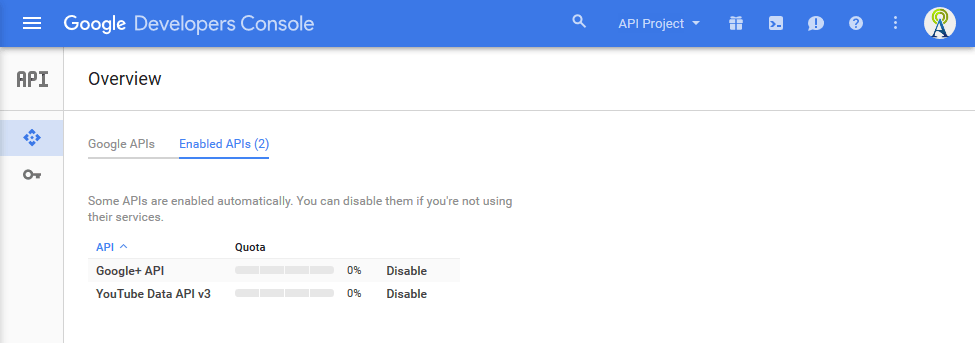
- Click back and you will have "Google+ API" and "YouTube Data API v3" under API Library tab.
- Click Credentials on the left sidebar, under Public API access, click "Create new key" button.
- Copy your API KEY and paste into its relevant input in API Credentials section.

Instagram API Credentials
To create an Instagram API Access Token, use one of the following methods:
Method 1 (Using our online App):
- Browse to this URL: http://axentmedia.com/instagram-access-token/
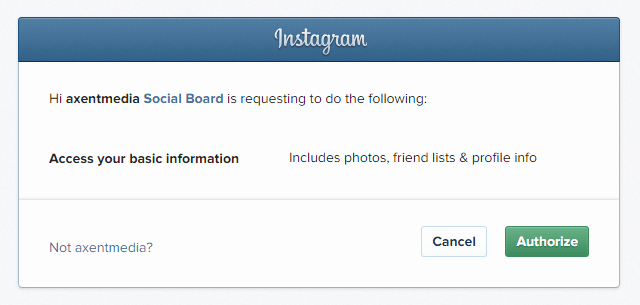
- Click on green "Generate Access Token" button.
- You will need to login to your Instagram account.
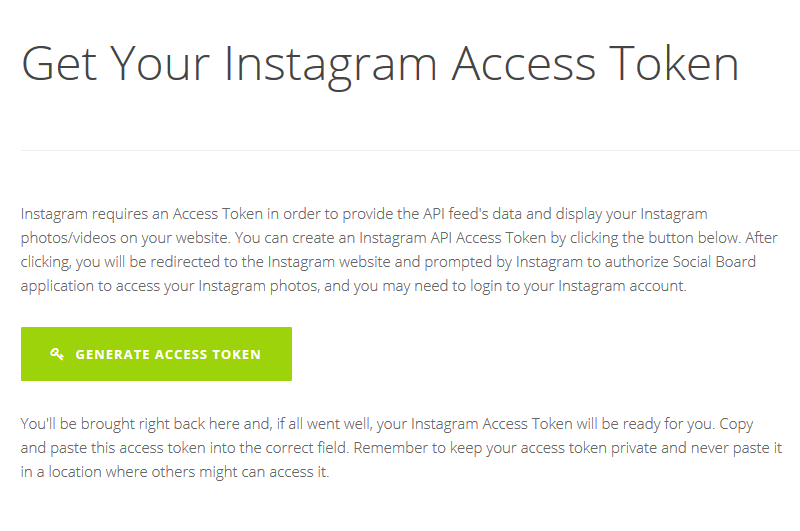
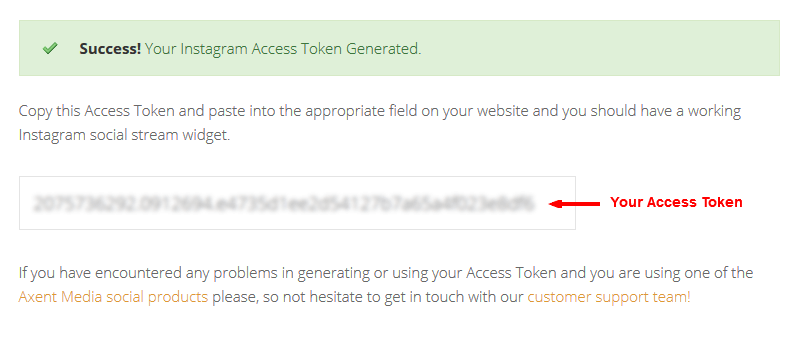
- Then, you will be redirected back to the http://axentmedia.com/instagram-access-token/ website displaying your Access Token.
- Copy your Access Token and paste into the "Instagram Access Token" field in API Credentials section or use it in 1. Instagram User Feed field to get feed result from more than one Instagram account.
Method 2 (Using your App):
If you want to use this method with any other endpoint rather than "Instagram User Feed" (users/self/media/recent), it requires your app to be approved by Instagram.
- Browse to https://www.instagram.com/developer/. Login to your account. Then click on Manage Clients, and finally click on Register a New Client.
- Fill out the required fields for registering a new Client ID.
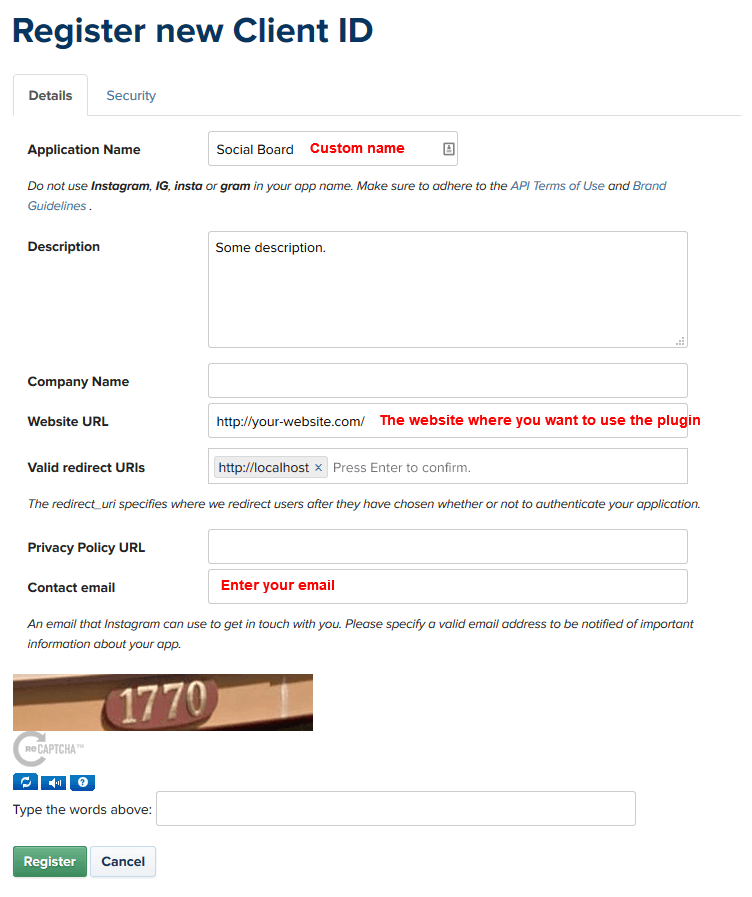
- Set the OAuth redirect_uri field to "http://localhost" (without quotes).
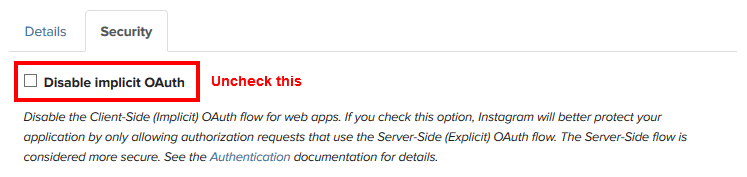
The reason you should use localhost is for security. In computer networking localhost is the web address of the computer you are using. So when Instagram redirects to your redirect_uri, all of your sensitive information is passed from Instagram's servers directly to your computer. - Go to Security tab and uncheck the "Disable implicit OAuth" box or else this method will not work.
- Once all of the fields are filled out click submit.
- Paste the following url into your web browser:
https://instagram.com/oauth/authorize/?client_id=[CLIENT_ID_HERE]&redirect_uri=http://localhost&response_type=token
and add the client id you generated to the url replacing "[CLIENT_ID_HERE]" (without quotes). - Hit enter, and you will connect to Instagram's servers. Instagram will ask you whether you want to grant the client you registered in step 2 access to your account. Once your client has been granted access to your account, Instagram will redirect your browser to your localhost and you will see a url similar to the following url in your browser address bar:

Your newly generated access token is appended to this url after localhost/#access_token= - Copy your Access Token and paste into the "Instagram Access Token" field in API Credentials section or use it in 1. Instagram User Feed field to get feed result from more than one Instagram account.
Tumblr API Credentials
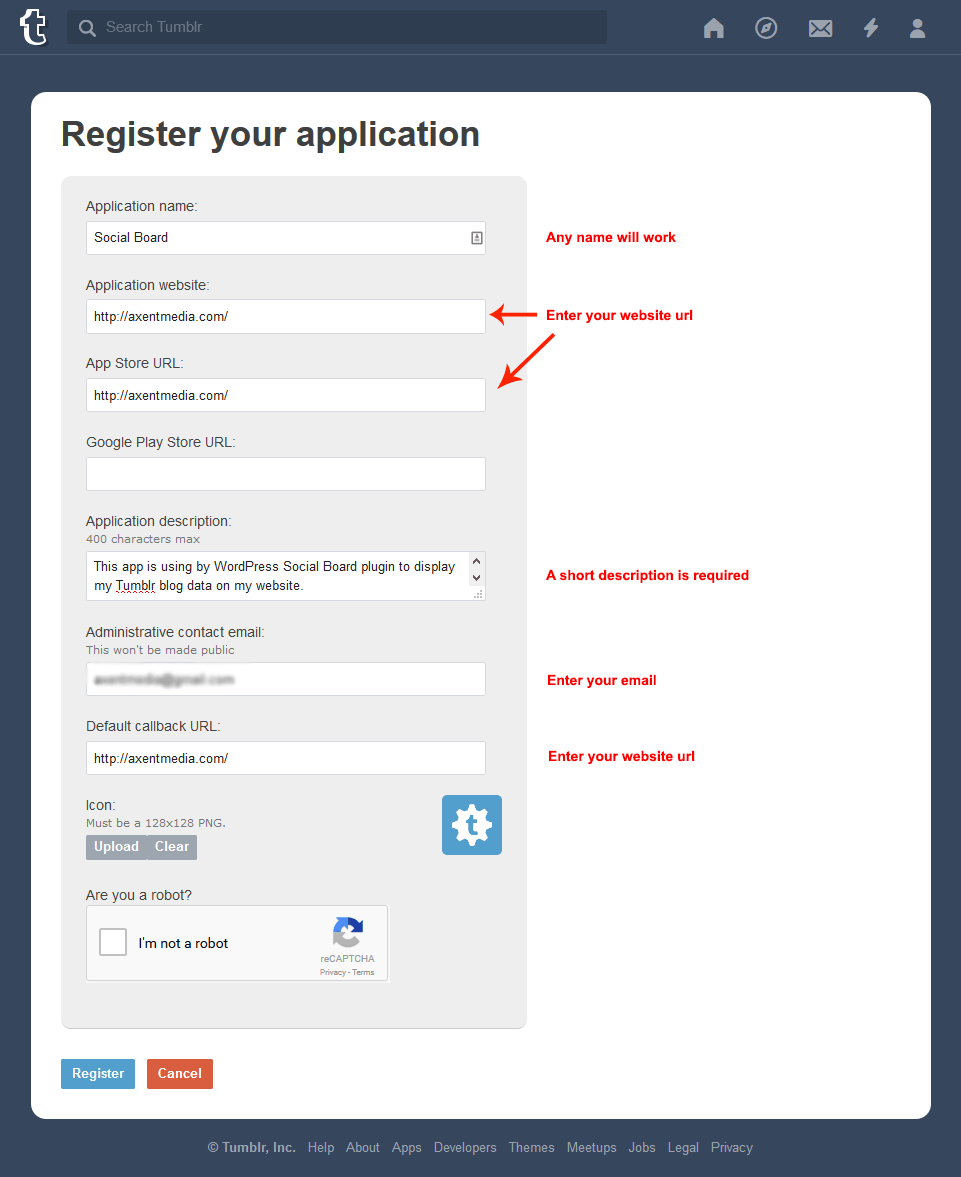
To create and obtain your Tumblr API Key:- Browse to this page: https://www.tumblr.com/oauth/register. You will be redirected to "Login" page if you are not login to your account.
- Fill out the form as highlighted below and click on Register button to complete.
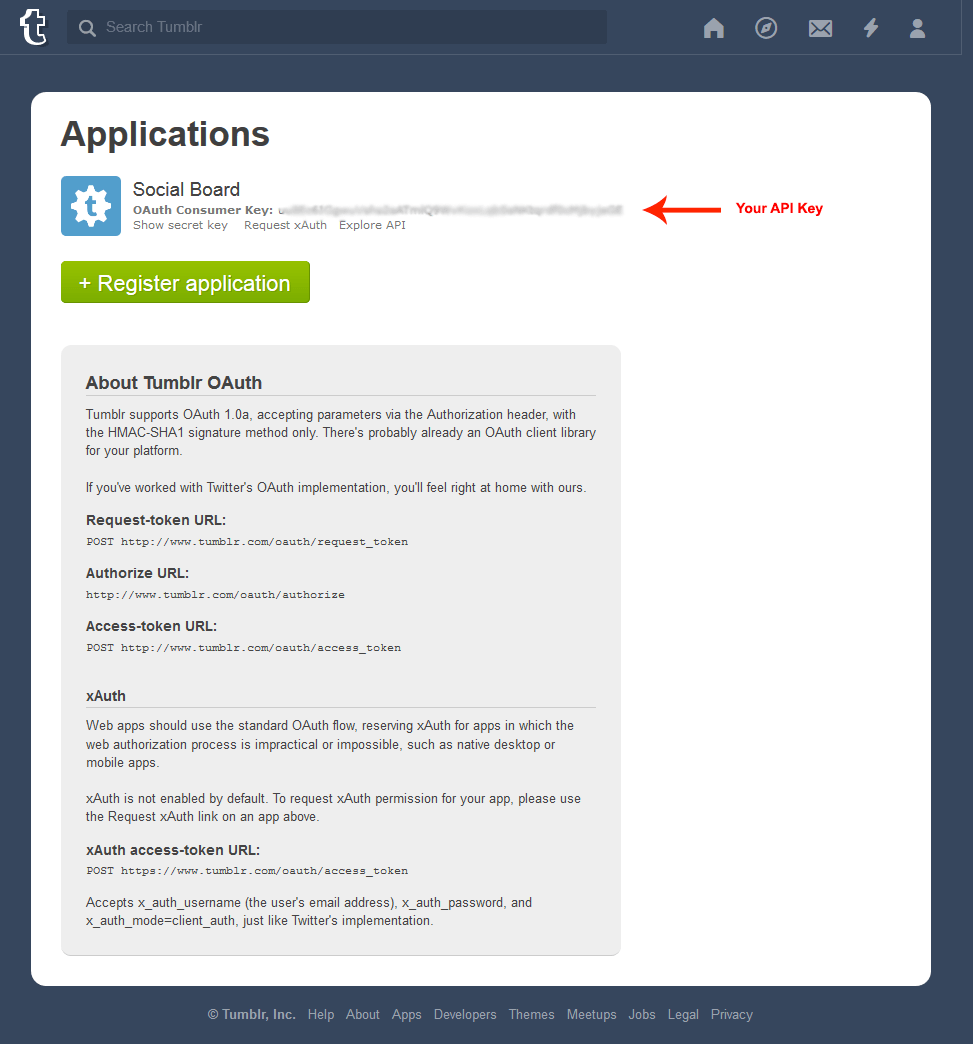
- In the next page, you will be provided with an Oauth Consumer Key and Secret Key. Copy the "Oauth Consumer Key" string and paste into "Tumblr API Key" text box in API Credentials section.
Flickr API Credentials
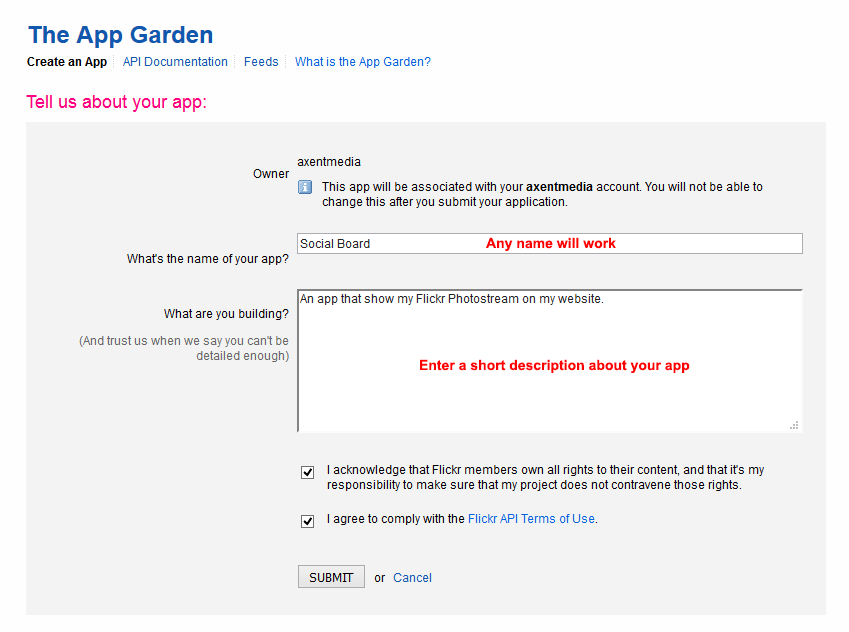
To create and obtain your Flickr API Key:- Browse to this page: https://www.flickr.com/services/apps/create/noncommercial/. You will be redirected to "Login" page if you are not login to your account.
- Fill out the form as highlighted below and click on SUBMIT button to complete.
- In the next page, you will be provided with an API Key and Secret Key. Copy the "Key" string and paste into "Flickr API Key" text box in API Credentials section.

SoundCloud API Credentials
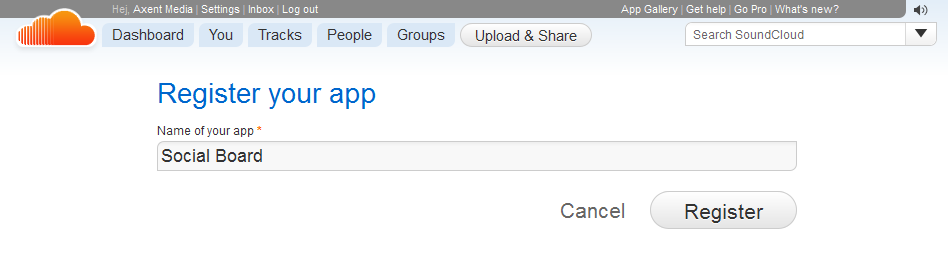
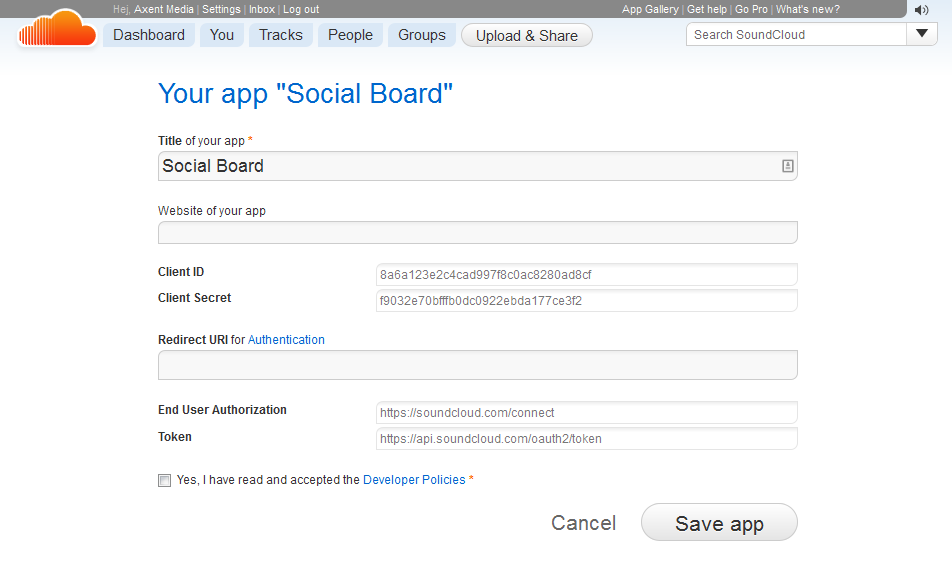
To create and obtain your SoundCloud Client ID:- Browse to this page: http://soundcloud.com/you/apps/new. You will be redirected to "Sign in" page if you are not login to your account.
- Enter a name for your app - e.g. "Social Wall" and click Register.
- In the next page, copy the "Client ID" string and paste into "SoundCloud Client ID" text box in API Credentials section.
LinkedIn API Credentials
To create and obtain your LinkedIn Access Token:- Browse to https://www.linkedin.com/developer/apps and log in, if necessary.
- Click on Create Application on top right of the page.
- Enter all required fields, you can use dummy info except Website URL, enter the URL of the website where you want to use the plugin.
- Press Submit.
- Browse to LinkedIn API console on top of the page.
- Choose OAuth2 in Authentication dropdown.
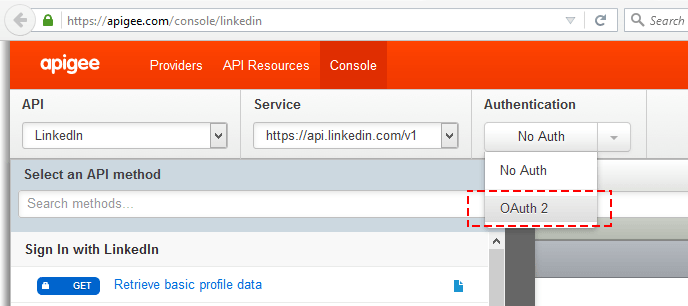
- You will be redirected to sign in screen. Sign in with LinkedIn.
- Now choose first method in list of API methods (if list is not visible click gray area on the right edge of screen)
- Click Send button on the right.
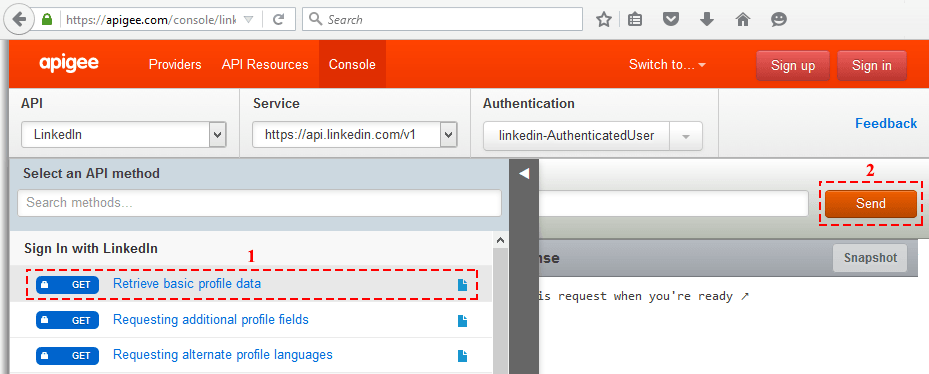
- Now you can see a URL in Request section.
- Copy the token string from URL starting after = and ending before &format=json (don't include & in token).
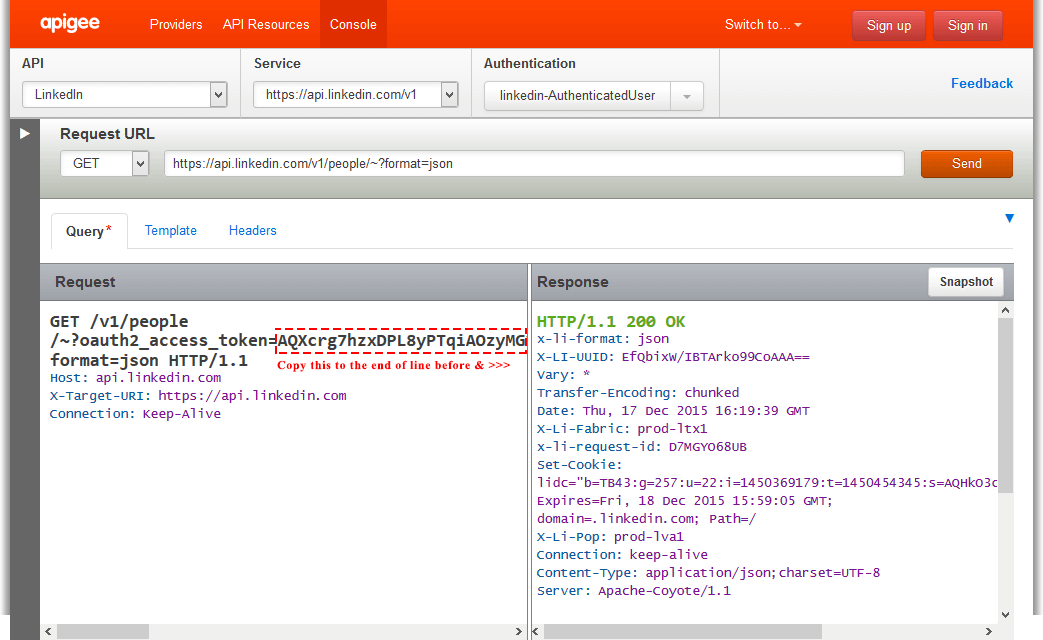
- Paste token into "Access Token" text box in API Credentials section.
Vimeo API Credentials
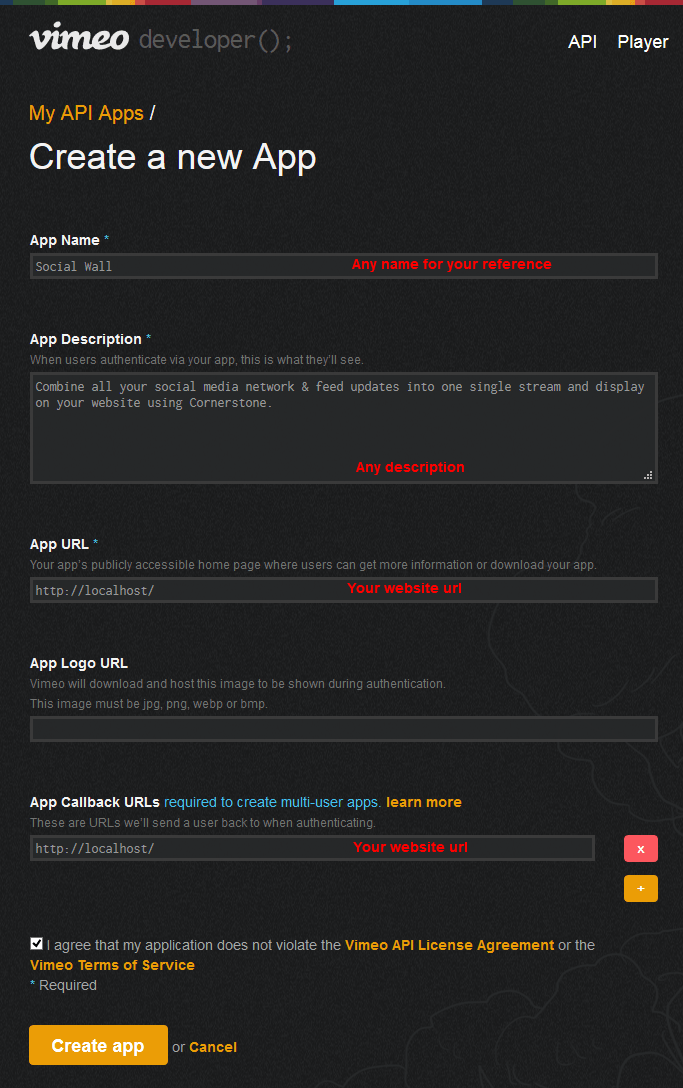
To create and obtain your Vimeo Access Token:- Browse to this page: https://developer.vimeo.com/apps/new. You will be redirected to "Sign in" page if you are not login to your account.
- Fill out the form as highlighted below and click on "Create app" button to complete.
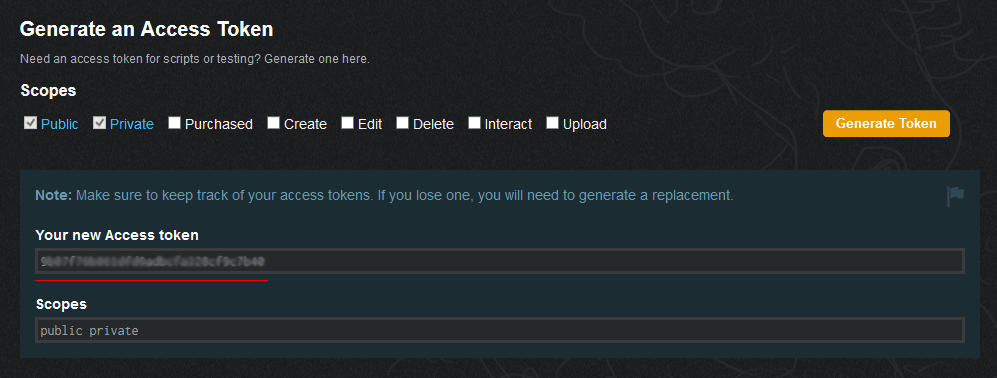
- In the next page, scroll to the end of the page where you can find the "Generate Token" button.
- Click on the "Generate Token" button and copy the "Your new Access token" string and paste into "Vimeo Access Token" text box in API Credentials section.

Wall Settings
To access the Wall Settings options, after selecting your created Social Wall element on the page, from Cornerstone panel click on the Wall Settings section/tab.
Results LimitLimiting the maximum number of results to display on the wall.
Words LimitLimiting the description words count to display for each item on the wall - Leave empty for no limit.
Comment Words LimitLimiting the comment words count to display for each item - Leave empty for no limit.
Title LimitLimit of the title words count to display for each item on the wall - Leave empty for no limit.
Read moreIf checked, the (…) character at the bottom of each feed item will be linked to the rest of the content.
OrderingSelect whether to order the results depending on date of each item or randomly.
Filter networksIf checked, a navigation bar of all active network icons will appear at the bottom of the rotating feed or above the social network wall. These icons will allow the user to filter the social wall items.
Load moreLoad more social items (Next page). If checked, a load more bar will appear at the bottom of the social network wall and loads more social items if clicked.
LinksIf checked, all links will open in a new window else they will be open in the parent window.
Nofollow linksAdd nofollow attribute on links. If checked, all links will have the status of nofollow.
Use httpsIf checked, all links and images will be getting over https.
Cache TimeThe time delay for caching of Social Walls (in minutes) - reduces up download time. 0 Zero value means no caching.
NOTE: Make sure the `cache` folder inside the plugin folder is writable by the server (depending on your web hosting server, permissions set to 755, 775, or 777). Crawl per requestNumber of feed crawls per each request. 0 Zero value means to crawl all at once. (depending on your web hosting server resources, some servers can not read a lot of feeds at the same time).
API connection timeoutSocial API request connection timeout (in seconds). Depending on your web hosting server resources, some servers can not wait to process very long time.
Stream Auto UpdateIf enabled, the social wall will get updated automatically without the need to refresh the page - If enabled, the `Cache Time` value will be ignored and considered as 0.
Auto update intervalThe time delay for updating the Social Wall (in minutes). Considering that there are some limits on social networks about the number of requests sent to their API, the minimum allowed value is 1.
Item OutputSelect the content blocks that you want to be included in each item on the Social Wall. Each social network may have different type of content blocks available.
Comments CountEnter the number of comments to display - You can disable comments from Item Output section - Set to 0 will not disable comments count.
LikesNumber of likes to display - You can disable likes from Item Output section - Set to 0 will not disable likes.
Lightbox contentThis will define, how to display the Social Wall item information in lightbox window.
AnimatedThis will enable/disable moving items with animation.
Rotate DelayThe time delay for showing items. It will increase by each block item.
Filter DirectionLet layout to start render from left to right or, right to left.
Gutter XThe horizon spacing between the column - Leave empty for auto value.
Gutter YThe vertical spacing between the row - Leave empty for auto value.
Item WidthWidth of feed item (px) - Do not leave empty!
Fix SizeAdjust and resize blocks to fill the gap in the wall - If enabled, the Item Width value will be ignored.
Debug LogIf checked, all plugin errors will be logged in a file named "sb.log" in plugin folder. You can find all the problems that may occurs during the feed crawling process.
NOTE: Make sure the `sb.log` file inside the plugin folder is existed and writable by the server (depending on your web hosting server, permissions set to 644, 655, or 666).
Display Settings
Wall LayoutThe wall layout is the main displaying structure of output feed items. We have created 4 different layouts for this element. You can create your own layout and put in the /layout/ folder to use here.
To create your own custom layout:
- Edit this file:
<your-wordpress-site.com>/wp-content/plugins/cornerstone-social-wall/assets/css/styles.cssin your WordPress directory using an FTP client and add your own css at the end of the file. - Browse to this directory:
wp-content/plugins/cornerstone-social-wall/layoutand create a new .php file with your own layout name - e.g. mylayout.php - Your new layout will be available in Wall Layout dropdown list.
You can also use the Cornerstone Custom CSS editor for styling your Social Wall. Any CSS rules included in Custom CSS editor section will automatically be inserted into the page.
Item image styleThis will define, how to display the image for each item on the Social Wall.
User info positionThis will define, how to display the user info for each item on the Social Wall. Picture will be only displayed if exists!
Font SizeIn order to set a font size (in px) for the Social Wall. This is the base font size for all type of walls.
This color applies to your Social Wall background. Select the new background color of the and click elsewhere on the screen to close the colorpicker widget.
Body Border ColorSelect the new border color of the Social Wall and then click elsewhere on the screen to close the colorpicker widget.
Body Border SizeIn order to set a border size (in px) for the Social Wall.
Body Border RadiusIn order to set a border radius (in px) for the Social Wall.
Body Background ImageIn order to set a background image for the Social Wall.
Font ColorSelect the new font color for the feed item and then click elsewhere on the screen to close the colorpicker widget.
Link ColorSelect the new color for the feed item\' links and then click elsewhere on the screen to close the colorpicker widget.
Item Background ColorSelect the new background color for the feed item and then click elsewhere on the screen to close the colorpicker widget.
Item Border ColorSelect the new border color for the feed item and then click elsewhere on the screen to close the colorpicker widget.
Item Border SizeIn order to set a border size (in px) for the feed item.
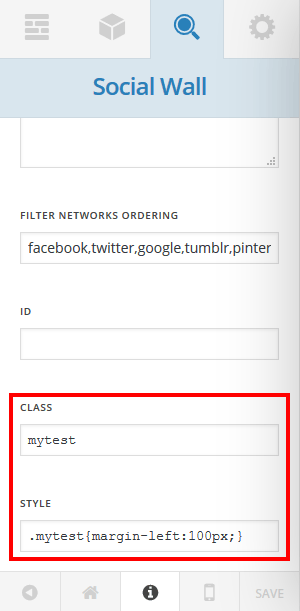
Filter networks orderingOrder of the filtering navigation bar that appear at the bottom of the rotating feed or above the social network wall.
Manipulation
Sometimes you may wanted to pin/stick an item on top of your created Social Wall or remove an item from the Social Wall. To do this:
- From Cornerstone panel, go to
Wall Settingssection/tab. - Scroll to the Pinned/Remove Items section at the right panel of the form.
- Enter the links of social items that you are going to remove from your Social Wall or pin on top of the Social Wall. Each link in a new line.
- Click the Save button.
If you want to remove an item from the Social Wall, enter the links of social items that you are going to remove from the Social Wall - Each link in a new line.
Custom CSS for styling the Social Wall can be entered into this text field. Any CSS rules included in this text area will automatically be inserted into the page.
Look at the following example screenshot:
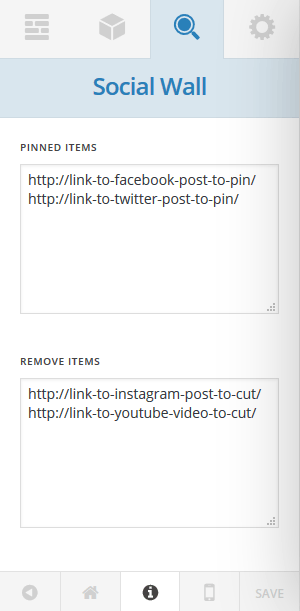
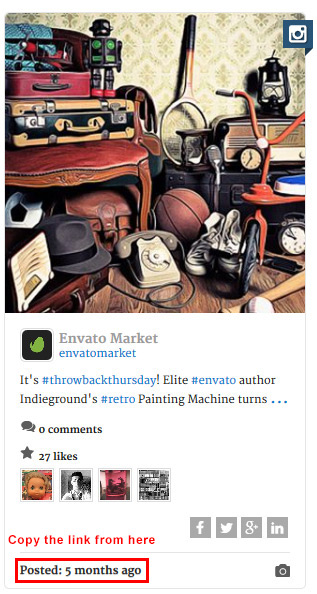
How to find the wall items' links?
Each item on the wall has a date/time in its footer area that is linked to the original post. You can copy this link to use in `Remove Items` and `Pinned Items` sections.
Translation
To translate Social Wall to your local language:
- Download and install Poedit translations editor. Poedit is an open source program for Windows, Mac OS X and UNIX/Linux which provides an easy-to-use GUI for editing PO and generating MO files.
- Open the
csw.potthat is located in theAssetsfolder in your downloaded CodeCanyon zip package file, in Poedit. - Click on the "Create new translation" button.
![]()
![]()
- Select your desired local language that you want to create a translation for.
- Do, your required changes on translation items.
![]()
- From the File menu, select "Save as".
- In the "Save as" window, select a name for your translation with this rule "csw-<WP Locale>.po" - eg.
csw-nl_NL.po, and save the file somwhere into your computer. - From the File menu, select "Complile to MO...".
- Upload the generated .po and .mo files from your computer into
<your-wordpress-site.com>/wp-content/plugins/cornerstone-social-wall/language/(Social Wall language folder in your WordPress plugin directory) on your website using an FTP client.
Find more info at Translate WordPress.
FAQ
There is no feed to show or you are not connected to the world wide web!
This message is usually caused for one of the following reasons:
- You have not declared any social network ID in
Social Feeds Settingssection. Read about Social Wall configuration. - API Credentials for social networks is not correctly set in
API Credentialssection or is not valid. Read this topic for more details about API Credentials configuration. - Your server has not access to the internet.
After fixing the problem, try cleaning the cache from Wall Settings section.
A shortcode appears as a simple text on the website instead of Social Wall
If you see the shortcode text appears on your website instead of the Social Wall, it is caused for one of the following reasons:
- Cornerstone Social Wall element plugin is not installed on your website or is inactive.
- Cornerstone plugin is not installed on your website or is inactive and can not process shortcodes.
The Social Wall is working but, some networks do not appear on the wall
- Network account is new and there isn't anything found in its feed or there is no public activity to show on the public feed.
- Something is incorrectly cached. Try cleaning the cache from
Wall Settingssection.
Facebook feed is not showing
There could be one the following reasons that your Facebook feed may not work:
- Your Facebook page ID or Album ID is incorrect. Read this topic on how to find your Facebook IDs.
- You are using a Facebook profile ID instead of a page ID.
- Make sure that you have set up your Facebook API Credentials correctly. Read this topic for details about Facebook API Credentials configuration.
- Your Facebook settings restrict the user that may view your page. You have to remove any age/profanity restrictions from your Facebook page.
Twitter feed is not showing
- Make sure that you have set up your Twitter API Credentials correctly. Read this topic for details about Twitter API Credentials configuration.
- If your Twitter API credentials is valid, this may be due to the Twitter API limits that is 180 calls per 15 minutes.
Google+ feed is not showing
- Google Profile ID is incorrect.
- Make sure that you have set up your Google+ API Key and it is valid. Read this topic to find that how to set Google+ API Key.
Instagram feed is not showing
- Instagram Username is incorrect.
- Make sure that you have set up your API Access Token and it is valid. Read this topic to find that how to set Instagram API Access Token.
Requirements
- The plugin requires the PHP version 5.6.x or higher.
- The plugin requires the WordPress version 4.1 or higher.
- The plugin requires the Cornerstone version 1.1.0 or higher.
- This script requires both PHP's multibyte string extension AND iconv extension.
- PHP's XML extension is required (enabled by default).
- PHP's cURL extension is recommended (required for Facebook feed)
Credits
Design & Development:
Cornerstone Social Wall Element - Created By Axent Media - CodeCanyon license.
Third Parties
Server-Side Scripting
OAuth library - by Andy Smith - MIT license.
OAuth for Twitter's REST API - Created by Abraham Williams.
Client-Side Scripting
jQuery - Released under the terms of the MIT license.
Freewall - Created by Minh Nguyen - Released under the MIT license.
Font Awesome - by @davegandy - Licensed under MIT
Colorbox - by Jack Moore - Licensed under MIT
jQuery Expander - by Karl Swedberg - Licensed MIT
Changelog
Version 1.7.0 - 15.04.2018- Instagram user public feed deprecated problem fixed.
- Twitter search API 140 characters limit and image displaying problem has been fixed.
- Trimming the RSS data to fix reading by XML parser.
- Facebook Graph API v2.11 updated and it will no longer display Facebook comment user info.
- Feature to define a custom size for YouTube videos.
- Fixing some Notice errors because of API Changes.
- Twitter OAuth library has been updated.
- Twitter hashtag feed duplicates problem fixed.
- Problems with Cornerstone v2.x has been fixed.
- Facebook duplicate problem on load more fixed.
- Facebook multi-share images problem fixed.
- Twitter hashtag feed duplicates problem fixed.
- SoundCloud API updated.
- SoundCloud tracks' artworks iamge size fixed.
- VK API updated and access token setup is required.
- The problem of opening videos in system inbuilt player instead of lightbox on IE and Safari has been fixed.
- Problem of not displaying more RSS feed items on load more has been fixed.
- Fixing a problem with showing the links in tweets body.
- Facebook Graph API v2.7 updated.
- Facebook enable lightbox display for direct GIF animation links.
- Changing from compatibility to extended mode for Twitter API latest updates.
- Video lightbox support added for Twitter.
- Problem with decimal separator in different locale settings has been fixed.
- Image size selection added for Pinterest.
- Loading videos over https option added for YouTube.
- Instagram feed, user search problem fixed.
- Problem with pinned & remove items fixed.
- Pinterest feed problem fixed.
- First release.